
 Member
Subscribing.
Member
Yes it will. Just FYI, I used this exact thread last year to build my tool. Cost was about $50. The price of steel has gotten out of control. I have used it three times so far and it works just fine. The best tip I can give is really give the heat time to work then it slides out like butter. Not enough heat and its a real struggle.Originally Posted by bmw2nv

1999 M Coupe Boston Green, Beige, H&R/Bilsteins, Underdrive Pulleys, Euro 6 speed, UUC SSK and Randy Forbes in the back
2002 2.5 Z3 roadster Oxford Green, auto, all stock
2013 Ram 3500 Crew Cab Dually 385 HP, 850 ft lbs torque at 1600 rpm, all stock and staying that way
2004 Mini Cooper Chili Red, daily driver, modified almost daily
Member
Not to 'jack the thread, but if you have concerns about using heat near the gas tank, time works as well, ie, the bushing will creep with time. This is what I did back in January when I refurb's the RSF: if you torque the nuts down on the all-thread good and tight, and then walk away for a minute or two, when you get back they'll be a lot looser, ie, the bushing had crept out a mm or two - repeat over and over and you'll have the bushing out [where the littlest creep will be on the first go, and you'll get more each time, until you're able to just tighten the nut(s) and the bushing will continue to move]. The only difference btwn the tool described above and what I did, was to use NF (vs NC) all-thread rod, that way I could get more torque on it without stripping the threads out; the other "change" was to use long-pattern wrenches so that I could get more torque with less hand effort... [follow-on edit: for the nut I was expecting to crawl up the all-thread - I used a NF 1/2"-20 coupling nut, that way it had 3x the threads to carry the load vs a regular nut.]
Last edited by gmushial; 03-20-2013 at 12:41 PM.
Member
Since we are bringing this back from the dead, Ill add a few additional comments.
1. Use 3/8 rod. 7/16 will fit, but there was problems when the 7/16 was used. The extra little play in the system seems to allow things to slide better.
2. The Rod connector is a great idea. Using the connector will likely allow you to get away with the softer rod maybe. You sure have a lot more thread to spread the load over.
3. Use of soft rod. Have extra and know you are taking a risk of getting the bushing half way out and no options.
4. The bushing will pull great and then for no reason bind sometime. Hence the need for hard parts.
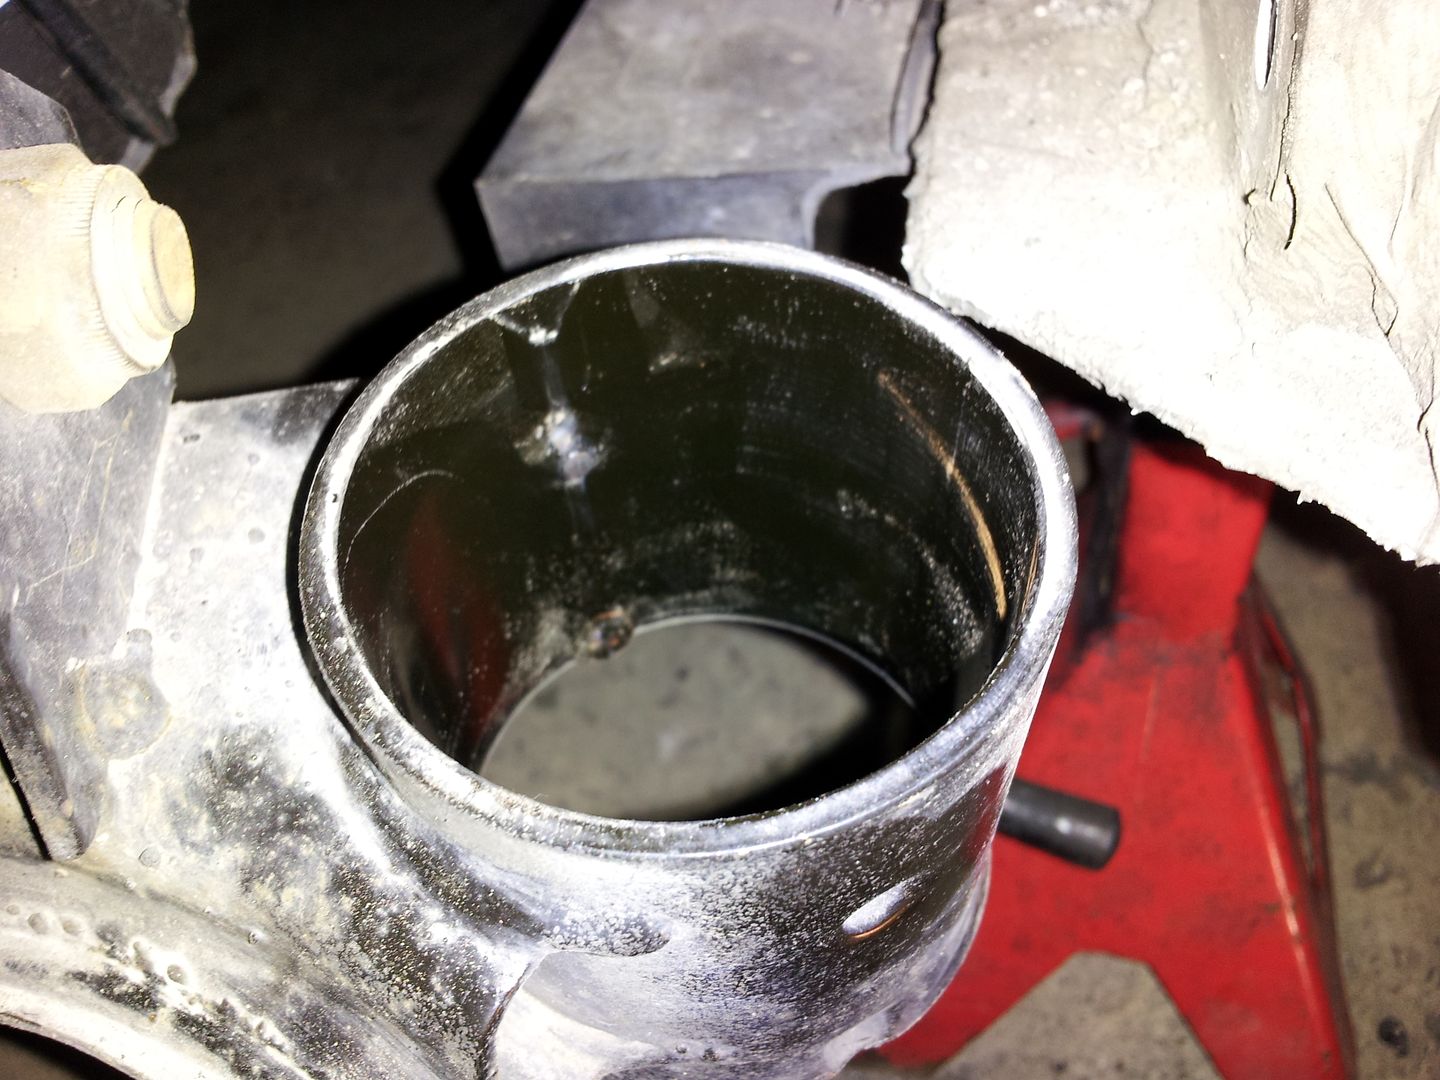
5. Heat makes it easier but you damage the coating on the subframe and are damn close to a fuel tank unless you take it all the way out.
6. Resting helps. The rubber will continue to slide under pressure and catch up to the position of the rod on exceptionally hard pulls.
7. Gear pullers will not work on the majority of bushings. Some may have luck. Most will not without heat.
8. Good oil or lube on the rod does wonders preserving the threads as you tighten that nut down.
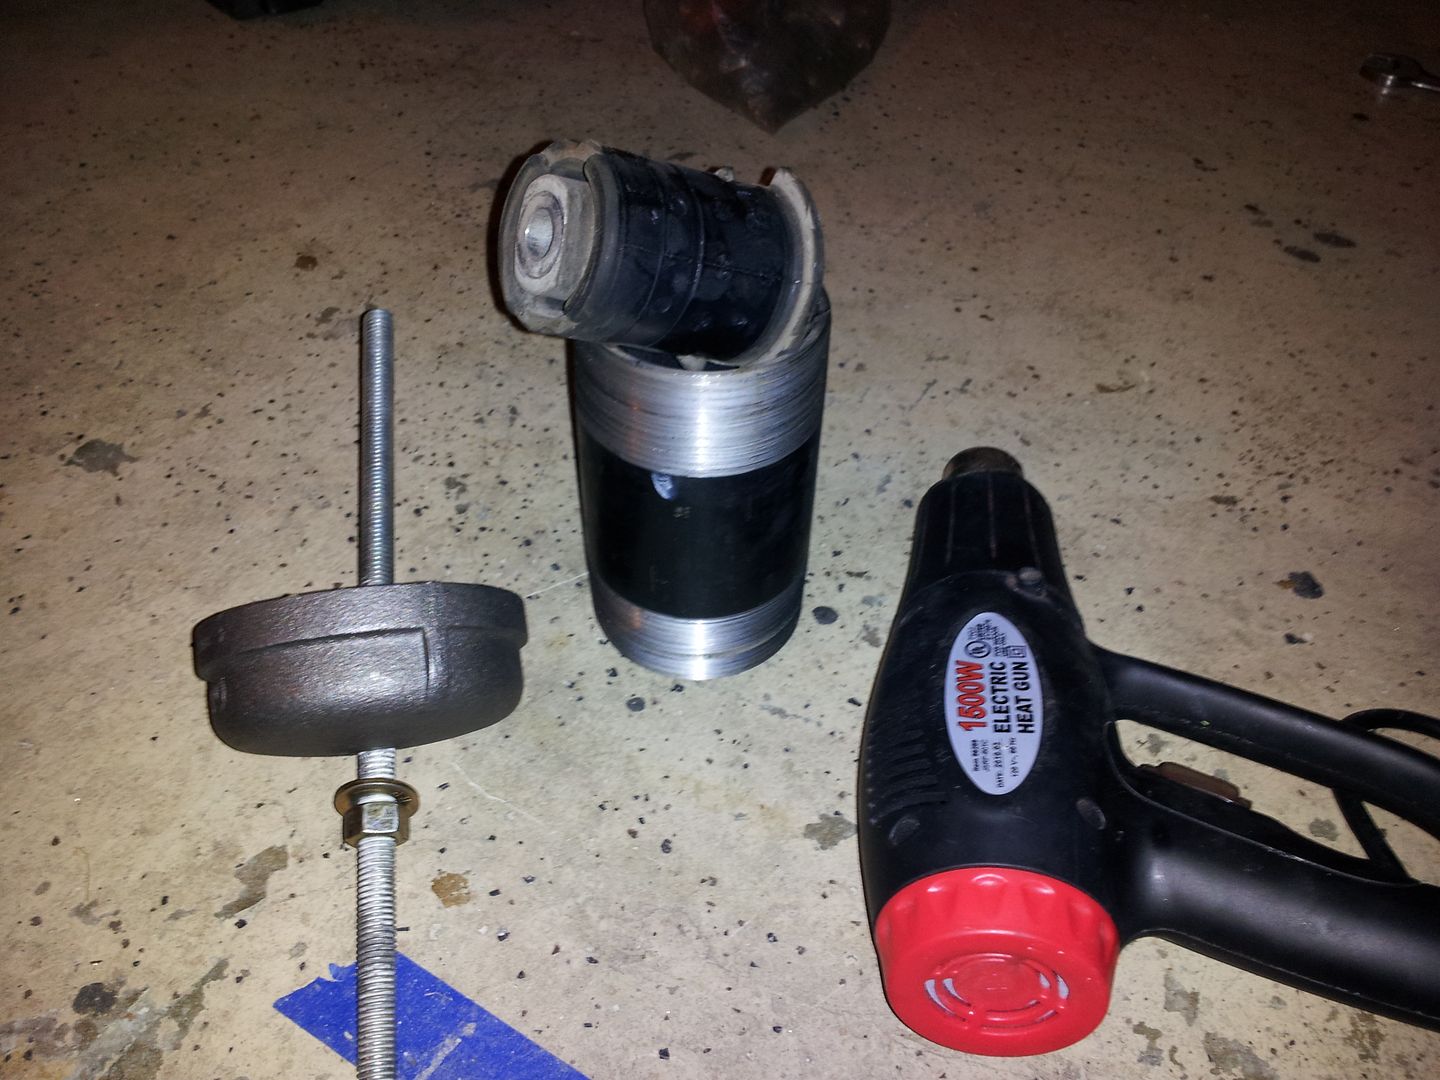
9. The pipe tool, AKA Shade Tree Puller or PbFut Bushing Tool was my idea. It was the result of the very first bushing day for the Z3s. Ms, mostly Coupes showed up at Mfrogs house in fall 2003. There was 9 in all and 5 pull I believe. I had my S54 and was the first to use the commercial tool that day. It had two previous pulls on it. The tool broke on my 2nd bushing pull. There were 4 other cars in various stages of frame removal waiting on the tool and i was 200 miles from home. We got by using soft rod, but the whole experience is what got me thinking of an alternative. Within weeks I had tested a prototype and was then used on 4 cars at my place one Saturday in Spring 04. I then sold about a dozen tools to members as word got out there was something other than a $300 tool to do the job. There were a few attempts at improvement, like 7/16 rod and putting 3 centering bolts around the lip to try to keep the tool from tipping. But really the best is just jamb something in, to keep the pipe from tipping, use 3/8 rod and drill the hole in the cap as close to center as possible. That pretty much does the trick.
Dan "PbFut" Rose
Member
+1
Mods: Remus 76mm exhaust, CDV delete, ASA AR1 18in staggered wheels, Turner 12 mm spacers, custom red tails, Kenwood deck/Sirius/BT/USB, ZHP knob, Redline boot, LeatherZ armrest, Amsoil all around, red needles, Akebono Euro brake pads, 34k original miles!
Member
As far as heat goes, for me it was no big deal. I used a heat gun on a low to medium setting. I let it go for about 6 or 7 minutes on the metal surrounding the bushing. Nothing else got even remotely warm. It was warm to the touch but not hot. There was no damage to the coating on the subframe. The old bushing slid out with the crappy Home Depot cheapo rod. I did have 2 spares on hand.
1999 M Coupe Boston Green, Beige, H&R/Bilsteins, Underdrive Pulleys, Euro 6 speed, UUC SSK and Randy Forbes in the back
2002 2.5 Z3 roadster Oxford Green, auto, all stock
2013 Ram 3500 Crew Cab Dually 385 HP, 850 ft lbs torque at 1600 rpm, all stock and staying that way
2004 Mini Cooper Chili Red, daily driver, modified almost daily
Member
Going to give this a shot tonight or tomorrow. Doing a rear end refresh
Ive got some extra 7/16" rod left from making a ball joint tool for the rear so Il give that a try first, see how it goes. Blow torch Ill use too since Im going to Por15 the entire thing anyways once all the bushings are out
- Jeff
Member
If anybody needs a tool for subframe bushing removal/installation, I have a tool that I made that I would be happy to send to whomever needs it. All I ask is that you do not just sit on the tool and permanently add it to your tool box. Send it to the next person that needs it. I know, somebody will just keep it, but at least I can try. You pay shipping.
Last edited by Zoupe6; 03-20-2013 at 11:09 AM.
Senior Member
BMW CCA MemberHaving snapped one of the real tool hardened ones, I'd highly suggest using no less than a 1/2' HARDENED threaded rod. Anything less and you're asking for trouble.
And I HIGHLY suggest using no open flames around the subframe considering the gas tank and charcoal canister are right there!
Member
Alright Ill take the words of advice and get the 1/2" hardened one then
The subframe is sitting on my workbench ... no gas tanks around
- Jeff
Member
Post changed for the 2nd time: seeing mcoupemindy's post, I actually went to the garage to measure what it was I used: for the RSFB is really was 1/2-20 NF all-thread (as per the original posting); but for the RTABs it was 7/16-20 NF all-thread... not that what I used is important, just want to not spew misinformation.
Last edited by gmushial; 03-20-2013 at 12:46 PM.
So you fly for a living?
PM'd!
'98 BMW Z3 2.8 -- S52 Cams/Dinan CAI & Twr Strut/Butt Strut/JC Shark/SS DTM Exhaust/Eurosport UDPs/Fan Delete/Eurosport M50 Mani/E30 3.73 LSD/JBRacing & RE LWF+Clutch/Evo M3 6-speed
Member
I've had multiple people interested in borrowing the tool. It would be cool if you guys could just keep sending it on to the next guy. I'll notify who I am sending it to who is interested in it next and I'll let them hash out the shipping details.
List:
Bcar
BMW2nv
Gibber66
Per request, here is a picture of the tool I made.
So you fly for a living?
Awesome! Thanks for doing this.
'98 BMW Z3 2.8 -- S52 Cams/Dinan CAI & Twr Strut/Butt Strut/JC Shark/SS DTM Exhaust/Eurosport UDPs/Fan Delete/Eurosport M50 Mani/E30 3.73 LSD/JBRacing & RE LWF+Clutch/Evo M3 6-speed
uʍop ǝpısdn
Wow, funny to see my old thread popping back up.
Last summer, I broke the tool in the original post out when rebuilding the rear end/subframe, and refabbing the rear unibody bracing in the body shell. Worked like a champ again.
BMW M3 - Ferrari 348 - Chevrolet Chevelle
Member
So I just used this tool for the removal of my subframe bushing on an e36 - Wow. So simple. So great. Kudos to this thread
Using this tool, I also figured something else out which im surprised I havent read anywhere else. Removing RTABs absolutely suck without the proper tool. Most cut and chizel and sawzall and everything in the book and curse at their mothers.
If you take just the tool the exact way for the subframe and place it against the RTAB on the outter edge and basicaly use the tool the same way for the subframe bushings, voila, the rtabs pull right out! The piping will be sitting on an angle and you WILL bend the 1/2" rod - but thats fine because you still have 2 feet left from the length you bought from home depot right? right. So the loss of maybe $2 to remove the RTABs in literally 3 minutes per side is well, WAY worth it!
- Jeff
Member
Will the tool work for poly (AKG) bushings or just OEM?
Member
Only need it to remove OEM bushings... the poly ones come out easily by hand ... assuming I'm answering the question you asked.
Member
Sorry, what I meant to ask is if it also installs the poly bushings.
Member
Poly bushings go in by hand - or even fingertip... actually the biggest problem with them is that they (the bottom one) wants to fall out as you lift the subframe back up into position [my solution, since I was working single handed was to wrap the receiver in the subframe + the bushings with two layers of duct tape (having poked holes in the ends for the mounting bolt to enter at the top and exit at the bottom, and then remove the tape when the subframe was in position].
Last edited by gmushial; 03-29-2013 at 08:38 PM.
Member
OMG!!!!! that was soooooo easy using this method. Applying heat with heat gun while cranking took only a few minutes. Purchased all parts locally. The 3" nipple was at a local pipe supply place for $16.00, the cap was $11.00 everything else was at hardware store. Thank you sir for this awesome DIY from the dead! Good bye rear end sway hello stable Z!
I love how clean the old mount comes out leaving zero residue.
Last edited by graveshaker; 04-01-2013 at 06:06 PM.
Member
Good things last forever...well at least your post does. As I too am a noob as of last year and these cars are not only fun to drive but as a "Mistress" fun to play with and really don't cost too much when you have great posts like this for us to find....now if the parts were only ubber cheap!
Z3lda - R.I.P. 7/6/13 crashed and burned, total loss.
So you fly for a living?
Okay, so I haven't heard from anyone on being next in line for the home-made subframe tool (this one) so if anyone else needs it, let me know! What Zoupe6 started still stands, give me your details and pay for shipping, then make sure you pass on to whomever needs it next. PM me.
Cheers,
Gibber
'98 BMW Z3 2.8 -- S52 Cams/Dinan CAI & Twr Strut/Butt Strut/JC Shark/SS DTM Exhaust/Eurosport UDPs/Fan Delete/Eurosport M50 Mani/E30 3.73 LSD/JBRacing & RE LWF+Clutch/Evo M3 6-speed
Member
Ok everyone, Just did my rear subframe bushings, RTAB's and new Koni yellow shocks in my garage. All the information and tips here were great! Used the homemade tool for the sub bushings and a heat gun. Used the AKG tool for the RTAB's Already had the Rogue Engineering RSM's so the shocks were easy.
A few pointers:
The length of the rod is important. If you have a lift this is a non-issue, but working on the floor with jack stands, the rod has to be just long enough the get the job done, but short enough to fit between the garage floor and the bottom of the bushing. About 13" worked right for me.
I used a standard steel rod from Home Depot and it worked fine with plenty on grease on the threads. I did apply some heat with my $7.99 heat gun from Harbor Freight, but I'm not sure it was necessary. A gear wrench made it a big difference on cranking the bushing out.
Do not forget to unplug the speed sensor from the back of the differential. I did and caught it just before doing damage, I was lucky. Also, don't forget to re-connect it when your done.
The toughest part for me was wrestling with the the subframe to get the bushings to come off the mounting studs. Thought about taking the studs off as some have done, but they are REALLY tight and I didn't want to risk twisting them off.
Using the tool from AKG for the RTAB's was a breeze. I really recommend this, IMO it is well worth the $15.
If you can beg/borrow/buy an extra set of jack stands and an extra floor jack or two it will help the whole job go better.
I live in the south SF bay area and would be glad to lend out the tool I made for anyone close by who wants to borrow it. Just PM me.
Cheers, and good luck!
Dennis
Member
PM sent your way.
 Posting Permissions


 Reply With Quote


Bookmarks