
 Member
i remembered this thread...similar issue
http://forums.bimmerforums.com/forum...ght=insulation
License Revoked
When I did my motor swap I removed all of it up to the firewall and put aluminum tape in place of it. No more sagging, no screws going through the cabin, and a lot cleaner.
Alpinweiß-Trash Lux-Hater
yup.. same hereOriginally Posted by bjhines

current = '99 Estoril/Mulberry M3 Coupe :: past = '97 Alpine/Anthrazit M3 Coupe
I hate drama.
I just removed my engine and trans a couple weeks back and I'm getting ready to put them back in... My insulation was sagging but also disintegrating to the point of no return (damn Texas dry heat), so I just ripped it all out, completely. Looks really nice and clean under there now, but I'm debating what to do before I put the engine/trans back in...
Would dynamat suffice as an alternative? By dynamat I mean cheap knock-off dynamat material (butyl)?? Or is that stuff not heat resilient?
Those of you who have used an alternate method, how is the heat?
^^ Really old picture.
Member
A couple of well-placed, self-tapping screws with fender washers will hold the saggin insulation in place just fine. But it helps to have the transmission out when you do this... Don't worry about a couple of extra holes under the console or carpet. After installation, grind down the screw tips and dab some RTV on them. The insulation is there for a good reason.
you're killin' me!
just carved out my droopy crusty tunnel blanket.
I removed the insulation too!! I cut it right after the silver stuff on the pass side. I will see if it makes my shift boot melty..
Member
Mine was laying against the drive shaft when I did my guibo. I used Wurth high temp spray adhesive......spray on both surfaces and let it sit for a couple minutes then press together. Sh!t is awesome....in fact anything with the Wurth name is awesome and worth the few extra bucks. PB blaster wasn't touching the exhaust manifold nuts after repeated spraying and about 45 min's. Worth Rostoff, 2 sprays and 10 min's and they all came off no probs.
shade tree mechanic
Moderator
my one is hitting the giubo at the moment, here some solutions
tunnel before repair http://s786.photobucket.com/user/jno...efore.jpg.html
some make such spring bracket http://s786.photobucket.com/user/jno...acket.jpg.html
spring bracket installed http://s786.photobucket.com/user/jno...ition.jpg.html
clearance after bracket installation http://s786.photobucket.com/user/jno...after.jpg.html
others use magnets http://redeyegarage.com/blogs/news/9...lever-solution
or aftermerket heat insulation http://s424.photobucket.com/user/mat...4iz0e.jpg.html
will tackle it tomorrow and see how I can fix it easiest
Shogun tricks and tips for the E32 series are HERE!
BMW Omnivore
If it were me, considering the age of our cars, I would replace it with the new part.
- BMW = Body Trim > Insulation > "TUNNEL HEAT INSULATOR" or "HEAT RESISTANT PLATE" 51488119049
- ECS = "Center Heat Shield" = $160
I have seen other generic heat shield matts that seem good - until you realize you need a couple pieces plus aluminum tape and it adds up close to the OEM part. I looked before at items such as:
- Heatshield Products - 175105 Heatshield Armor 1/2" Thick x 1' Wide x 5' Long Exhaust Pipe
- Thermo-Tec - 13575 12" X 24"
So, strip it down or restore it?
Guy Z
shade tree mechanic
Moderator
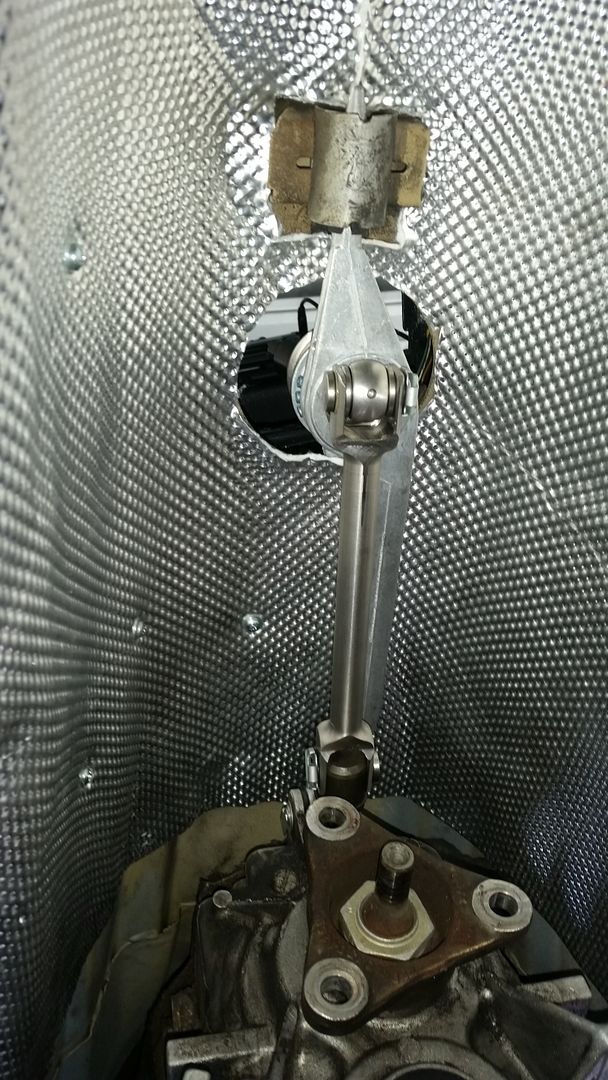
Fixed it today, as I have a pit and a transmission jack, it made it easier for us. Exhaust must come off. So we loosened the 6 copper nuts M10 in the front (have 6 new of them ready) , but did not take them off the bolts, so the exhaust was secured in the front but movable downwards, rear and middle we took off the brackets/rubbers and with the trans jack we lowered the exhaust so far, that we could pull out the silver color metal shroud between exhaust and driveshaft towards the rear, the wires from the O2 sensors were long enough, so even no need to disconnected the O2 sensors.
The 'fiber' mat was already damaged from the giubo and the fibers came down, so no change to fix it somehow. So I used a cutter knife and scissors and cut all from the old fiber mat from the end of the trans housing - above giubo - driveshaft off, so all of that mat above/around the giubo and driveshaft is gone now, no more noise. No need to cut much, maybe around 10-15cm width.
To renew the mat complete without taking out the trans seems to be impossible, no access above the transmission.
In my opinion, if you want to make it 100%, then the trans has to come out and the old fiber mat has to be replaced, too much disintegrated after more than 15 years. But that has time till I really have to remove the trans for other work, the slapping noise from the fiber mat is gone.
51488119049 is not the correct part number, that is the center heat shield between exhaust and driveshaft https://www.ecstuning.com/ES126120/
What we are looking for is the insulation mat above the transmission which looks like this http://s786.photobucket.com/user/jno...efore.jpg.html
Found it with the help of snaponbob: it is NOT a heat insulation, it is a sound insulation and it does not matter if you cut a portion of it off:
P/N 51481977019 List Price USD$ 167.68 http://www.realoem.com/bmw/de/showpa...71#51481977019
Last edited by shogun; 12-12-2015 at 09:57 AM.
Shogun tricks and tips for the E32 series are HERE!
Observer/Master Skeptic
Moderator
51481977019 $132.80 at thebmwminipartstore.com
04M3 TiAg 69k slick-top 3 pedal
99M3 Cosmos 61k S50B32 euro 6Spd
88M3 AW 43k miles Project FS
WTB: 3.5" Eurosport/Conforti CAI
shade tree mechanic
Moderator
Did meanwhile a longer test drive and there is no sound difference inside the cabin with the cut off parts of the sound insulation mat (the parts I cut off is from the end of the trans housing towards giubo/driveshaft).
So all is fine without that parts and I assume the cooling of the trans is even improved as the fallen down sound insulation blocked before the flow of the air from engine bay >>>trans tunnel.
Shogun tricks and tips for the E32 series are HERE!
Member
The factory insulation (P/N 51481977019) covers the transmission tunnel and firewall. On the firewall it's pinned behind the right front brake hard line. Other items in the way: clutch hard line, fuel lines, power brake booster, ABS pump, heater control valve, throttle cable, fuse box. Basically, replacing the mat with a new factory part means removing the engine + transmission and many other things. That piece of insulation is probably the first thing that goes onto the body during assembly.
Here are two engine bay photos I took. My engine and transmission have been in & out a couple times over the years. The red line shows the top of the insulation mat. Replacing the whole piece is impractical, so I first used the bracket idea. The bracket photos you found above are mine. After using that bracket for a while I cut off the transmission section of the mat and replaced it with DEI heat shield. Replacing the whole factory mat is not practical for most people. Too labor intensive. The bracket method or creative trimming are better solutions in the short term.
Tunnel 1b.jpgIMG_1969.jpg
Last edited by NoLastName; 12-13-2015 at 02:55 PM.
shade tree mechanic
Moderator
Thanks for the pics today and also for the idea with the bracket, gave me some possibilities.
But at that time I was still believing that insulation is against heat and I was worried about heat from there going into electronics like switches for the windows inside on the center console.
After I found out that it is NOT heat insulation but just sound insulation, I changed my mind and made it the easiest way by cutting off the section standing out from the end of the transmission and above the giubo and the driveshaft.
And the slapping noise is gone and I cannot hear more noise from there, and 1 important thing is, that also the cooling effect for the transmission is now better again, as the insulation mat basically clogged the tunnel after the trans, now air can come in thru engine bay and is pushed thru by the visco fan and aux fan as it should be.
Maybe next time when I have the exhaust off I cut even more off above the transmission and install DEI heat shield or something. The best solution is as shown on your pic on the right, but that is only possible when the drive train is out complete.
I am glad that the cooling for the ATF/trans will be better again, because heat is deadly for transmissions.
Copied: At elevated operating temperatures, ATF oxidizes, turns brown and takes on a smell like burnt toast. As heat destroys the fluid's lubricating qualities and friction characteristics, varnish begins to form on internal parts (such as the valve body), which interferes with the operation of the transmission. If the temperature gets above 125 degrees C., rubber seals begin to harden, which leads to leaks and pressure losses. At higher temperatures the transmission begins to slip, which only aggravates overheating even more. Eventually the clutches burn out and the transmission calls it quits. The only way to repair the damage now is with an overhaul -- a job which can easily run upwards of $1500 on a late model front-wheel drive car or minivan.
As a rule of thumb, every 15 degree increase in operating temperature above 80 degrees C. cuts the life of the fluid in half!
At 90 degrees C., for instance, fluid life is reduced to 80,000 km. At 110 degrees, which is commonly encountered in many transmissions, the fluid is only good for about 60 000km. At 120 degrees C., the fluid won't go much over 15,000 km. Add another 20 degrees, and life expectancy drops to 8000kms. Go to 150 degrees C., and 1,000 to 1,500 klm is about all you'll get before the transmission burns up.
If you think this is propaganda put forth by the suppliers of ATF to sell more fluid, think again. According to the Automatic Transmission Rebuilders Association, 90% of ALL transmission failures are caused by overheating. And most of these can be blamed on worn out fluid that should have been replaced.
More here http://www.thetransmissioncentre.com...l-information/
Last edited by shogun; 12-16-2015 at 05:05 AM.
Shogun tricks and tips for the E32 series are HERE!
Member
So, those who have used the DEI stuff, what size mat did you get? I'm not replacing the entire thing, just from shift linkage back where my insulation was literally disintegrating. TIA.
97 M3 - SCCA TT Prepped
17 F150 - Tow Pig
05 S2000 - Sold
88 325is - S52 powered - Sold
95 M3 LTW Rep - Death by Altima
shade tree mechanic
Moderator
Did you meanwhile find out the size? Post some pics, maybe next time I work in that area I might do the same, but so far all the probs are gone and no more sound after I removed those sound insulation pieces in the giubo area.
Shogun tricks and tips for the E32 series are HERE!
Member
For posterity, I never got a response but guessed at a size that worked out well for me. I wasn't replacing the entire thing, just shift linkage back, and the 24"x21" was pretty much perfect. The below is copied from my build thread in the track section.
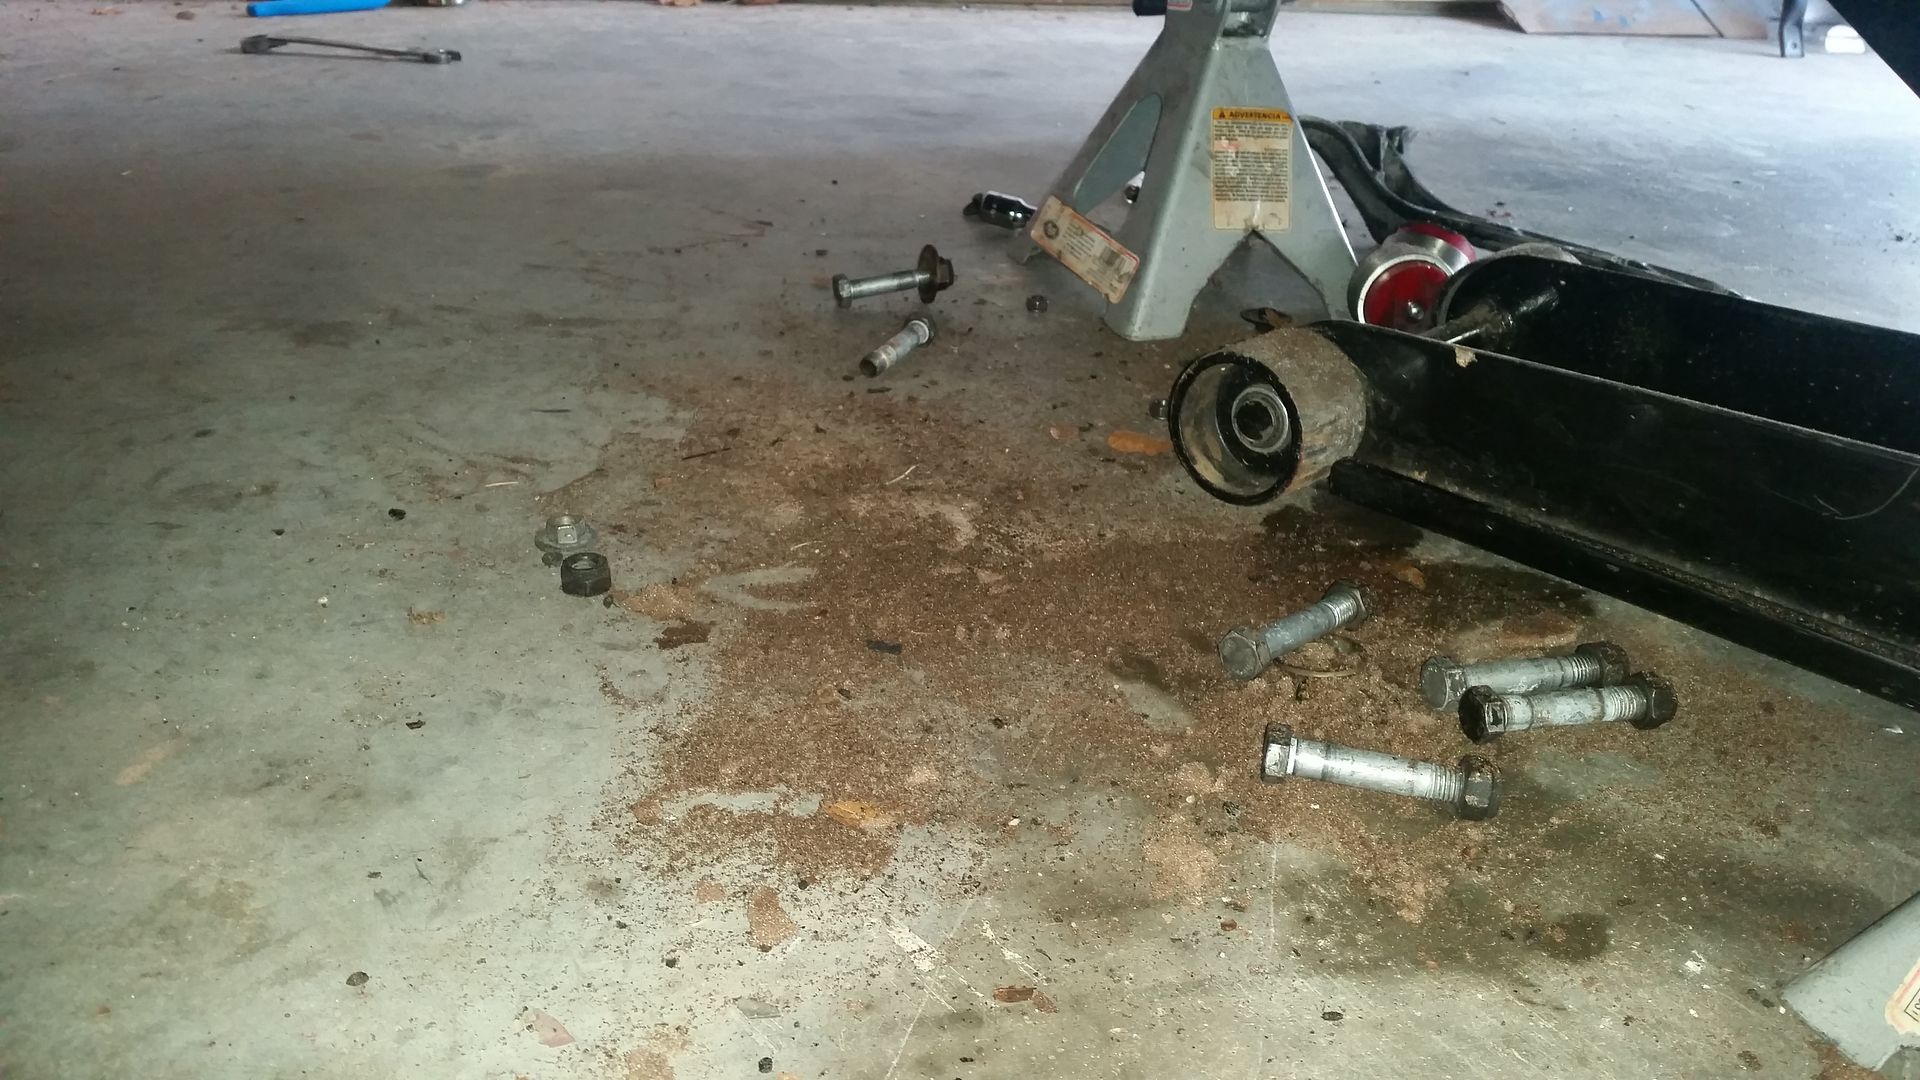
I previously noticed the trans tunnel insulation had been rubbing the guibo for quite a while, and given that the PO did no maintenance it wouldn't surprise me if it was a couple years. I knew it was in somewhat rough shape, but did my research and thought the metal bracket method of holding it in place would be fine. I decided I would also use this opportunity to replace the guibo, CSB, and install the UUC SSK and DSSR I had laying around. Unfortunately, this was the scene by the time I had the driveshaft out. The insulation had just disintegrated while removing the bolts at the guibo.
With the insulation past being salvageable I had to decide what to do. I didn't want an excessively warm center console and ST rules don't allow for removal of stuff like that, so I had to replace it with something. After some research here it seemed using DEI heat shield seemed to be the best/easiest option so I picked up a sheet of that. It's adhesive, but I also secured it with about a dozen small self-tapping screws with washers to hopefully keep it in place. Once in I also got the SSK and DSSR installed.
97 M3 - SCCA TT Prepped
17 F150 - Tow Pig
05 S2000 - Sold
88 325is - S52 powered - Sold
95 M3 LTW Rep - Death by Altima
shade tree mechanic
Moderator
Looks very nice and clean, thanks for sharing the info and pics. If I have to remove the 5H18 one day for some reason, I will do the same.
Shogun tricks and tips for the E32 series are HERE!
Member
Just did this, the peal and stick stuff works great!
Member
I have some of that stuff and was going to do that, but decided just hit the existing insulation with 3M adhesive spray instead. I glued it to the tunnel where it was sagging, and also sprayed a bunch in between the "falling apart" layers of the insulation to bond it back together. This seems to have worked, and also greatly stiffened up the insulation so it can't really sag anymore. Still holding so far.
1999 M3/2/5 - Titanium Silver - Track/Weekend Toy
Member
BMW E36 M3 Expert
I like the peel and stick stuff if your insulation is already too far gone. Although I'm really not a fan of adhesive based solutions when they start to fail and cleanup is necessary.
I make these insulation brackets to keep everything OEM.

Wait, what?
Honestly the best solution I've ever seen. Well worth the money.
https://www.msportparts.com/collecti...ation-brackets
"Be who you are and say what you feel because those who mind don't matter and those who matter don't mind."
-Dr. Seuss
DIY BMW Tools. Charlie For President
Member
BMW E36 M3 Expert
That's the most ridiculously over-engineered solution I've ever seen — I love it!
Back in 2005 when I put in a lightweight flywheel and racing clutch I found the usual sagging sound insulation blanket above the trans. I took some hardware store perforated steel strip, bent it into an arch over the trans and attached it using the stock studs and plastic nuts on either side. Nowhere near as pretty as your brackets, but it's worked so far. Has the advantage of fully supporting the overhead portion of the insulation.
Neil
Last edited by NeilM; 01-09-2019 at 08:31 AM.
Member
I like the space you get to remove/install the trans with adhesive fiberglass reflective heat tape or sections in place of the factory insulation, but obviously the trans needs to be out to change the insulation. My heat tape has been in place for probably close to 10 years. If you want a solution for sagging factory insulation while the trans is installed, these braces look nice.
Member
Damn, and I thought I was the first one to do that! I guess great minds think alike!
20160326_192239.jpg
I bought it to lock the flywheel, but found a great use for it once I was done with it.
I use the threaded holes ahead of the shifter and just bolted it in without shaping it much. The spring pressure keeps it tight against the tunnel, and then I hammered the ends around the frame rails on either side of the tunnel. It's stayed tight for years with just the two bolts at the top.
-Josh: 1998 S54 E36 M3/4/6 with most of the easy stuff and most of the hard stuff. At least twice. 271k miles. 1994 E32 740il with nothing but some MPars. 93k miles.
 Posting Permissions


 Reply With Quote


Bookmarks