
 Member
have a torch and a mig welder. I do a lot of custom bumpers, sliders and stuff like that for 4x4 wheeling trucks. no lift and no tig with all the nice cutting/bending tools. thats it i'm putting a lift in the garage.Originally Posted by SiGmA

License Revoked
I highly recommend it. Beer helps the amateur fabricator do excellent workIts now my best friend and I made my charge pipes, every cut was dead on and it went pretty quickly, considering we drank 14-18 beer between us. Hah.
Member
what is the best all around tool for cutting? I def. use the hand held grinder for alot with cut off discs. I would assume maybe a ban saw..??
I cant wait to see more of this project. Looks perfect. and the welding skills are great!
License Revoked
I would pick up a steel chop saw blade (12"+ is best, but I think a 10" will do 3" tubing too) and a bandsaw. I strictly use a bandsaw, as that is what I have. I forget where I bought blades, but fine tooth is better. You want as many teeth on the tube as possible, and when you get to the sides, you won't have much engagement. I have yet to use a chopsaw for piping, but it seems like it would make some things easier and a lot of people I know use them. I have a Harbor Freight bandsaw, and it works, but its a POS. Get something better.
Member
Sounds like a good idea. A bandsaw used shouldnt be to hard to come by. chop box will burn my garage down as i almost do everytime cutting thick steel with the grinder. Well I still would have years to match the capabities of the OP.
License Revoked
Yes indeed. He is very very skilled, I hope some day I am as skilled.
Facebook.com/LUXFAB
fabricator/welder type
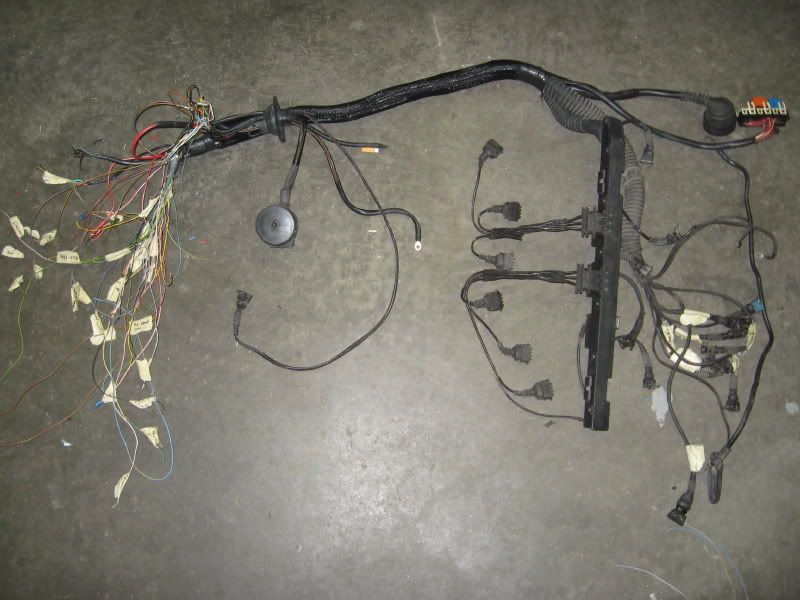
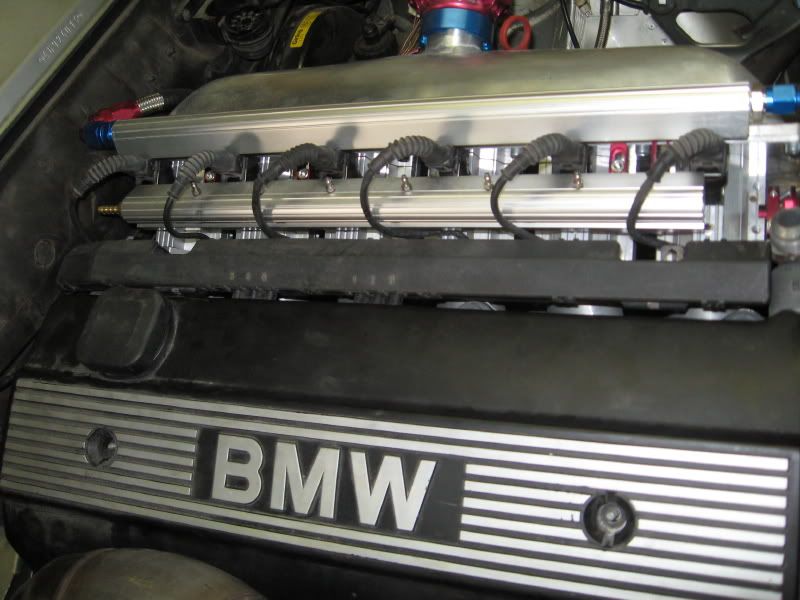
Well after a lot of thought, planning etc... this is how I am tackling the wiring. I have (thankfully) two complete M50 harness' plus my original M20 harness... so... I made this (and saved a crapton of money)
That should take care of my cluster and gauges and whatnot that is factory... Now I needed to figure out how to make the M50 harness start to fit my already crowded engine bay. So my first step was to build the injection and coil harness'. So far that is all I have completed but I am pretty satisfied with the results... the rest gets a LOT easier
Now I just have to organize the original junction box, smooth it out into a main harness trunk. Re do some wires for different purposes for stand alone operation. Hook up original M50 connections, tie it all into the stand alone harness and done! For some strange reason I don't mind doing the wiring
I have like I said the 245 and 265... Not sure if it's gonna be enough tire, but I'll see... Not many E30 guys run even that much so again, we'll see.
Last edited by DTRguy; 08-21-2009 at 07:38 PM. Reason: Automerged Doublepost
Dreams To Reality Performance One Lap of America 2010 GT2SB winner, 4th Overall, car build http://forums.bimmerforums.com/forum/showthread.php?t=1268384
fabricator/welder type
did some random little plumbing things lately, but not gonna show that until I am done... I am a lot closer to having the whole engine bay wired though. All I have to do now is make my ECU connections and done! Engine bay should be wired tomorrow. There is still much to do, but that is mostly all of the big stuff... GETTING CLOSER!
Dreams To Reality Performance One Lap of America 2010 GT2SB winner, 4th Overall, car build http://forums.bimmerforums.com/forum/showthread.php?t=1268384
fabricator/welder type
progress... we like progress
Harness complete... only minor wiring left for the fuel pump and gauges. Compared to building this harness that will be a breeze! I still have to make a holder for the harness to stay up against the firewall area yet too. But she's all wired. Need to get some gaskets, nuts and bolts, oil and bolt some stuff down and she will be ready to fire up!
Oh and that wire running next to the downpipe is my boost control wire... it will run to the OUTSIDE of the shock tower to my boost solenoid (yet to be acquired)
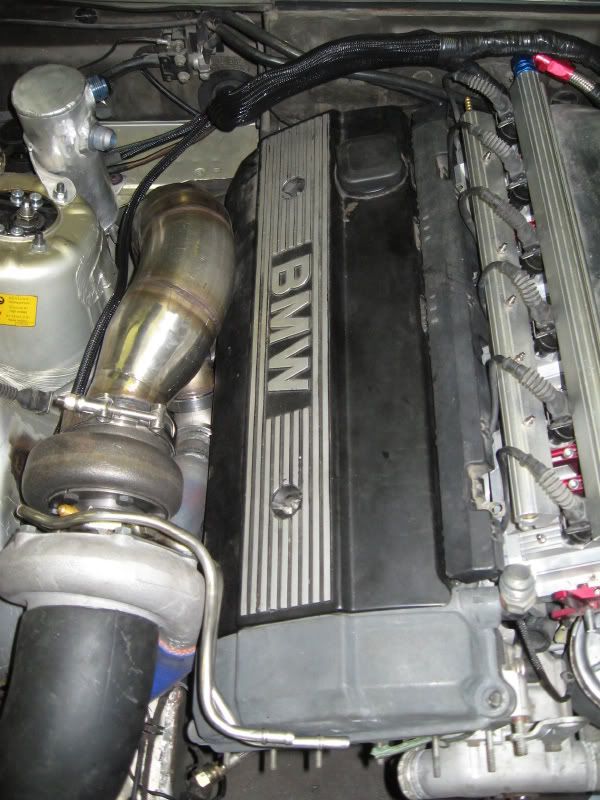
The plumbing I mentioned before you can see in this pic... the water cooling lines for the turbo. Still working out the oil stuff...
Last edited by DTRguy; 08-27-2009 at 08:06 PM.
Dreams To Reality Performance One Lap of America 2010 GT2SB winner, 4th Overall, car build http://forums.bimmerforums.com/forum/showthread.php?t=1268384
License Revoked
Someone does excellent work. Nice progress Kevin!
Member
Where can i acquire that flexible tubing you are using for the water lines?
Luke
03 330i
fabricator/welder type
Thanks Sigma!
Despite what it appears like... those lines are NOT flexible. What those are, are reshaped stainless water lines from a stock VW 1.8t engine. The lower one I had to cut and re weld the banjo end on. The upper I had to carefully re shape to that shape. It probably took me 2 hours to get them to look like that. I am not super pleased with it but it didn't cost me anything in materials so I am happy with that part. I think that you could go to a turbo rebuild shop that sells turbo parts and whatever and get tubes that have the banjo fittings on them already and bend to suit. That is what I have done in the past.
Dreams To Reality Performance One Lap of America 2010 GT2SB winner, 4th Overall, car build http://forums.bimmerforums.com/forum/showthread.php?t=1268384
Member
by flexible i meant "bendeable"
and thanks for the info, i got excited that there was a site that had some goodies like that ready to go.
Luke
03 330i
fabricator/welder type
Ah I got ya... Nope... more custom fab work. Unfortunately I am not privy to a great deal of cool purchased parts... I have to make my own in many cases to save money for the things that I can not actually make. This is an example of that. The oil lines will also be semi custom bits made from parts I have from other project cars and all welded up.
Dreams To Reality Performance One Lap of America 2010 GT2SB winner, 4th Overall, car build http://forums.bimmerforums.com/forum/showthread.php?t=1268384
Member
Just saw this thread and although off topic for this section of the forum:
How did you fit the rear fenders? I am currently at the start of fitting almost exactly the same parts that you seem to be using. I have got more than 20 year experience of working with fibers and resins or prepregs but have not fitted something like the rear fenders before. I am planing to cut away all unnecessary metal panels on the rear as I will have a cage welded in. Where I see some probelms to arise is not the mounting of the panels themself but how not to get cracks on the joint between metalwork and grp. Any advice, or where I can get some?
Facebook.com/LUXFAB
fabricator/welder type
It's gonna be my first time too... but I have done quite a bit of custom body work (but not really a painter). As I understand, it gets bonded with either an epoxy or bondo hair while simultaneously being pop riveted. Then, knock down the high spots, and fill to smooth. When I get to that point I will surely have pics.
Absolutely man!
Dreams To Reality Performance One Lap of America 2010 GT2SB winner, 4th Overall, car build http://forums.bimmerforums.com/forum/showthread.php?t=1268384
Member
alright, similar to what I had in mind too. I was just a bit worried about either the rivets to protrude too much and big amounts of filler to be used, or the rivests to be too far away from the joint, so that cracks would form. I will see how it turns out to be when the rivest a kept about 20mm away from the joint and to use those 20mm to chamfer the grp down to nothing. THought that also stiching the panel onto the remaining metal panels could work by using some rovings. In the end quite similar to the rivets.It's gonna be my first time too... but I have done quite a bit of custom body work (but not really a painter). As I understand, it gets bonded with either an epoxy or bondo hair while simultaneously being pop riveted. Then, knock down the high spots, and fill to smooth. When I get to that point I will surely have pics
By the way: Excellent work, car looks impressive. Very nice fabrication!
fabricator/welder type
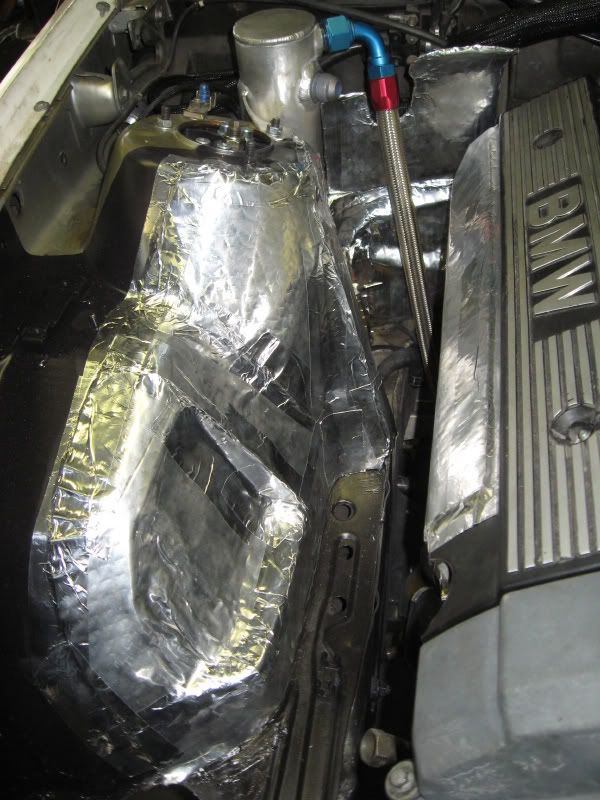
I was hoping to have the hot side bolted up for the final install... but... my exhaust gaskets never showed upBut I got everything ready for the install. This is what I did for fender and overall insulation. Hope it meets with approval.
Dreams To Reality Performance One Lap of America 2010 GT2SB winner, 4th Overall, car build http://forums.bimmerforums.com/forum/showthread.php?t=1268384
E30 Supercar
You really think all that reflective material is really necessary? Even on the valve cover plastic?
I have all my exhaust running fairly close to my valve cover plastic and it only deformed slightly where my WG plumbing comes off of my collector and passes by within a 1/4''.
Member
Mazur how close is close? Pics or ban...
I have reflective stuff on my valve cover and i plan on hooking up the fender too. The turbo actually melted off the undercoating in the wheel well.... I think its too hot.
-Chris
Member
BMW CCA Member
Unbelievable work going on here. I commend you, fabulous job! Subscribed
~Phil
Madeiraviolett Bf.C club member #001
1996 BMW 328is Madeiraviolett/Dove Grey: 5 Spd, Sport, Cold Weather & Premium Sound pkgs.
3.5" ECIS/ITG intake -> Samco ASC Delete Boot -> DINAN TB -> M50 Manifold -> S52 Cams | Bav Auto Red-top ignition coils tuned w/ AA software, Dynomax Cats & Stromung exhaust UUC Pulleys & Clutch stop, FDM=Zionsville radiator, Mishimoto Tank, SAMCO hoses, Fidanza LTW flywheel & M3 clutch, UUC Evo3 SSK, 3.23 LSD, Koni/Eibach Adjustable Damper suspension, PUR RSM's & RTABs, CF Strut brace, UUC Swaybarbarians, Motorsport X-Brace, 17x8 Beyern Mesh wheels Hella CELIS projectors + 5k TRS HID's, Fog delete=Brake cooling duct, LTW wing, ///M Bumper & R. Diffuser
CCA Member #382557
fabricator/welder type
Yeah I do... and if not better safe than sorry. My downpipe is REALLY close to the valve cover. I want to make sure my coils and coil wiring aren't subjected to that heat. They weren't designed with that heat from the downpipe being so close. I also made the heat shield for the firewall wiring exit area. Same reason.
Kind of why I did it. Also, didn't want the sheetmetal getting hot and then stressed while driving on track and getting twisted.
Thanks!
Dreams To Reality Performance One Lap of America 2010 GT2SB winner, 4th Overall, car build http://forums.bimmerforums.com/forum/showthread.php?t=1268384
fabricator/welder type
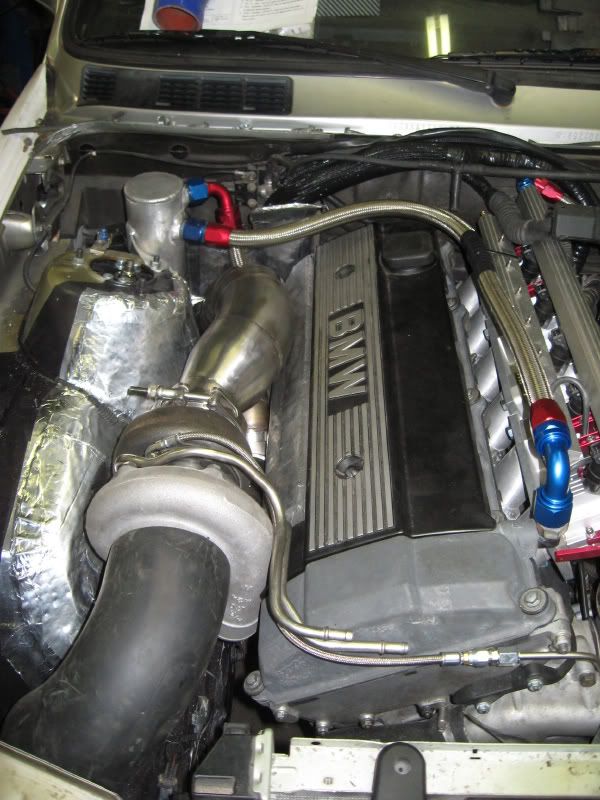
Finally got the gaskets I was waiting on and got some stuff done!
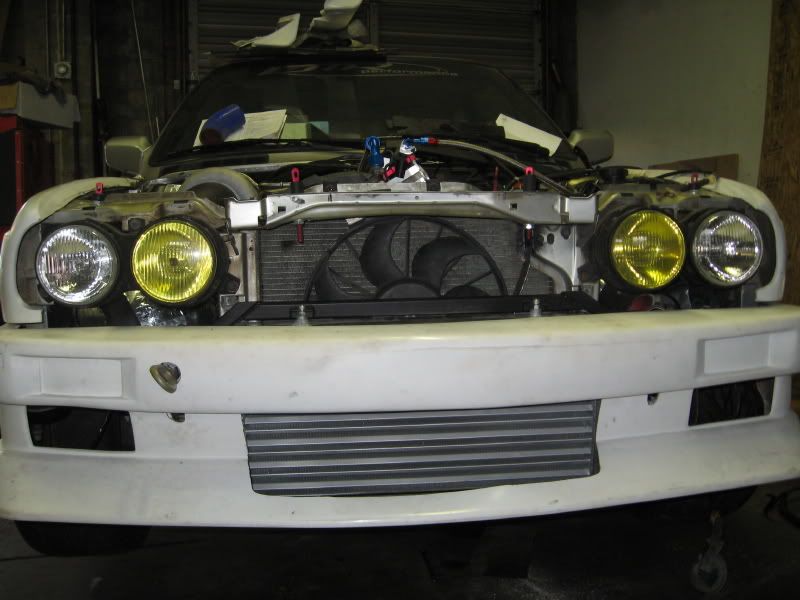
In the time waiting, I got the fan mounted and worked out more on the bumper mounting issues...
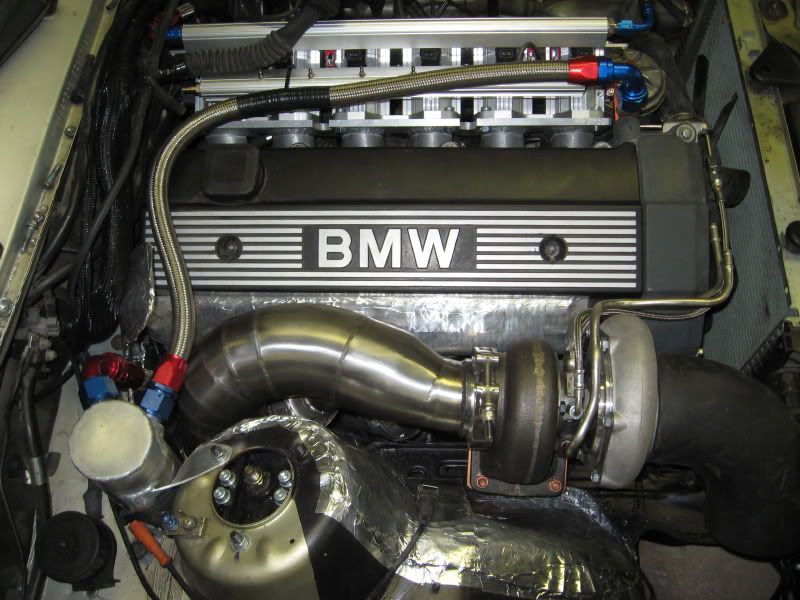
But I have been waiting to bolt up the hot side of the engine for over a week now! Finally got that all buttoned up!
Another angle...
Still waiting on stuff for the intake side before I finish it all up and go for startup!
Dreams To Reality Performance One Lap of America 2010 GT2SB winner, 4th Overall, car build http://forums.bimmerforums.com/forum/showthread.php?t=1268384
 Posting Permissions


 Reply With Quote
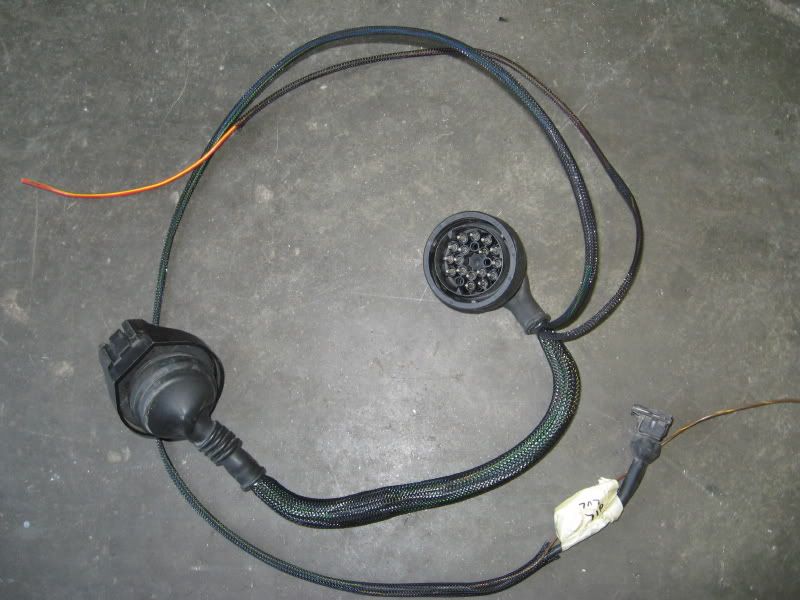


Bookmarks