
 Member
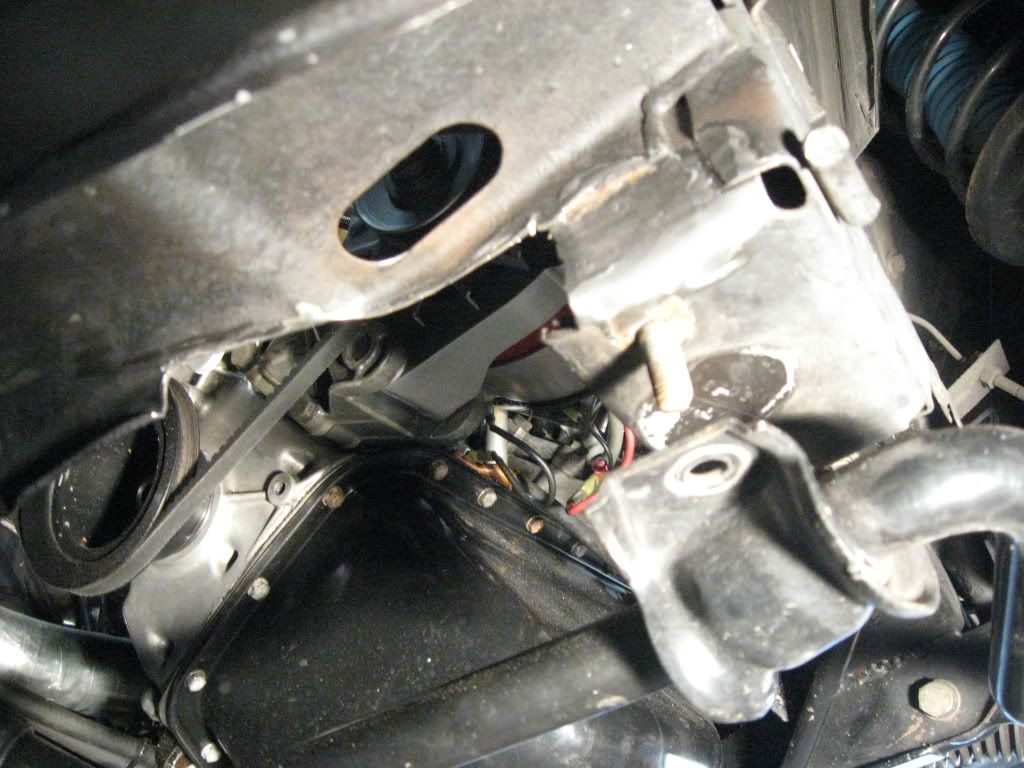
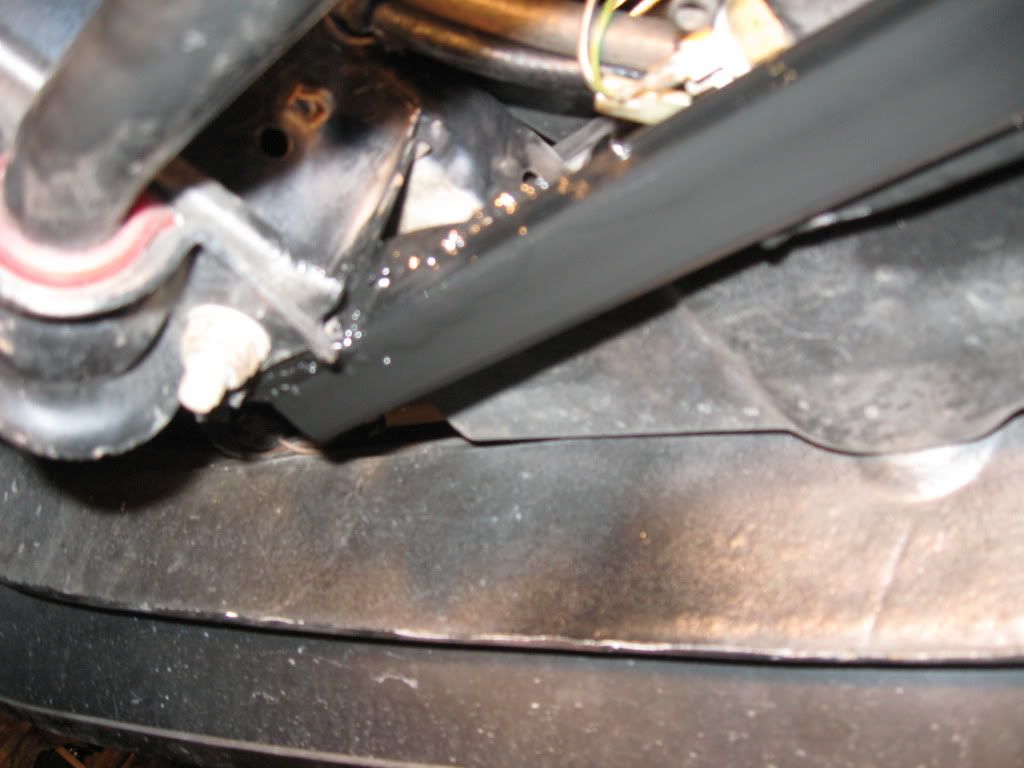
I've been wanting to make an Alpina "wonder bar" for a long time as my core support had a ton of stress cracks in it. Stress cracks means that before there were cracks it flexed far enough and often enough to fatique the metal, and now that it's cracked it does nothing but move.
I've never liked any of the bolt-on bars because they do nothing for frame rail twist or opposing vertical flex, only spread. When you turn hard, the sway bar pushes up on one side and pulls down on the other side at the front bar mounts. With a cracked core support, I'm sure the rails move which makes it more difficult for the sway bar to do it's job.
I wanted something that would keep the rails from spreading (like the alpina bar), but also tie them together enough to keep one from lifting while the other drops (opposing vertical flex), and also keep them from twisting.
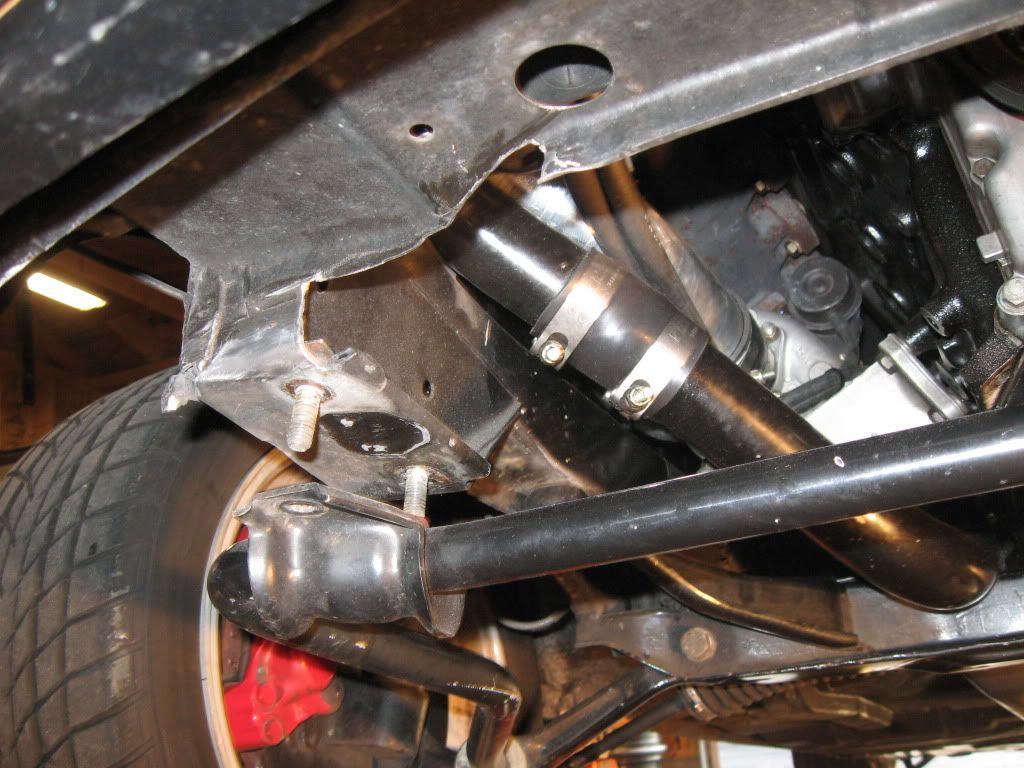
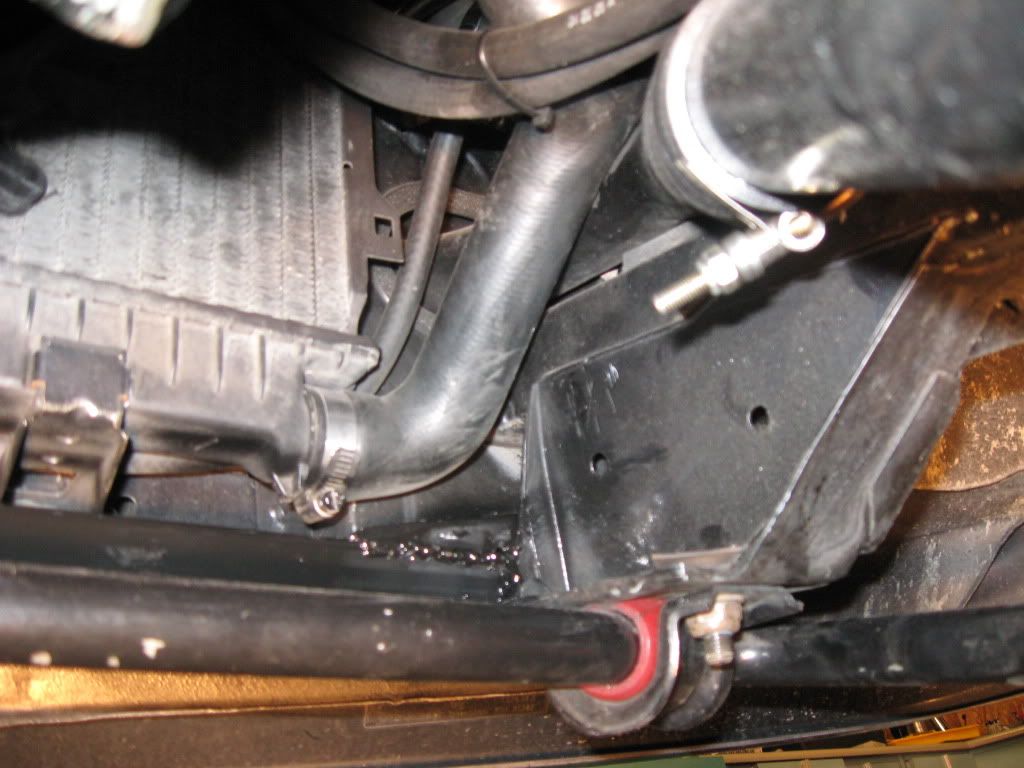
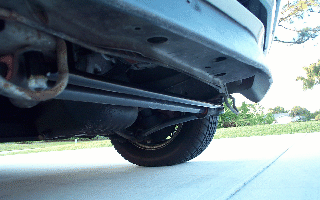
I started with 1"x 1" x 1/8" wall square tubing and cut it to length to match the width of the sway bar "boxes".
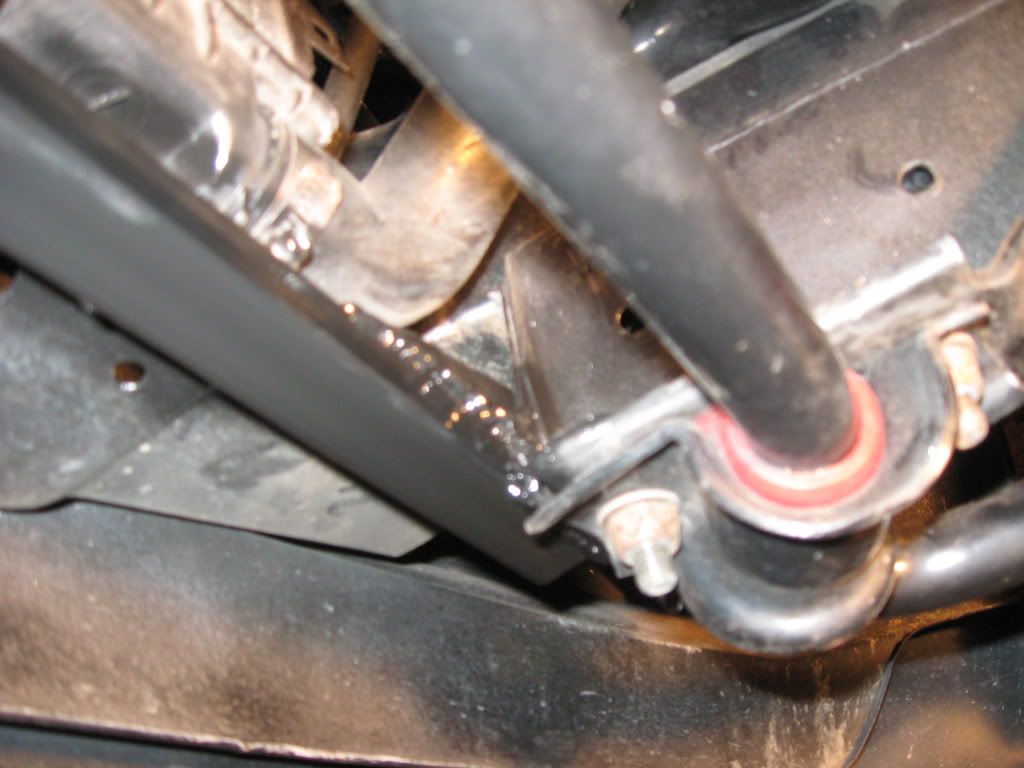
I then decided where I was going to cut. The areas of the core support that I cut out were chock full of stress cracks. Removing this material allowed me to push the 1" tube right up level with the bottom of the core support and directly on the front of the boxes. You can see the area where the outside of the box wraps around the front edge. I cut the bar so it was short enough to fit inside this lap joint to allow the bar to sit flush and be welded directly to the box. I was also sure to grind off the portion of the core support that was welded to the front of the boxes for the same reason.
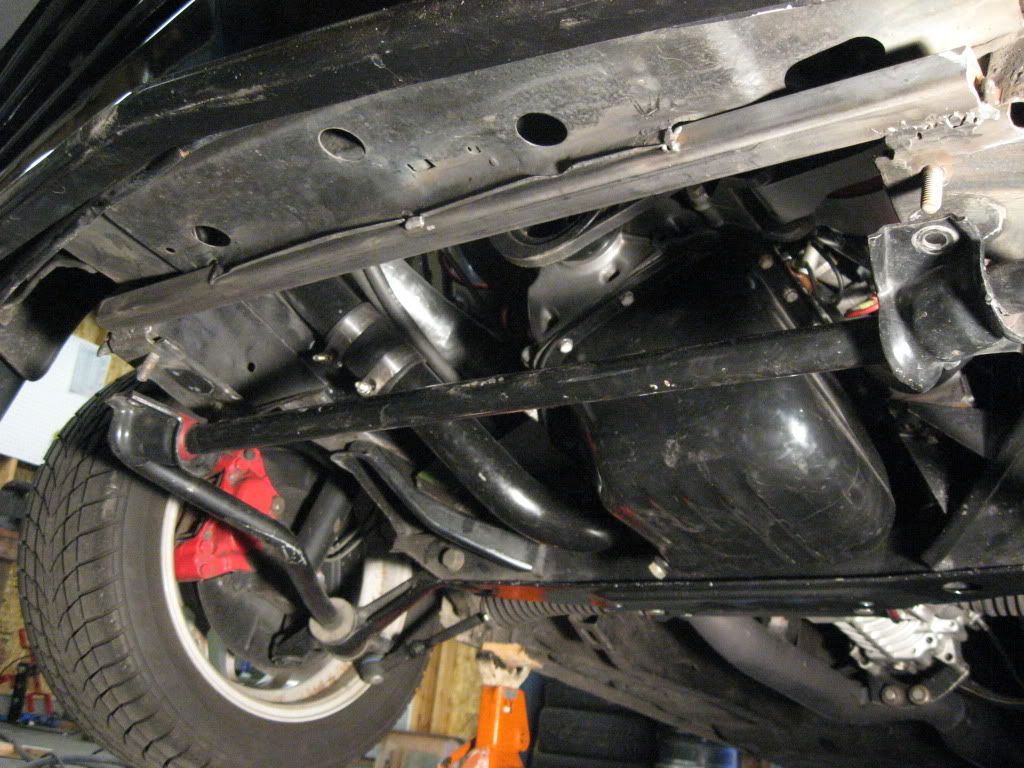
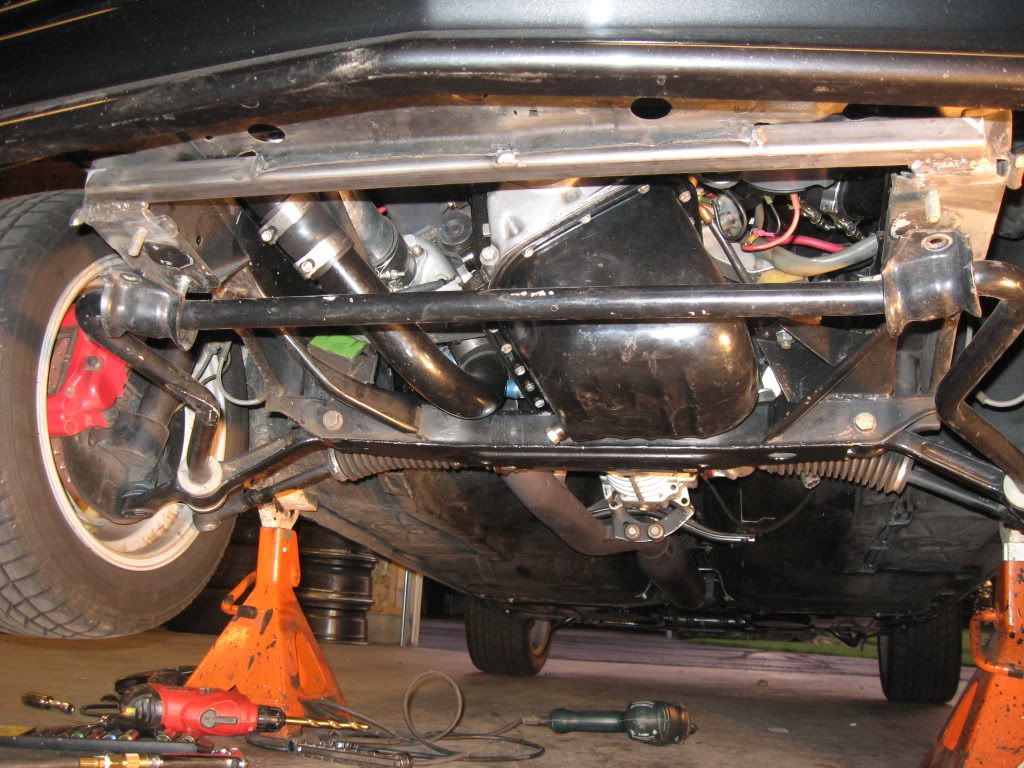
Once all the cuts were cleaned up, the fuel tank vent tube tabes removed and test fit was satisfactory I welded the bar in place. Welding obviously is stronger than bolting it in place, but if you don't have access to a welder (or don't want to weld on your car), you could do this same basic thing by drilling holes and bolting to the boxes. I can't weld upside down to save my life, the welds look terrible and I'm embarrassed to post pics of them, but they will work. I also put a couple spot welds along the length of the original core support to tie it together (hopefully stronger).
Once I cleaned the welds up a tad I shot it with a quick coat of paint.
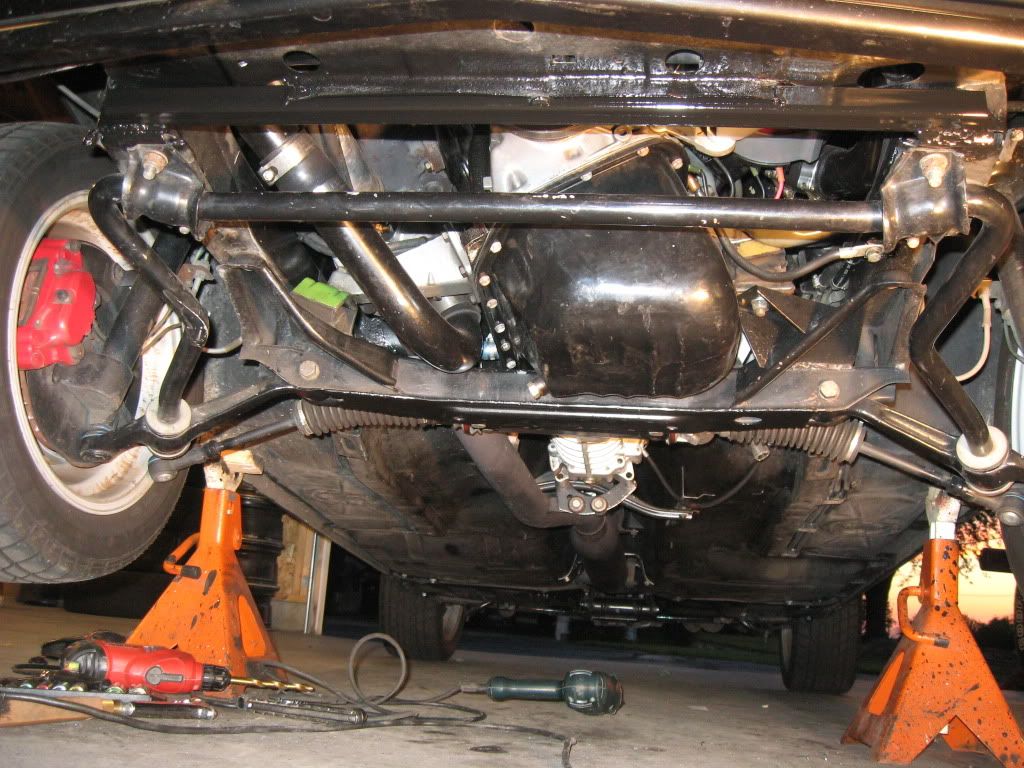
I haven't taken any super hard turns yet, but I can already tell the front end feels more stable and planted with less body roll.
Last edited by jrcook320; 06-05-2009 at 05:01 AM.
S50 Powered 2.9 M20
cool stuff....
"..Horsepower is a measure of work done over time, or the rate at which work is done."
http://www.cardomain.com/ride/579694/1

Member
Awesome work mate, i will be doing this now you have made it look so easy. May try to incorporate some sort of sump bash plate mount aswell.
I is e21 zombie?
neat
Member
nice work dude, looks clean too!
Member
your not the only one who can't weld upside down.
I am almost done putind the floor back in on my driverside. I went with 16 gauge so it had enough meat so I could bang it around enough to reposistion the sub frame which has been jacked on lots befor I got it. I overlaped the exsiting metal from the top and plug welded it and than ran the seam and that is all as passable as Ia can get it with my chepo harbor frieght mig welder then I started welding the seam from the bottom just to seal it up and it just looks horrible by the time I am done dressing it will probably have to get a new grinder
Member
Great pictures. Man I love good documentation. Makes me think that some 2" DOM tubing with a plate welded to each end and holes to match the holes above the sway bar mount would be a good solution for those without a welder (assuming that they could get someone to weld the plates)
Originally Posted by jrcook320

Last edited by milotrain; 06-05-2009 at 11:48 AM.
Member
1982 323i Dogleg
Very cool.
I love my Ken Alpina bar myself. How do you think it compares?
Also how does this compare to Ken's Welded Piece:
http://www.kengineering.info/resurection.html
Either way, the car feels a million times more solid with this kind of product....
Do you have a rear brace too?
My Website
1982 323i
Under the Hood:
M20B23, Dogleg tranny, K&N Box Air Filter, Hayden 11inch Pusher Fan, redline tranny/diff fluid, Dual Exhaust,3.45 open.
Braking/Suspension:
Steel brake lines in front, front/rear 323i disks, Front and Rear Strut Braces, Lower Alpina(Ken) Bar, Kmac Camber/Castor Plates(Raise the front 1 inch), PolyUrethane Steering Rack Mounts, Rims = RG alloy wheel set (BBS design) silver 6x13 KBA 40324, Tires: Sumitomo 195/60/13, Struts: Bilstien HDs Springs: Stock
Body:
087-Graphit-metallic, Euro Bumpers, BBS Valance, Foha Rear Spoler, Yellow Hella High Beams
Interior:
Recaro Front Seats, Sports Steering Wheel, Kph 220 Speedometer, Vacuum gauge, Air/Fuel Gauge
UlTiMaTe DrIvInG MaChInE
Looks good josh but, I have a minor concern...
Did you weld it in with the car only on it's two rear wheels? not to mention the jacks are at two different points (not symmetrical), with odd pieces of wood. That is already in a slight twist which is stressed. therefore not "square"
-Rick
Bav's Build Thread: http://www.stanceworks.com/forums/showthread.php?t=2498
Member
I see the opportunity for a bit of triangulation. A couple peices of that same 1" stock angle cut to go from the bar to the inner sides of the frame rails. Maybe overkill, but the additional weight would be negligible. I'm looking forward to doing a lot of chassis work to my car!! Mild, street type stuff but better than stock nonetheless. Good work and great pics!!
Member
Got the Alpina bar from Ken, still think this is a good idea though.
1982 323i Dogleg
Some Useful links:
A guy that sells the lower alpina bar for $75
http://www.angelfire.com/de3/bimmertoyz/alpina.html
A discussion on them:
http://e21.tricord.be/forum/view.php?view=10629
Again good work Josh!
My Website
1982 323i
Under the Hood:
M20B23, Dogleg tranny, K&N Box Air Filter, Hayden 11inch Pusher Fan, redline tranny/diff fluid, Dual Exhaust,3.45 open.
Braking/Suspension:
Steel brake lines in front, front/rear 323i disks, Front and Rear Strut Braces, Lower Alpina(Ken) Bar, Kmac Camber/Castor Plates(Raise the front 1 inch), PolyUrethane Steering Rack Mounts, Rims = RG alloy wheel set (BBS design) silver 6x13 KBA 40324, Tires: Sumitomo 195/60/13, Struts: Bilstien HDs Springs: Stock
Body:
087-Graphit-metallic, Euro Bumpers, BBS Valance, Foha Rear Spoler, Yellow Hella High Beams
Interior:
Recaro Front Seats, Sports Steering Wheel, Kph 220 Speedometer, Vacuum gauge, Air/Fuel Gauge
Member
No offense to Ken, but a piece of 1/4" flat stock offers almost no structural rigidity at all. I'm not sure why he did that rather than tubing, flat stock bends easily.
Yes. I actually didn't even notice the jackstands were at different levels. I don't think that the height difference caused much flex, though I agree it would have been better to have them level. I always put small 2x4 blocks in the jack boxes, it keeps the jack stands off the car.
Yeah, I plan to run a tube up to the frame rail, angled up for even more "twist" rigidity and back for sway rigidity.
Member
That's 1.5 x 3/4 rectangular box tubing. It won't resist twist as much as square but is stronger when the rails are trying to move up or down.
Welding in is ALWAYS stronger than bolting in and 1x1x.120 welded in is pretty good, especially tying it in to the sheet metal too.
ken
Member
hey were did u get ur urethane bushes from for ya sway bar can't find em newere in australia
Member
A. I think you should market these as "The Wunderbar"
B. It occurred to me in looking at the pics, is this why the swaybar to frame mounts are set oblique to the front of the car instead of parallel? Any lateral motion by the front frame rail inboard would be obstructed by the angle of the mount (compressive force rearward on the frame rail = Lateral force * TAN[angle of mount].)
[Edit]
Nevermind. That was stupid. The swaybar's not attached to anything else.
Last edited by pommeree; 06-09-2009 at 09:15 AM.
Eric P.
Member
Good stuff Josh.
 Posting Permissions


 Reply With Quote


Bookmarks