
 Artifically Aspirated
Moderator
Artifically Aspirated
Moderator
The engine mounts could take you 3 hrs depending on what tools you have available.
The engine needs to be jacked up to get them out.
Make sure you loosen the nuts before you jack the motor up.
The drivers side top is a bit harder to get at, not a lot of room, you'll need a long extension.
The tranny should only take you 30-45 min, you may find it easier to just remove the rear tranny support after the tranny is jacked up.
Member
JimLev - You da man, I know that, but even I have done engine mounts 2x on M62s in much less than 3 hrs. From start to finish, and the right tools I think it could be done in less than an hour (including time to jack up the car). With the ratchet extension, a jack under the engine, it's just a few nuts to come off, then position the new mounts, tie it all back together, done.
Member
Great write up! I'm planning on doing my mounts and have already placed the parts in the shopping cart, however am still not yet ready to press 'pay & ship'..
I've seen a few threads that have mentioned to do the oil line o-rings while doing the engine mounts (as mine seem to be leaking). Is this correct? I can't find the parts numbers (and qty required) and realoem doesn't show the oil lines going to the engine mounts?
I'm located down-under and will usually buy a bulk of parts from pelican to save on the shipping.. so your advice will be very much appreciated to get my replacement CPS quicker! (damn stealers here are asking for approx. $250 for 1 CPS!! also they don't carry them in stock)
aka dkhead
Helped a lot!
E90 335i
On3 Performance top mount single turbo kit, Precision 6466 Turbo, ECS Tuning charge pipe, 7in FMIC, JB4 w/ MHD backend flash, Stage 3 fuel pump, Port injection, E85, some wheels that came w the car but are thick
E39 540i (SOLD)
6 spd swap, "Almost Nardo" Vinyl Wrap, JB Racing LTW flywheel, M5 clutch & control, BC Racingcoilovers, cat back straight pipe, E60 SSK, ZHP shift knob, hard wired aux, Style 32 17", BFG G-force Sport Comp-2 tires, shadow-line trim, reenforced differential bushing, ATE Type 200, Hawk HP Plus pads, intake res delete, 10W40 M1, trans fill 50/50 Redline MT-90 & 75w90NS, solid shifter carrier bushing, pixel fix, red needles
Member
Is there any difference when changing manual transmission mounts? Where do you support the transmission from? As we have no flat surface as shown in the pictures.
2001 BMW 540i6 Anthracite/Sand
1997 BMW 328i - Sold
Member
I'm in the middle of doing this as I type this. Motor mounts are done and I have the trans brace loosened. Both my motor mounts were utterly destroyed at 158k miles and both trans mounts are sheared in half, with the lower parts of each trans mount out. Taking a beer break before going back under to try and access the upper flange nuts on the top of the trans mounts.
I have to say the engine mounts are a piece of cake if done the way the OP describes. Instead of removing the fan however, I simply dismounted the fan shroud, leaving the overflow bottle fully attached, and lifted it up 2-3", and supported it with a socket. That gave all the clearance needed without removing the fan or shroud.
Jeremy
2003 Black/Black 540i MSport | nav | cold weather (pride and joy)
1999 Silver/Black-gray two tone Audi A4 30vqm | low | suede trim | catback | KrautoLED full package | RS4 grille | Merc wheels (much loved DD)
2004 Odyssey EXL (family hauler)
Member
I haven't done the engine mounts yet; that will come before long.
My transmission mounts were shot. One was sheared in two, the other squished about a quarter inch thinner than the new one.
I was able to reach the upper nuts using a 13mm closed end wrench.
2001 BMW 540i6 Anthracite/Sand
1997 BMW 328i - Sold
Member
That's how I did it as well. Both of mine were sheared in half. The car is amazingly smooth now - I can't even tell it's running with a hand on the bodywork.Originally Posted by nikatkimber

Jeremy
2003 Black/Black 540i MSport | nav | cold weather (pride and joy)
1999 Silver/Black-gray two tone Audi A4 30vqm | low | suede trim | catback | KrautoLED full package | RS4 grille | Merc wheels (much loved DD)
2004 Odyssey EXL (family hauler)
Member
I need to do the engine mounts, mine vibrates a bit. But then I need to do the TCG's and Vanos seals too, I've got the diesel tick going on. No rattle other than a tiny bit at startup, so I don't think the TCGs are gone yet. It would be nice to get the motor smoothed out, and have good mounts isolating the car nice like that.
2001 BMW 540i6 Anthracite/Sand
1997 BMW 328i - Sold
Member
I can't believe the difference in mine. This is my first BMW so I had no practical knowledge of how it should feel, other than knowing it would be smooth. My mounts were already on the way out when I got it evidently, as it never felt this smooth at any time since I owned it.
Doing the trans mounts was the more difficult of the two parts. Engine mounts were 15-20 minutes tops. Try what I posted earlier too - leave the fan on and just lift the shroud and overflow a few inches, prop them with something, and you'll have the clearance you need when lifting the engine, without having to pull the fan off.
Jeremy
2003 Black/Black 540i MSport | nav | cold weather (pride and joy)
1999 Silver/Black-gray two tone Audi A4 30vqm | low | suede trim | catback | KrautoLED full package | RS4 grille | Merc wheels (much loved DD)
2004 Odyssey EXL (family hauler)
Member
Good to know, as I thought the trans mounts were pretty easy.
2001 BMW 540i6 Anthracite/Sand
1997 BMW 328i - Sold
Member
Yeah they were a little contorting but nothing bad. With the placement of the motor mounts, they're a piece of cake. Passenger side you can put the top nut on with your fingers from under the car and spin it down, then torque from above. If you have dexterity and can squeeze a couple fingers in, you can even start the driver side top nut from below, just enough that it grabs, and finish from above with the socket and extensions. They're very, very easy.
Jeremy
2003 Black/Black 540i MSport | nav | cold weather (pride and joy)
1999 Silver/Black-gray two tone Audi A4 30vqm | low | suede trim | catback | KrautoLED full package | RS4 grille | Merc wheels (much loved DD)
2004 Odyssey EXL (family hauler)
Member
Trying to get some socket nut things, of course not available in Australia, $50 delivered from sears, damn postage
Member
Don't know if you need them for the motor mounts, but I did not need one for the transmission mounts. Just a 13mm standard socket (+ extension), and a 13mm closed end wrench.
2001 BMW 540i6 Anthracite/Sand
1997 BMW 328i - Sold
Member
Motor mounts only need 13mm and 16mm standard sockets, no special ones required.
Jeremy
2003 Black/Black 540i MSport | nav | cold weather (pride and joy)
1999 Silver/Black-gray two tone Audi A4 30vqm | low | suede trim | catback | KrautoLED full package | RS4 grille | Merc wheels (much loved DD)
2004 Odyssey EXL (family hauler)
Member
Nice, this thread ID is 12100416, and I was born on 12/10 at 4:16 a.m.
I guess that means I need to get my mounts swapped out today.
Member
The issue is the Exhaust, My ring spanners are the flat type, thinking about it what I really need is one with a foot so that it will fit inside the brace as well as slide under the exhaust.
E39540v8
Member
I'll see if I can't get under my car again and take a pic showing what I did.
Looking at the OP pictures again, my exhaust (2001 540i, so a TU motor) does not completely block any of the support bolts. I was not able to reach the forward most bolts with a socket and ratchet, but the closed end wrench was able to fit easily.
Nevermind, not the TU / non-TU difference, OP's car is also a TU motor. But his exhaust does not look stock, I don't see the secondary cats in the pictures.
When do you plan on working on this again? I'll try and get some info up here before then if I can, if that would help.
Last edited by nikatkimber; 08-20-2015 at 10:13 AM.
2001 BMW 540i6 Anthracite/Sand
1997 BMW 328i - Sold
Member
I will take a pic over the weekend, I have a pit so I can take it easy, will show you guys what I mean. I tried this ages ago as I have the parts, I ended up doing the engine mounts only.
Thanks
E39540v8
Member
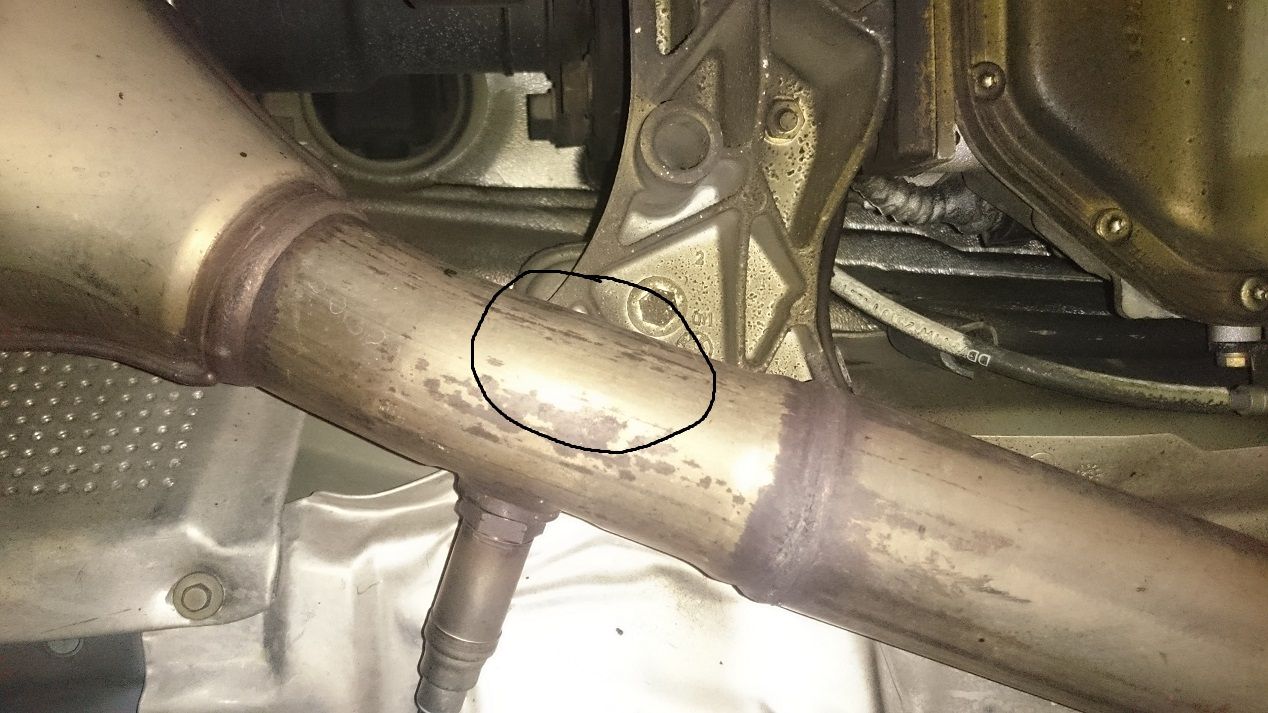
So here are my pics, bolt location circled in black
Member
Interesting. My exhaust had much less interference with the outer most bolts. It's jacked up again right now, so I'll try and take a pic or two tomorrow night.
2001 BMW 540i6 Anthracite/Sand
1997 BMW 328i - Sold
Member
This isn't from directly under the trans brace, but you can see I was easily able to access all the bolts.
Member
At 160k, both tranny mounts were sheered in half, explaining the rattle from under the middle of the car. One engine mount (drivers) was failed and I'm sure the second close behind. Thread was an excellent assist. Instead of the socket and wrench cap, I just used a small 13mm box wrench.
Since I had the fan clutch wrenches, the fan removal was a breeze.
All told, right at 2 hours.
Thanks!
Member
I did not have room on the driver's side to get my 3/8" 20" long extension WITH the 16mm socket to the bolt. Instead I went under and put the 16mm socket on the bolt and from up top put the extension through (without the socket on) and then lock it into the socket that was already sitting down there. Maybe I had trouble because my driver's side engine mount was literally in half.
This DIY was way over due for me.
Only took an hour and 30min including jacking the front end up and putting the car back down.
Member
While torquing the driver side down to 47nm or 34 ft/lbs it snapped. Advice?
Using Tapatalk
 Posting Permissions


 Reply With Quote


Bookmarks