Page 3 of 5 FirstFirst 12345 LastLast
Results 51 to 75 of 109

Thread: E39 Motor and Transmission Mounts

  1. #51
    Join Date
    Apr 2010
    Location
    Tampa,FL
    Posts
    180
    My Cars
    97 e39 540i,2011 550i

    Thumbs up super kool!!!

    Thanks man i wan to do this so bad,i was told my engine was sitting lower than normal a while ago but did not pay to much attention to it! no i will get ti done myself which is the best part!

    Now i have a question for you
    do you recommend to get the hd control arm bushings also replaced too?
    my car has 130k and is runing great or so i think!
    thanks in advance!!!
    im ready to place the order thru the web you provide so the sooner you can let me know the better.

    check!
    I Kill them! But i didn't mean it,Is Just what I had to Do!

  2. #52
    Join Date
    Apr 2010
    Location
    Tampa,FL
    Posts
    180
    My Cars
    97 e39 540i,2011 550i

    Thumbs up thanks and thanks again!!!!

    This was awesome i did too and omg it was in a giffy and i had to check for my daughters a the same time..hehheeheh and i talked to a guy that works in bmw and he said
    " oh man that is so hard and i will need to charge you more (that was not the problem)" but the fact of "oh man that is so difficult" hahahahah i see his face as a joker now..wait to i tell him i did myself. jjajajjja!


    Thanks man for real....bless you!
    I Kill them! But i didn't mean it,Is Just what I had to Do!

  3. #53
    Join Date
    Nov 2008
    Location
    Sacramento, CA
    Posts
    1,417
    My Cars
    540it-318ti-318ic-Z3
    I'm glad this helped you and others too! I've had a bunch of practice on this on 3's, 5's, 6's and it is always worth the few hours to get this done.

    Enjoy the better performance and extra cash in your pocket!

    1999 540it - Schwartz II/Sand Beige, style 5 rims, Conti DWS 235/45 tires, Billy HD/Sports, Stoptech S/S BL, F1 Pinacle 35% tint, Zionsville Cooling kit
    1998 318ti Cali Sport - Schwartz II/Schwartz Anthratz, staggered style 23
    1997 318ti Sport - Schwartz II/Schwartz Anthratz, staggered style 68 ,

    1995 318ti Active - Alpineweib III/Schwartz, squared style 32
    1994 325i - Bostongrau/Tan, Billy Sports, H&R springs
    1991 318ic - Schwarz/Anthratz Stoff, Bilstien HD, Z4 3.0 SS, Magnaflow, S/S Stress bar, x-brace, M20 FW, Elipsoid/HID, K&N

    BMWCCA# 160411

    1995 318ti Sport Schwartz II/Schwartz Anthratz - Sold
    1985 635CSI - Schwartz\Sand - Sold

    1984 533i "Max" - Schwarz/Schwarz, - Sold
    1984 318i - Champagne/Tan, Stock - Sold

  4. #54
    Join Date
    Nov 2008
    Location
    Sacramento, CA
    Posts
    1,417
    My Cars
    540it-318ti-318ic-Z3
    Quote Originally Posted by skan View Post
    Now i have a question for you
    do you recommend to get the hd control arm bushings also replaced too?
    my car has 130k and is runing great or so i think!
    thanks in advance!!!
    im ready to place the order thru the web you provide so the sooner you can let me know the better.

    check!
    I swapped in HD control arm bushings I got from EACTuning (Jared) when i installed Bilstien HDs on the 540it. No more shimmy. I installed the bushings in my existing control arms. If I had to do it again, I'd just get the whole control arm with the HDs installed from Jared for less hassle.

    I think I had a DIY for this replacement somewhere.

    1999 540it - Schwartz II/Sand Beige, style 5 rims, Conti DWS 235/45 tires, Billy HD/Sports, Stoptech S/S BL, F1 Pinacle 35% tint, Zionsville Cooling kit
    1998 318ti Cali Sport - Schwartz II/Schwartz Anthratz, staggered style 23
    1997 318ti Sport - Schwartz II/Schwartz Anthratz, staggered style 68 ,

    1995 318ti Active - Alpineweib III/Schwartz, squared style 32
    1994 325i - Bostongrau/Tan, Billy Sports, H&R springs
    1991 318ic - Schwarz/Anthratz Stoff, Bilstien HD, Z4 3.0 SS, Magnaflow, S/S Stress bar, x-brace, M20 FW, Elipsoid/HID, K&N

    BMWCCA# 160411

    1995 318ti Sport Schwartz II/Schwartz Anthratz - Sold
    1985 635CSI - Schwartz\Sand - Sold

    1984 533i "Max" - Schwarz/Schwarz, - Sold
    1984 318i - Champagne/Tan, Stock - Sold

  5. #55
    Join Date
    May 2006
    Location
    Omaha, NE
    Posts
    4,196
    My Cars
    1998 528i 5-spd 102K
    This DIY is for the V8 engine.

    For those with 6-cylinder, I just replaced the Engine/Trans Mounts using the method of removing the engine brackets (instead of raising engine).
    It was a breeze this way.

    Here is the DIY:

    DIY: 1998 528I Engine/Trans Mounts Replacement

    http://forums.bimmerforums.com/forum....php?t=1650080

  6. #56
    Join Date
    Aug 2007
    Location
    Wiesbaden, Germany
    Posts
    682
    My Cars
    2007 Cayman S, 2006 E55
    I'm thinking that at least the transmission mounts must be going or already gone on my 540i/6. When shifting I get a strange clunk, especially when downshifting on deceleration. The thing that had me confused about it was that the noise comes as I move the shifter into the next gear, but while the clutch is still fully depressed and the engine disengaged from the driveshaft. It's like a very well muted boom, and you feel it more than hear it. I guess the kickback the tranny gets from the syncros is what is making this noise. I started to suspect bad engine mounts and came to this thread as a result of that suspicion, but after reading how it is all set up, it seems more likely the tranny mounts themselves are causing the bulk of the issue. Makes sense to replace the whole shebang if I'm going to the trouble though.

    Making an inventory of things to do, and hopefully soon I will have time to take care of it all in one weekend. So far I have a fan clutch to replace, tie-rod ends, and now the motor/tranny mounts. Should make for a nice greasy weekend. Anyone think of any other simple preventative maintenance I should take car eof while I'm dirty?

  7. #57
    Join Date
    May 2011
    Location
    atlanta,ga
    Posts
    12
    My Cars
    '08 BMW 550i
    Can this DIY be applied to E60 550i?
    I know the engine is essentially same, but the motor mounts seem to come from a different vendor.
    My car has only 60K and shakes when engine idles.
    Does it make sense to change them or should I look somewhere else for the cause of the problem?

  8. #58
    Join Date
    Nov 2008
    Location
    Sacramento, CA
    Posts
    1,417
    My Cars
    540it-318ti-318ic-Z3
    It makes sense to get under and check them. I'd suspect and usually see that the tranny mounts go first. E60/550i/N62N mounts below look different then the E39/540i/M62, but mount similarly.


    I have found that generally the procedure is the same on most all of the pre 2004 bimmers I've worked on (no x5s or x3s) The difference is what will be in your way or binding when you lift the assembly to swap the mounts.

    Take pics... Good luck!
    Last edited by BlackBMWs; 05-28-2011 at 11:01 AM.

    1999 540it - Schwartz II/Sand Beige, style 5 rims, Conti DWS 235/45 tires, Billy HD/Sports, Stoptech S/S BL, F1 Pinacle 35% tint, Zionsville Cooling kit
    1998 318ti Cali Sport - Schwartz II/Schwartz Anthratz, staggered style 23
    1997 318ti Sport - Schwartz II/Schwartz Anthratz, staggered style 68 ,

    1995 318ti Active - Alpineweib III/Schwartz, squared style 32
    1994 325i - Bostongrau/Tan, Billy Sports, H&R springs
    1991 318ic - Schwarz/Anthratz Stoff, Bilstien HD, Z4 3.0 SS, Magnaflow, S/S Stress bar, x-brace, M20 FW, Elipsoid/HID, K&N

    BMWCCA# 160411

    1995 318ti Sport Schwartz II/Schwartz Anthratz - Sold
    1985 635CSI - Schwartz\Sand - Sold

    1984 533i "Max" - Schwarz/Schwarz, - Sold
    1984 318i - Champagne/Tan, Stock - Sold

  9. #59
    Join Date
    Apr 2010
    Location
    NJ
    Posts
    2
    My Cars
    2000 BMW 528i

    Thumbs up Thanks Man!

    Thanks for the DIY man... it was very easy job to do.. I used your instructions to do this job... I had posted on the other forum to figure out the weird noise I was dealing with... and I just came accross link to your instructions... both my Engine mount and transmission mounts where shot... Thanks for the post!

  10. #60
    Join Date
    Aug 2008
    Location
    princeton, nj
    Posts
    1,149
    My Cars
    2001 540i 6speed
    i just did my transmission mounts tonight. thank you for the DIY. took me about 1.5 hours (yes i do work slow). the old mounts have slightly more deflection then the new units but i was actually alittle disappointed the old ones still had life in it. my car has 118k miles, im guessing these may have been replaced once already.
    2001 540i 6speed metallic silver

  11. #61
    Join Date
    Jul 2011
    Location
    hillsborough n j
    Posts
    5,085
    My Cars
    2001 540i sport 6spd
    mine looked fine when i took them out until i held them side by side with the new ones and realized they were at least 3/8 inch shorter from being compressed.

    i also noticed it changes the angle your engine sits at because the gap between my trans and trans rubber bump stop on the trans cross brace was cut in half.

    although i have to admit i cant feel the difference. just good to know my motor wont fall off. lol this happened to a friend. the mounts in his truck were so bad that the motor fell out the bottom while he was driving lol old
    azz gmc beater pick up
    ~2001 540i/6speed~
    Schmiedman M5 headers, SPEC stage2+ kevlar clutch, JBR 11lb lightweight flywheel, ESS Tuning m60 manifold software tune, 3" SS freeflow OBX catback, afe cold air intake, m60 intake manifold, Cdv delete, powerflex urethane sway bar bushings, M5 rear sway bar ,Autozone replacement driver side blinker light bulb, 545 short shifter zhp weighted, "dsc off" sticker, m5 3.15 lsd differential, m5 chassis rods, akebono ceramic pads, G2 caliper epoxy, ecs braided lines, BC-Racing br-plus series w/swift springs 8/6~
    On the night that I go back in time, you will be shot by terrorists. Please take whatever precautions are necessary to prevent this terrible disaster.

  12. #62
    Join Date
    Aug 2008
    Location
    princeton, nj
    Posts
    1,149
    My Cars
    2001 540i 6speed
    anyone know if e39 m5 motor mounts will fit the e39 540i? the s62 is a modified m62 so i'd assume it would be compatible... i did verify on Pelican the part numbers are different. if the m5 motor mount is more robust, i would not mind slightly increased vibrations either...
    2001 540i 6speed metallic silver

  13. #63
    Join Date
    Nov 2008
    Location
    Seattle, WA
    Posts
    1,816
    My Cars
    M550iX, 540M-Sport, Scud
    Quote Originally Posted by mifesto View Post
    anyone know if e39 m5 motor mounts will fit the e39 540i? the s62 is a modified m62 so i'd assume it would be compatible... i did verify on Pelican the part numbers are different. if the m5 motor mount is more robust, i would not mind slightly increased vibrations either...

    I cannot say for sure, but they look very similar to the 540 mount...interesting. http://www.realoem.com/bmw/showparts...13&hg=22&fg=05

    I would imagine the M5 mount may be a bit stronger or durable, but not sure they are necessary. I replaced mine at around 120k and they were not all that bad...did the trans mounts as well. Pretty easy swap if you have a lift.
    2001 540 M-Sport (cdn), ST X (KW) coilovers, H&R 15mm spacers, Eibach anti roll bars (28mm/18mm), Beastpower rear antiroll bar brackets, M5 rear chassis reinforcements (traction rods), Strong Strut front upper strut bar, Dinan Stage 1 software, factory M-Audio subs, Bavsound speaker upgrade, Bluebus bluetooth integration, Stop Tech SS brake lines, ATE coated brake rotors, ATE ceramic brake pads.

  14. #64
    Join Date
    Oct 2008
    Location
    Walnut Creek, CA
    Posts
    3
    My Cars
    1998 BMW 318i

    Thumbs up 98 E36 318i

    Very nice writeup. Thank you.
    I have 98 E36 130k and tried to replace tranny mounts.
    I removed tranny bar but couldn't remove upper bolts which
    attached to transmission. I used small 13mm tool since there's not enough room as you described but no luck.
    I reinstalled tranny bar without replacing mounts.
    What kind of tool did you use?
    Thanks in advance
    Quote Originally Posted by BlackBMWs View Post
    E39 Brothers,

    Yesterday, I replaced my motor and transmission mounts. I have 83k miles on my 1999 540it. I have the M62TU motor and a Steptronic auto transmission.

    I decided to swap all the mounts as I suspected they were weak or failed. The OE motor mounts are fluid filled rubber bushings mounted in a metal cup. The tranny mounts are a simple rubber bushing with attached metal plates and attachment studs.

    After reading a number of posts on various boards, the M62 mounts typically fail due to the increased torque of the V8 over the I6 motors. I figured it was a safe bet my M62 mounts and tranny mounts were due.


    This is an easy DIY and in retrospect, well worth the effort for me in engine and auto shifting feel.

    -----------------------------------------------------------------------

    For this DIY, I used the following tools and 3/8" 13mm and 16mm sockets. I also used a 1/4" 13mm socket and 6" extension. 13mm combo and ratchet wrench.


    Not pictured are a 3/8" torque wrench, magnetic pick up tool, safety goggles, 4 wheel chocks, 4 jackstands, 1 floor jack, a 12"x16"x1/2" piece of plywood and a floor creeper.

    I purchased the Boge OEM motor mounts for $66 each and the two Lemforder OEM transmission mounts for $13 each. Jared@EACtuning have these mounts on their site.

    I'd rate this a 3 of 10 on difficulty of a DIY. 2 hours included to prep, replace the four mounts, take photos and cleanup.

    -----------------------------------------------------------------------

    Prep

    I lifted the car up on four Jackstands. I raised the bottom of the car high enough for me to get under both the front end and center of the car where the tranny mounts are located.

    Remove the front lower engine cover with a Philips screwdriver.

    Now ready to replace the motor mounts.

    -----------------------------------------------------------------------

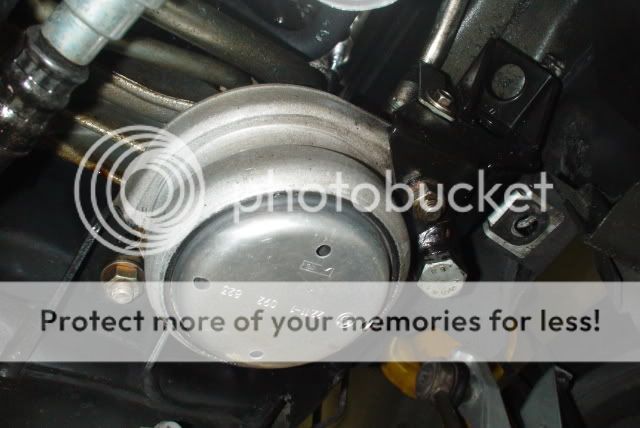
    Replace Motor mounts

    Each motor mount has three attachment points. Two 13mm flange nuts attaching the mount to the chassis mount points on the underside of the mount. There is a 16mm flange nut on the top of the motor mount that secures the motor mount to the engine mount.

    I first loosened the two 13mm nuts on the bottom of each of the two motor mounts.
    Passengers side


    Drivers Side


    Next, I removed the 16mm flange nut on the top of the motor mount. I removed each nut from the top of the engine compartment using a bunch of 3/8" socket extensions and a 3/8" flex joint. I used enough to make a 24" length to reach the nut from the top of the engine compartment.
    Passenger side


    Drivers side


    Once the top nuts were off the motor mount, I raised the motor slowly using my floor jack on the oil pan with a 12"x16"x1/2" piece of plywood to distribute the jack point across a wider area across the oil pan. Make sure the board will clear the front subframe just aft of the oil pan.


    Lift the motor until the passenger motor mount is able to be removed. Lift a bit further and remove the drivers side motor mount.

    Note: I have a Zionsville electric Fan installed on my 540it, so I did not have to worry about the engine cooling fan hitting the fan shroud. For folks with the original fan setup, I would spin off the fan to permit enough movement without no damage to the fan or shroud.

    Here's a shot of the new and old mounts side by side.


    Here's a shot of the drivers side motor mount connection points. For the engine motor mount point, the forward hole is the one used for my M62 motor.


    I cleaned up the flange nuts with brake component cleaner before reassembly. I put blue Locktite on the top threads of the motor mount studs. I positioned the motor mount on the engine brackets and loosely attached the 16mm flange nut to hold each of the two mounts in place.

    To get the drivers side nut started as it is a very tight space, I used a magnetic retrieval tool to position and attach the 16mm flange nut.


    Here's the magnetic retrieval tool used as a nut starting tool on the drivers side 16mm top flange nut. Turn till snug. (I see the gunk on my hoses, leaking power steering hose is a future DIY. ) Repeat on passenger side 16mm nut.


    I slowly lowered the motor until the drivers side lower studs reinserted into the chassis mounts. I did have to position the mount to align the studs during the lowering process. (of course, not while I was actually in the process of lowering the motor.) Once the studs were in place, I added blue Locktite on the two studs and attached the two 13mm flange nuts. Repeat the procedure for the passenger side.

    Once the motor is fully lowered, tighten all the lower nuts to 22nm and the upper 16mm nuts to 47nm.


    Motor mounts are done. On to the Tranny mounts.

    -----------------------------------------------------------------------

    Replace Tranny mounts

    There are two Tranny mounts positioned in an aluminum support brace aft of the tranny output shaft just under the Guibo flex coupling.

    There is a lower and upper stud to each transmission mount. The two Tranny mounts are sandwiched between the end of the transmission case and the aluminum support cross member.


    The procedure here is to remove the 2 13mm flange nuts from the bottom of the two Tranny mounts, remove the six 13mm bolts holding the transmission support cross member, remove the 2 13mm flange nuts from the top of the two Tranny mounts, remove old mounts/reposition the new Tranny mounts and reattach all bolts and nuts.

    There are two different 13mm flange nuts. The difference being the top securing flange nuts have a wider washer attached to it. Note the difference when reinstalling them.

    I first supported the tranny case using a 12"x16"x1/2" piece of plywood on my floor jack to distribute the support pressure from the floor jack.


    On the 540it, the exhaust pipes obstruct two of the three 13mm bolts on each side of the transmission support cross member.


    I used a combination of 3/8", 1/4" ratchets with 13mm sockets and extensions. On one of the bolts, I used a 3/8", 13mm socket with a 3/8" socket cap and a 9/16" combo wrench to turn it.

    I did have to bend the heat shield out of the way to access the retention bolts. At a point, I used an open end, 13mm wrench to finish the removal. Once the support cross member is loosened, the two Tranny mounts should slide out.

    As anticipated, both Tranny mounts were damaged, one was completely detached, so I only had one damaged mount securing the tranny in place.

    BTW, this is where safety glasses came in handy as the detached mount plate fell off once the Transmission support member was loosened and fell right onto my safety goggles. Without the goggles, It would have fell on my left eyeball. It left a scratch on my goggle lens.


    Position the Tranny mounts with the portion with the positioning bump facing up and aft in the u-shaped attachment point. The positioning bump fits into the Transmission Mount Attachment Point on the tranny and keeps the Tranny mount from spinning while you are tightening the upper 13mm flange nut. Tighten the nut to 22nm. I tightened the nut to "real tight" with an open end, 13mm wrench as I could not fit a torque wrench into the tight space.

    Position the transmission cross member and replace the 13mm bolts and retighten the bolts. (passenger side shown)


    Replace the flange nut for each of the lower transmission mount nut and tighten to 22nm.

    Reposition the heat shield that was bent out of the way. Remove the floor jack and any you're done with the Tranny mounts.

    -----------------------------------------------------------------------

    Finish up and observations

    Once I was done with both sets of mounts and after checking for tools in the way, I started the engine to check for any wierd noises or new fluid leaks. No noises or fluid, Motor and Tranny mount installations complete!

    I reattached the lower engine cover and lowered the Tour for a test drive.

    ZZzzzmmmmmm...


    Observations:
    • At 83k miles, I had one completely separated Tranny mount, one separating Tranny mount and a failed Motor mount. Only the passenger Motor mount was intact, but starting to develop cracks in the side of the rubber mount.
    • After installation, I could feel more responsive and solid accelleration on throttle inputs. Before the fix, on initial accelleration, there would be a slight pause. Now, seems like direct, immediate and appreciated application of BMW V8 power.
    • I could feel smoother transition on auto upshifts, less noticable than before.
    • No more downshifting clunk or jerk at low speed auto downshift 3-2 and 2-1. Folks have said the low speed jerk was normal, which I can say is true, if you have broken Tranny mounts. Otherwise, it should be way less pronounced.
    • The ride is erriely smoother... Just started noticing that. Less vibration... Just like a performance luxury car.
    • This would have been a PITA DIY if I did not have a magnetic retreval tool and a bunch of socket extensions to get to the top 16mm flange nut for the motor mounts. The drivers side is just too tight to get a hand in there.
    • For the Tranny mount, I needed a 3/8" socket cap and corresponding 9/16 open end wrench to get to the 13mm flange nut without messing with the exhaust. This prolly saved 30 minutes.
    • The Guibo has small cracks in it, I've added to my 100k DIY list. Shoulda snapped a pic for comparasion later. I'll check it at 90k. Not too difficult to swap out.
    • One realization after reading a post lower in this thread, is that I do not have the original engine cooling fan, fan clutch and fan shroud as I have a Zionsville SPAL electric fan unit installed, so lifting the motor may require removing the fan/fan clutch to not have the fan hit the fan shroud.
    Drivers side motor mount


    Passenger side motor mount - Slight cracking observed and squished as compared to new.


    Drivers side Tranny mount totally separated. Passenger side Tranny mount starting to separate. Both old Tranny mounts were compressed and shorter than new.


    So, at 83k miles, this ended up being a repair, rather than a preventive maintenance. In comparison, before and after the repair, it is now clear that sounds and feel I had on auto shifts were because of the broken and weakened mounts.

    This is one of those DIYs where you can feel the difference when you're done. While the fix was noticable with my Steptronic transmission, I imagine my 540i/6 brothers would really feel the difference with the manual trannies. Don't go halfway and just replace the motor mounts, do em all to get the complete benefit...

    One more off the list. Self leveling rear sport air spring DIY next...

    Cheers!

  15. #65
    Join Date
    Nov 2008
    Location
    Sacramento, CA
    Posts
    1,417
    My Cars
    540it-318ti-318ic-Z3
    Hmmm.. I did the same job on my 94' E36 auto tranny. I believe I would have used a 13mm 3/8" socket and extension to get the bottom nuts off at the bar and probably a 13mm speed wrench for the top nuts if I could not use a socket set.

    I can't imagine a M44 based tranny having harder access. Do you have a pic for the access issues?

    Cheers!

    1999 540it - Schwartz II/Sand Beige, style 5 rims, Conti DWS 235/45 tires, Billy HD/Sports, Stoptech S/S BL, F1 Pinacle 35% tint, Zionsville Cooling kit
    1998 318ti Cali Sport - Schwartz II/Schwartz Anthratz, staggered style 23
    1997 318ti Sport - Schwartz II/Schwartz Anthratz, staggered style 68 ,

    1995 318ti Active - Alpineweib III/Schwartz, squared style 32
    1994 325i - Bostongrau/Tan, Billy Sports, H&R springs
    1991 318ic - Schwarz/Anthratz Stoff, Bilstien HD, Z4 3.0 SS, Magnaflow, S/S Stress bar, x-brace, M20 FW, Elipsoid/HID, K&N

    BMWCCA# 160411

    1995 318ti Sport Schwartz II/Schwartz Anthratz - Sold
    1985 635CSI - Schwartz\Sand - Sold

    1984 533i "Max" - Schwarz/Schwarz, - Sold
    1984 318i - Champagne/Tan, Stock - Sold

  16. #66
    Join Date
    Mar 2012
    Location
    houston
    Posts
    3
    My Cars
    bmw 325i
    [QUOTE=BlackBMWs;16028089]E39 Brothers,


    Here's a shot of the new and old mounts side by side.


    I am acctually looking to order new motor mounts,does it come with that metal around the mount, because i dont see it like that in the picture from the website. I dk how this mount suppose to look like, i just bought a bmw and i dont know nothing about them
    http://www.autohausaz.com/search/pro...&cid=20@Engine Parts, Seals %26 Gaskets&gid=5552@Engine/Motor Mount

    http://www.pelicanparts.com/cgi-bin/...C%20Each%20%20
    Last edited by chicka; 03-08-2012 at 07:35 PM.

  17. #67
    Join Date
    Jul 2011
    Location
    hillsborough n j
    Posts
    5,085
    My Cars
    2001 540i sport 6spd
    the rubber is attached to the metal. if it comes apart that means they are shot. basically what you see in the pic is how they come. just be warned you need about 2 feet of extension on your ratchet because the nut is on the top side and completely inaccessable so you need to work from above the fender. helps to have someone below help to line the socket onto the nut. it was hard as hell. a good trick to get the nut back on is to put a peice of reciept(if you own a bmw im sure you have plenty of fresh reciept paper around lol) put the paper on the nut and press it into the socket. the paper is just thick enough to keep it from falling out of the socket when you face the socket down and lower it thru the engine down to the mount.

    to jack the engine simply put a peice of plywood or 2x6 under the oil pan and jack it up a few inches. just enough to clear the threads on the mount so you can slip it out.
    ~2001 540i/6speed~
    Schmiedman M5 headers, SPEC stage2+ kevlar clutch, JBR 11lb lightweight flywheel, ESS Tuning m60 manifold software tune, 3" SS freeflow OBX catback, afe cold air intake, m60 intake manifold, Cdv delete, powerflex urethane sway bar bushings, M5 rear sway bar ,Autozone replacement driver side blinker light bulb, 545 short shifter zhp weighted, "dsc off" sticker, m5 3.15 lsd differential, m5 chassis rods, akebono ceramic pads, G2 caliper epoxy, ecs braided lines, BC-Racing br-plus series w/swift springs 8/6~
    On the night that I go back in time, you will be shot by terrorists. Please take whatever precautions are necessary to prevent this terrible disaster.

  18. #68
    Join Date
    Feb 2009
    Location
    USA
    Posts
    2,973
    My Cars
    2001 530i (E39) 128k


    Do you place the mount into the 2 holes, and then lower the engine so one of the bracket holes goes through the protruding motor mount bolt?
    What if the bracket is not lining up with the protruding bolt? It seems very dangerous to try to maneuver the motor mount...
    Last edited by OnTheFence; 04-16-2012 at 05:41 PM.

  19. #69
    Join Date
    Feb 2009
    Location
    Bay Area, CA
    Posts
    179
    My Cars
    '03 540i M-sport
    BlackBMWs, thanks for the write-up.

    I just finished installing my motor mounts. Odd enough, my drivers side mount looked identical to the OP's driver mount, with a tear running along the top of the rubber. My passenger side mount was intact, just like the OP's as well.
    I wonder if there's a reason why the driver side would be more prone to failure.

    Did anyone else notice this on theirs?

  20. #70
    Join Date
    Jun 2012
    Location
    Woodstock, GA
    Posts
    566
    My Cars
    2001 BMW 540i6
    Wow when I had my shifter linkage replaced (by the way don't buy the UUC double shear selector rod unless you plan on buying the short throw too because it won't clear the guibo and will cause problems. It says it will work but in reality it does not) I had the transmission mounts done too but there's a vibration especially under a load and I suspect maybe the motor mounts. It has 162k on it and I don't know when the last time they were replaced.

  21. #71
    Join Date
    Nov 2007
    Location
    Justin Texas
    Posts
    2,184
    My Cars
    2003 525it 2003 X5 4.6is

    My 2000 528it story

    The previous owner spent big money on a brand new driveshaft.
    The car had this very noticeable hum and drone at 30 to 34.5 MPH.
    You could hear it clearly. Below or above theat speed the driveshaft was
    quiet. I read a lot from here and thought I might try some new engine
    motor mounts. I bought a set and read up on the install.

    I pulled the old mounts out and the passenger side was in sad shape.
    Drivers side looked fair. Both were hard as stone. The right mount was about
    5mm compressed from the new unit.
    I installed my new mounts and checked the tranny mounts.
    Tranny mounts were soft and recently done.

    Anyway, after about 10 miles on the new mounts, the driveshaft hum
    completely went away.

    Thought I would share that story.
    I will always own a BMW.

  22. #72
    Join Date
    Dec 2010
    Location
    GA
    Posts
    131
    My Cars
    2013 535i M Sport
    Thanks for the great write up on this. My 540 has 95k on it and I think thats going to be my next DIY.

  23. #73
    Join Date
    Dec 2010
    Location
    GA
    Posts
    131
    My Cars
    2013 535i M Sport
    BlackBMWs,

    Thanks for the write up. The motor mounts were pretty easy. The trany mounts gave me trouble and I couldn't finish those up just yet. I couldn't get the 13mm bolt loose that's under the exhaust pipe. I'll have to get one of those socket caps mentioned in the DIY. Thanks again for the help.

  24. #74
    Join Date
    Feb 2010
    Location
    Arizona Republic
    Posts
    125
    My Cars
    e34 m5 s38b36/e39 540ia
    What is the part number for automatic transmission mounts for a 540i 06/00 build?? I cannot find them on realoem and on pelicanparts it doesn't even list them for automatic tranny but only manual.

    Thanks.

  25. #75
    Join Date
    Nov 2012
    Location
    Stillwater, MN, USA
    Posts
    59
    My Cars
    2000 BMW 540i M Sport
    I tried searching but may have overlooked the answer. How many hours does it take for the motor mounts? How long for the transmission mounts? I just want to make sure i get a fair price from my mechanic. thanks!
    Last edited by jmckee601; 09-23-2014 at 12:58 PM.

Page 3 of 5 FirstFirst 12345 LastLast

Bookmarks

Posting Permissions

  • You may not post new threads
  • You may not post replies
  • You may not post attachments
  • You may not edit your posts
  •