
 Check twice, fix once...
E39 Brothers,
Yesterday, I replaced my motor and transmission mounts. I have 83k miles on my 1999 540it. I have the M62TU motor and a Steptronic auto transmission.
I decided to swap all the mounts as I suspected they were weak or failed. The OE motor mounts are fluid filled rubber bushings mounted in a metal cup. The tranny mounts are a simple rubber bushing with attached metal plates and attachment studs.
After reading a number of posts on various boards, the M62 mounts typically fail due to the increased torque of the V8 over the I6 motors. I figured it was a safe bet my M62 mounts and tranny mounts were due.
This is an easy DIY and in retrospect, well worth the effort for me in engine and auto shifting feel.
-----------------------------------------------------------------------
For this DIY, I used the following tools and 3/8" 13mm and 16mm sockets. I also used a 1/4" 13mm socket and 6" extension. 13mm combo and ratchet wrench.
Not pictured are a 3/8" torque wrench, magnetic pick up tool, safety goggles, 4 wheel chocks, 4 jackstands, 1 floor jack, a 12"x16"x1/2" piece of plywood and a floor creeper.
I purchased the Boge OEM motor mounts for $66 each and the two Lemforder OEM transmission mounts for $13 each. Jared@EACtuning have these mounts on their site.
I'd rate this a 3 of 10 on difficulty of a DIY. 2 hours included to prep, replace the four mounts, take photos and cleanup.
-----------------------------------------------------------------------
Prep
I lifted the car up on four Jackstands. I raised the bottom of the car high enough for me to get under both the front end and center of the car where the tranny mounts are located.
Remove the front lower engine cover with a Philips screwdriver.
Now ready to replace the motor mounts.
-----------------------------------------------------------------------
Replace Motor mounts
Each motor mount has three attachment points. Two 13mm flange nuts attaching the mount to the chassis mount points on the underside of the mount. There is a 16mm flange nut on the top of the motor mount that secures the motor mount to the engine mount.
I first loosened the two 13mm nuts on the bottom of each of the two motor mounts.
Passengers side
Drivers Side
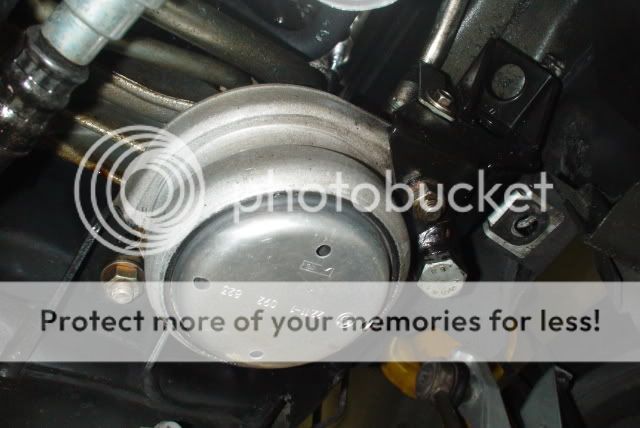
Next, I removed the 16mm flange nut on the top of the motor mount. I removed each nut from the top of the engine compartment using a bunch of 3/8" socket extensions and a 3/8" flex joint. I used enough to make a 24" length to reach the nut from the top of the engine compartment.
Passenger side

Drivers side
Once the top nuts were off the motor mount, I raised the motor slowly using my floor jack on the oil pan with a 12"x16"x1/2" piece of plywood to distribute the jack point across a wider area across the oil pan. Make sure the board will clear the front subframe just aft of the oil pan.
Lift the motor until the passenger motor mount is able to be removed. Lift a bit further and remove the drivers side motor mount.
Note: I have a Zionsville electric Fan installed on my 540it, so I did not have to worry about the engine cooling fan hitting the fan shroud. For folks with the original fan setup, I would spin off the fan to permit enough movement without no damage to the fan or shroud.
Here's a shot of the new and old mounts side by side.
Here's a shot of the drivers side motor mount connection points. For the engine motor mount point, the forward hole is the one used for my M62 motor.
I cleaned up the flange nuts with brake component cleaner before reassembly. I put blue Locktite on the top threads of the motor mount studs. I positioned the motor mount on the engine brackets and loosely attached the 16mm flange nut to hold each of the two mounts in place.
To get the drivers side nut started as it is a very tight space, I used a magnetic retrieval tool to position and attach the 16mm flange nut.
Here's the magnetic retrieval tool used as a nut starting tool on the drivers side 16mm top flange nut. Turn till snug. (I see the gunk on my hoses, leaking power steering hose is a future DIY.) Repeat on passenger side 16mm nut.
I slowly lowered the motor until the drivers side lower studs reinserted into the chassis mounts. I did have to position the mount to align the studs during the lowering process. (of course, not while I was actually in the process of lowering the motor.) Once the studs were in place, I added blue Locktite on the two studs and attached the two 13mm flange nuts. Repeat the procedure for the passenger side.
Once the motor is fully lowered, tighten all the lower nuts to 22nm and the upper 16mm nuts to 47nm.
Motor mounts are done. On to the Tranny mounts.
-----------------------------------------------------------------------
Replace Tranny mounts
There are two Tranny mounts positioned in an aluminum support brace aft of the tranny output shaft just under the Guibo flex coupling.
There is a lower and upper stud to each transmission mount. The two Tranny mounts are sandwiched between the end of the transmission case and the aluminum support cross member.
The procedure here is to remove the 2 13mm flange nuts from the bottom of the two Tranny mounts, remove the six 13mm bolts holding the transmission support cross member, remove the 2 13mm flange nuts from the top of the two Tranny mounts, remove old mounts/reposition the new Tranny mounts and reattach all bolts and nuts.
There are two different 13mm flange nuts. The difference being the top securing flange nuts have a wider washer attached to it. Note the difference when reinstalling them.
I first supported the tranny case using a 12"x16"x1/2" piece of plywood on my floor jack to distribute the support pressure from the floor jack.
On the 540it, the exhaust pipes obstruct two of the three 13mm bolts on each side of the transmission support cross member.
I used a combination of 3/8", 1/4" ratchets with 13mm sockets and extensions. On one of the bolts, I used a 3/8", 13mm socket with a 3/8" socket cap and a 9/16" combo wrench to turn it.
I did have to bend the heat shield out of the way to access the retention bolts. At a point, I used an open end, 13mm wrench to finish the removal. Once the support cross member is loosened, the two Tranny mounts should slide out.
As anticipated, both Tranny mounts were damaged, one was completely detached, so I only had one damaged mount securing the tranny in place.
BTW, this is where safety glasses came in handy as the detached mount plate fell off once the Transmission support member was loosened and fell right onto my safety goggles. Without the goggles, It would have fell on my left eyeball. It left a scratch on my goggle lens.
Position the Tranny mounts with the portion with the positioning bump facing up and aft in the u-shaped attachment point. The positioning bump fits into the Transmission Mount Attachment Point on the tranny and keeps the Tranny mount from spinning while you are tightening the upper 13mm flange nut. Tighten the nut to 22nm. I tightened the nut to "real tight" with an open end, 13mm wrench as I could not fit a torque wrench into the tight space.
Position the transmission cross member and replace the 13mm bolts and retighten the bolts. (passenger side shown)
Replace the flange nut for each of the lower transmission mount nut and tighten to 22nm.
Reposition the heat shield that was bent out of the way. Remove the floor jack and any you're done with the Tranny mounts.
-----------------------------------------------------------------------
Finish up and observations
Once I was done with both sets of mounts and after checking for tools in the way, I started the engine to check for any wierd noises or new fluid leaks. No noises or fluid, Motor and Tranny mount installations complete!
I reattached the lower engine cover and lowered the Tour for a test drive.
ZZzzzmmmmmm...
Observations:
Drivers side motor mount
- At 83k miles, I had one completely separated Tranny mount, one separating Tranny mount and a failed Motor mount. Only the passenger Motor mount was intact, but starting to develop cracks in the side of the rubber mount.
- After installation, I could feel more responsive and solid accelleration on throttle inputs. Before the fix, on initial accelleration, there would be a slight pause. Now, seems like direct, immediate and appreciated application of BMW V8 power.
- I could feel smoother transition on auto upshifts, less noticable than before.
- No more downshifting clunk or jerk at low speed auto downshift 3-2 and 2-1. Folks have said the low speed jerk was normal, which I can say is true, if you have broken Tranny mounts. Otherwise, it should be way less pronounced.
- The ride is erriely smoother... Just started noticing that. Less vibration... Just like a performance luxury car.
- This would have been a PITA DIY if I did not have a magnetic retreval tool and a bunch of socket extensions to get to the top 16mm flange nut for the motor mounts. The drivers side is just too tight to get a hand in there.
- For the Tranny mount, I needed a 3/8" socket cap and corresponding 9/16 open end wrench to get to the 13mm flange nut without messing with the exhaust. This prolly saved 30 minutes.
- The Guibo has small cracks in it, I've added to my 100k DIY list.
- One realization after reading a post lower in this thread, is that I do not have the original engine cooling fan, fan clutch and fan shroud as I have a Zionsville SPAL electric fan unit installed, so lifting the motor may require removing the fan/fan clutch to not have the fan hit the fan shroud.
Passenger side motor mount - Slight cracking observed and squished as compared to new.
Drivers side Tranny mount totally separated. Passenger side Tranny mount starting to separate. Both old Tranny mounts were compressed and shorter than new.
So, at 83k miles, this ended up being a repair, rather than a preventive maintenance. In comparison, before and after the repair, it is now clear that sounds and feel I had on auto shifts were because of the broken and weakened mounts.
This is one of those DIYs where you can feel the difference when you're done. While the fix was noticable with my Steptronic transmission, I imagine my 540i/6 brothers would really feel the difference with the manual trannies. Don't go halfway and just replace the motor mounts, do em all to get the complete benefit...
One more off the list. Self leveling rear sport air spring DIY next...
Cheers!
Last edited by BlackBMWs; 05-18-2009 at 11:23 AM.
1999 540it - Schwartz II/Sand Beige, style 5 rims, Conti DWS 235/45 tires, Billy HD/Sports, Stoptech S/S BL, F1 Pinacle 35% tint, Zionsville Cooling kit
1998 318ti Cali Sport - Schwartz II/Schwartz Anthratz, staggered style 23
1997 318ti Sport - Schwartz II/Schwartz Anthratz, staggered style 68 ,
1995 318ti Active - Alpineweib III/Schwartz, squared style 32
1994 325i - Bostongrau/Tan, Billy Sports, H&R springs
1991 318ic - Schwarz/Anthratz Stoff, Bilstien HD, Z4 3.0 SS, Magnaflow, S/S Stress bar, x-brace, M20 FW, Elipsoid/HID, K&N
BMWCCA# 160411
1995 318ti Sport Schwartz II/Schwartz Anthratz - Sold
1985 635CSI - Schwartz\Sand - Sold
1984 533i "Max" - Schwarz/Schwarz, - Sold
1984 318i - Champagne/Tan, Stock - Sold
Member
Great write-up. Thanks for sharing.
Member
thanks for the DIY .. sticky req
Who really can face the future? All you can do is project from the past, even when the past shows that such projections are often wrong. And who really can forget the past? What else is there to know?
― Robert M. Pirsig, Zen and the Art of Motorcycle Maintenance
Member
Bravo! The proof is in the pudding as all can clearly see how shot the one mount is. I changed mine at 60K and will do so again at 120K miles. While some debate using aftermarket, urethane mounts, they should simply purchase the OEM versions and have them installed asap.
Great stuff and the underside of that automobile is fantastic.
"I'd smash that (Jennifer Connelly) like a failed coup in sub-Saharan Africa."
~Macktheknife in my epic Jennifer Connelly OT Thread
Member
Originally Posted by RJLupin


Member
Awesome, I'm going to hit up Jared and do this asap.
E46 M3 | Steel Gray/Imola Red | 19" BBS RS-GT
E39 540i | Jet Black/Black | 17" Style 42
Member
+1!
I am sooo doing this!
Thanks MUCHO!
I just need the new motor mounts!
Looking for an E39 belly pan , passenger front inner fender liner
Member
The tranny mounts are a "free-bee" when you are replacing a clutch. This is a nice write up - I hope it goes in the DIY section.
ATB
Larry
Impossible is Interesting
thanks!
Member
Great job Rich!!!!
Gotta do my tranny mounts some time too. Too much to do.....
"If everything seems under control, you're not going fast enough. - Mario Andretti"
Member
Jared, don't do them, save your time and money. You don't need new tranny mounts. Just Plasti-Dip the ones in the car, they'll look and act like new.
"I'd smash that (Jennifer Connelly) like a failed coup in sub-Saharan Africa."
~Macktheknife in my epic Jennifer Connelly OT Thread
Member
Maybe its funny. You definitely need to work on your sense of self worth if you let other people get so deep under your skin.
Last edited by taylorwilsdon; 04-12-2009 at 10:58 PM.
E46 M3 | Steel Gray/Imola Red | 19" BBS RS-GT
E39 540i | Jet Black/Black | 17" Style 42
Member
Jared, gotta let me know when you changing these .. i'll be up/down there with my camera
Who really can face the future? All you can do is project from the past, even when the past shows that such projections are often wrong. And who really can forget the past? What else is there to know?
― Robert M. Pirsig, Zen and the Art of Motorcycle Maintenance
Member
Here's your new mounts. I thought you were a kid, turns out I was right, lol..."Good meeting you guys. We didn't really do introductions but I was the kid in the blue crewneck and black shorts (and Louis Vuitton) with the 540i." Taylor you're not under anyone's skin. You're merely a mosquito on skin.
See here Potsie:
http://forums.bimmerforums.com/forum...9#post15990609
http://forums.bimmerforums.com/forum...9#post16022149
Last edited by bimmerfiver; 04-13-2009 at 12:57 AM.
"I'd smash that (Jennifer Connelly) like a failed coup in sub-Saharan Africa."
~Macktheknife in my epic Jennifer Connelly OT Thread
Member
I am using General tires for tranny and motor mounts!
Love it!
Then, I am coming over and stealing your new wheels and tires!
Don't worry, I will leave Zenyatta Mondatta in the CD player....
LOL!
[ame]http://www.amazon.com/Zenyatta-Mondatta-Digipak-Police/dp/B00008BRDV[/ame]
Last edited by Jason5driver; 04-12-2009 at 11:01 PM.
Looking for an E39 belly pan , passenger front inner fender liner
Member
Great write-up man!
I had my indie tech change out my tranny mounts when he changed out my torque converter seal and rear main seal. All I need to do now is my motor mounts.
Did you notice the engine idle more quietly or without vibration after changing out the motor mounts?
Current:
2016 BMW 535i xDrive
2017 Volvo XC60
2000 BMW 540i
Past:
2012 Audi A4 S-Line
2011 BMW X5 50i
2010 Mercedes ML350
2002 Lexus IS300
1998 Audi A6 Quattro
1988 Honda Prelude
Member
Thanks for the write up, I definitely need to do my tranny mounts.
Member
rich,
great write up. i know that this is the next upgrade that i will do after we complete the radiator. thanks for your expertise.
Check twice, fix once...
Hey Jared! Hope all is going well with the new shop! I suspect you may get a few orders for both type of mounts from the 540i Brethren. Do you get many orders from the I6 dudes as well for these mounts?
Hi Al! No, I did not notice any change in idle as the motor ran pretty smooth to start with. I do feel the drivetrain seems more responsive. Especially when accelerating from a dead stop.
Auto shifting is way smoother both on upshifts and downshifts. Less noticable. No clunk on auto downshifts from 3-2 or 2-1. It would definately jerk sometimes when rolling to a stop at a stop light or sign.
There does seem to be less vibration when underway. Almost errie. Feels like a luxury car...
Last edited by BlackBMWs; 04-13-2009 at 02:21 AM.
1999 540it - Schwartz II/Sand Beige, style 5 rims, Conti DWS 235/45 tires, Billy HD/Sports, Stoptech S/S BL, F1 Pinacle 35% tint, Zionsville Cooling kit
1998 318ti Cali Sport - Schwartz II/Schwartz Anthratz, staggered style 23
1997 318ti Sport - Schwartz II/Schwartz Anthratz, staggered style 68 ,
1995 318ti Active - Alpineweib III/Schwartz, squared style 32
1994 325i - Bostongrau/Tan, Billy Sports, H&R springs
1991 318ic - Schwarz/Anthratz Stoff, Bilstien HD, Z4 3.0 SS, Magnaflow, S/S Stress bar, x-brace, M20 FW, Elipsoid/HID, K&N
BMWCCA# 160411
1995 318ti Sport Schwartz II/Schwartz Anthratz - Sold
1985 635CSI - Schwartz\Sand - Sold
1984 533i "Max" - Schwarz/Schwarz, - Sold
1984 318i - Champagne/Tan, Stock - Sold
The camera man
Thanks for the detailed writeup. I'm afraid to look at mine but they have to be done.
Got pics? Here are 500+ of the last meet in NJ --> http://forums.bimmerforums.com/forum....php?t=1233956
2000 540i Titanium Silver on Black leather
Mods: Zionsville Radiator, electric fan, Magnaflow muffler, resonators deleted, UUC clutch with medium weight flywheel
You bought a BMW, it requires a level of taste that is above the gleaming masses that are drawn to a car with 22" logos on the side. Keep it refined.
Check twice, fix once...
Thanks Chris!, BTW, not upgrade... fix. I bet yours are shot. Bring up all four mounts... We'll do them after we finish up the Zionsville... Between us, all four should take an hour or so... The difference is like when we did the Subframe bushings...
Last edited by BlackBMWs; 04-13-2009 at 02:05 AM.
1999 540it - Schwartz II/Sand Beige, style 5 rims, Conti DWS 235/45 tires, Billy HD/Sports, Stoptech S/S BL, F1 Pinacle 35% tint, Zionsville Cooling kit
1998 318ti Cali Sport - Schwartz II/Schwartz Anthratz, staggered style 23
1997 318ti Sport - Schwartz II/Schwartz Anthratz, staggered style 68 ,
1995 318ti Active - Alpineweib III/Schwartz, squared style 32
1994 325i - Bostongrau/Tan, Billy Sports, H&R springs
1991 318ic - Schwarz/Anthratz Stoff, Bilstien HD, Z4 3.0 SS, Magnaflow, S/S Stress bar, x-brace, M20 FW, Elipsoid/HID, K&N
BMWCCA# 160411
1995 318ti Sport Schwartz II/Schwartz Anthratz - Sold
1985 635CSI - Schwartz\Sand - Sold
1984 533i "Max" - Schwarz/Schwarz, - Sold
1984 318i - Champagne/Tan, Stock - Sold
Member
Exhaust mounts are next! Take a gander under there and see which mounts to tackle. You'll have a smoother car @ idle too!
"I'd smash that (Jennifer Connelly) like a failed coup in sub-Saharan Africa."
~Macktheknife in my epic Jennifer Connelly OT Thread
Check twice, fix once...
Thanks! I'll take a closer look at them. I inspected them when I cleaned the rear underbody and they looked solid. I'll check to see if they've hardened up.
Next DIY for the 540it will be sport Air Springs for my non-sport self leveling suspension. However the next actual DIY will be a set of control arms for the front suspension of my 533i.
Thanks everyone for your kind words. I hope this DIY helps you all out. Regards,
Last edited by BlackBMWs; 04-13-2009 at 02:01 AM.
1999 540it - Schwartz II/Sand Beige, style 5 rims, Conti DWS 235/45 tires, Billy HD/Sports, Stoptech S/S BL, F1 Pinacle 35% tint, Zionsville Cooling kit
1998 318ti Cali Sport - Schwartz II/Schwartz Anthratz, staggered style 23
1997 318ti Sport - Schwartz II/Schwartz Anthratz, staggered style 68 ,
1995 318ti Active - Alpineweib III/Schwartz, squared style 32
1994 325i - Bostongrau/Tan, Billy Sports, H&R springs
1991 318ic - Schwarz/Anthratz Stoff, Bilstien HD, Z4 3.0 SS, Magnaflow, S/S Stress bar, x-brace, M20 FW, Elipsoid/HID, K&N
BMWCCA# 160411
1995 318ti Sport Schwartz II/Schwartz Anthratz - Sold
1985 635CSI - Schwartz\Sand - Sold
1984 533i "Max" - Schwarz/Schwarz, - Sold
1984 318i - Champagne/Tan, Stock - Sold
Member
I have a 6-cylinder engine.
Does anyone know:
1. A good DIY link like this one (good job BlackBMWs)?
2. At 100K, anyone with experience with 6-cylinder engine mounts?
Member
Excellent write-up, will be doing this soon as well.
 Posting Permissions


 Reply With Quote


Bookmarks