
 Handling nerd
I'm enjoying your build alot. Thanks.
'95 E36 318tdS:
Bilstein Sport shocks; x-brace; H&R front sway bar; camber shims; M3 offset LCABs; Meyle HD LCAs; Z3 RSM reinforcement plates; ZHP shift knob.
Member
October 2009, First Week
I just came back from Oktoberfest at Road Atlanta. Had a great time. I wish I had the car ready for it, but it was impossible. I went mainly to support my pal Bill Heumann on his bid to clinch the BMWCCA IP Championship.
We took most of the parts I bought with us, as spares, just in case. Radiator, suspension and even my engine. I went ahead and ordered Sunbelt cams to be delivered at the track, to have them ready in case Bill needed it. And while there, Randy Mueller was going to put the cams on while I learned from his expertise. Sounded like a good plan. Unfortunately, the cams were in back order.
But we took the engine still. Worse case scenario, cams from Bill's engine could've been re-used on my motor.
By the end of the weekend, Bill had no need for it. But since it was already there, I asked Randy to take it with him to Miami and to build it for me. Bill's engine (build by Randy) has been extremely powerful and reliable. And his on track support has been mind blowing. So for me, it was an easy decision. Now the engine is sitting at Randy's shop. Waiting for the cams to become available.
October 09, Second Week
Due to some misfortunes, Bill could not clinch the title. So he has to go run at Mid-Ohio. Therefore, he still needs the lift to do regular work on his car. In the meantime, I keep working on what I can, while my car still sits on the trailer.
Fortunately, brake lines have arrived by now. But they are not molded. I will need to bend them to their needed shape. Getting ready for it, I go to Napa, and buy a tube-bending tool and extra brake lines to "practice" first. I know there isn't much room for error. Once bent, it is almost impossible to straighten the tube back to its original shape.
I was right. It takes me quite a few lines to learn to do it right. And a lot of patience too. It is so time consuming! I'm so grateful they are not that expensive, though.
But once bent, putting them on gives me great satisfaction. Ahh! Not bad for a newbie.

Last edited by Naka; 12-04-2009 at 07:14 AM.
Member
Simply awesome! Looking forward to following this thread to your first race.
Member
It was Winterfest at Sebring. But since they terminated a partner at work, we are stuck with his shifts. So vacations are out of the question. And less time to work on the car too.Originally Posted by RacerX

I don't know. But big maybe. Car is being built to comply to BMWCCA IP rules. So BMWCCACR will be the priority on the schedule. But that doesn't mean I won't be willing to join the NASA crowd when time and budget allows.
Last edited by Naka; 12-05-2009 at 09:34 AM. Reason: Automerged Doublepost
Member
October 2009, Third Week
Time to finish the fuel Tank.
I originally had the Turner Motorsport "Fuel Pump Upgrade".
I installed it in 2004 as soon as I started tracking the car. But even with it, I would get fuel starvation by the third session (a little less than 1/2 a tank). So I know for a fact that this setup is going to be insufficient.
The solution, I am hoping, is to install a secondary pump. The first order of the day, is to remove the "old" secondary sending unit from the driver's side.
And replace it with an active pump (not just a sender) identical to the one on the passenger side.
And finally, the tubing has to be re-arranged using adaptors and hoses of different lengths and diameters.
Bimmerworld sent me this kit, everything included. I believe it is their Stage II upgrade. I don't think their Stage III with a modified fuel tank is legal in Prepared class, or is it?
The kit also included the necessary connector and wiring to power this secondary pump. The connector has to be tapped into the existing wiring for the original pump on the passenger side. Not hard. But extra time for me since I had my wiring harness already wrapped and ready to go.
Next, I go to my basement, and start looking at all the parts I have there. I didn't know that Diffs On Line shipped their differentials without a cover. Apparently it is done for ease of shippment, as the cover can easily break during transport. Or so I am told. Usually, the cover is sent in a different package (which I never got). So I am surprised to find an "opened" differential when I open the box (that has been sitting in my basement for more than 9 months, unmolested).
I start to wonder what happened to the cover I sent with my original core. But thanks to the guys at BW, the problem with Diffs On Line will be quickly rectified and they tell me to expect the cover and bolts on the mail anyday. I ask them if it comes with a new gasket, and they tell me that the stock gasket is not needed, and instead, I should use an RTV sealant.
October 2009, Fourth Week
I clean all the rust out of my stock rear calipers (what a pain), paint them, rebuild them, and install solid caliper bushings.
November 2009, First Week
Finally!! Bill is done with his car and takes it to Mid-Ohio to become the 2010 IP Class Champion!!
Congratulations Bill!! Glad you did it now, because once I'm done with my car, you may not get a second chance!!(Obvious wishful thinking from my part).
Thanks to Bill, Beth and Dave Arnold, who come to my house during their lunch breaks, we finally get the car on the lift . It's not that hard this time. We only have to do the reverse of what we did when loading it up.
Now that the car is on the lift I can start working UNDER it.
The first thing I do is remove the rear subframe, and drop it at a local shop, to take off the stubborn stock bushings and press in new solid aluminum ones. Along with it, I take the differential cover that has already arrived to have the same job done.
Then I come back to finish the brake piping, installing the rear brake lines.
And follow with the fuel lines (now simplified to only two lines) and filter.
I initially don't know whether I need to put the fuel filter cover back on or not. I wonder if this weight saving is worth considering. But since it is quite light and at the bottom of the car, I decide to put it back on.
Upon close examination, I'm glad I did so. I realize that there is a good reason for that cover to be there. Especially if off-road excursions or bottoming down on ramps or kerbs are a strong possibility.
Then, I install the fuse box back in place, along with all associated wires
I decide not to secure the wires under the dash yet, as more wires for accesories will need to be installed too (differential cooler, electric fan, safety main switch, etc).
November 2009, Second Week
Thanks a lot to Bruce Domeck from Unique Automotive here in Louisville, for his rapid turn around time. He has my rear subframe and differential cover ready in no time.
So the rear subframe with solid bushings goes back on today.
I then install the differential cover using an RTV sealant, per Bimmerworld instructions. Initially, I didn't know what RTV sealant to use, but per Randy Mueller's advice (many thanks to him), I used the very famous Black Toyota FIPG Sealant (Form-In-Place-Gasket).
Now the differential is ready to go when needed.
.
Member
November 2009, Third Week
Bill comes home to help me install the fuel tank. It is not that heavy, but an extra pair of hands are always welcome.
Now that the tank is in place, I install the fill up and ventilation tubings.
For the vent pipe, I use 6 feet of tubing, coiled in the space where the expantion tank used to sit. Then, I plug it at the end with an Autozone fuel filter to keep bugs from nesting inside of it when stored, but still allowing air to flow through it without obstruction. I also make sure that it is pointing in the same direction as the stock drain from the fill-up hose boot, in case it decides to regurgitate fuel.
Later in the week, Bill and his sweet wife Lynn come to my house to help me in the project. She gets to torque all the nuts and bolts we install. Now she can brag she helped build this car too. If it ever wins anything....
We start with the steering rack, followed by the control arms and motor mounts.
Then the spindles...
and the shocks (JRZ) and camber plates (Ground Control).
Lots of progress for a day. Big thanks to Bill and Lynn.
The following day I continue with the brake backing plates...
the front wheel bearings...
and the studs...
Then I install the ABS sensors...
and route all the wires safely and out of harm's way.
I originally planned to use Performance Friction calipers all around. But Bill doesn't seem too happy with that same set up on his car (unlike other racers that are extremely happy with theirs). So I'm still undecided on that. Bill offered me his old front Stoptechs, so I decide to go Stoptechs is the front and stock in the rear. That'll save me quite a few pennies.
I know I will need new rotors before my first race, but I figured the old ones would be good enough for a shake-down track day, whenever ready. Yes, I plan to take it to a relaxed Test'n Tune day before my first race. I need to make sure it starts or doesn't fall apart, first.
So i start with the rotors...
and then the calipers. I would've prefered black, but can't complain. The Champ offered me a deal I couldn't refuse.

Member
November 2009, Fourth Week
Now it is time to tackle the rear axle.
First, the upper control arms...
then the trailing arms. Earlier in the day, I had taken the trailing arms to Evolution Autosports to get the old bearings pushed out, and new bearings and hubs pushed in. So with the hard part out of the way, the install becomes a piece of cake (I know, I cheated).
Next, the JRZ shocks and Eibach springs ...
and the studs.
During removal (many, many moons ago), I damaged one of the half shafts, so I had to get a new one. I didn't know these suckers were so expensive ($400+)! Ouch!
I'm so glad I can reuse my "old" TCKline aluminum lower control arms.
I can't forget to install the ABS sensors...
and to route the wires very carefully, too.
Unlike the front of the car, I install new rotors this time
After a well deserved rest, I get up more cheerful this morning. Bill comes to my house, again during his lunch break, and helps me install the rear differential. What a good fellow! If he only knew the nightmares he is going to have once we start racing each other, he wouldn't be so helpful!
We then go have lunch and later I come back and finish installing the brake calipers...
and the stainless steel brake lines
I won't have much time now. My schedule looks very busy, so my progress will have to slow down again. But at least, the project is starting to look more and more like a car.

Member
Nice job on the progress. It all looks very clean and just awesome.
Member
>>>>> Well..... I kind of feel sorry for you. I am already having nightmares of you stopped in front of me like you were in the karts the other day! :-)
After a well deserved rest, I get up more cheerful this morning. Bill comes to my house, again during his lunch break, and helps me install the rear differential. What a good fellow! If he only knew the nightmares he is going to have once we start racing each other, he wouldn't be so helpful!
Member
Ay-ay-ay!!
My ribs are still sore from that encounter!
.
Member
Gary,
Looking good. You've got the whole crew helping you with the build. I noticed one thing I'm not sure if you went back and took care of. You installed the new front wheel bearings/hubs and studs, but in the picture you had not staked the big nut on the Front spindle. Just wanted to make sure you remembered to do that.
-Scott B.
Last edited by scottbm3; 12-14-2009 at 10:26 AM.
Member
I noticed that too, but I'm betting he's waiting to do the final torque on the nut with the car on the ground.
-tammer
Member
Yes, thank you for keeping me honest. But Tammer was spot on. I haven't done it yet because the Big Nut hasn't been torqued, as I want to put some weight on the axle before I apply that much force to it. As soon as I'm able to put the car on the ground, I will take care of that. Promise!
Last edited by Naka; 12-14-2009 at 11:10 AM.
Member
Thats when my 4ft. long 600 Ft. lbs. torque wrench comes in handy. Makes torquing to 215-220 ft. lbs. seem like nothing, especially after torquing the center lock wheel nuts on the Porsche cup car to 350....
-Scott B.
Member
Just what I needed, sitting here for an hour reading this incredible build thread. Can't wait to see it finished. Well done!
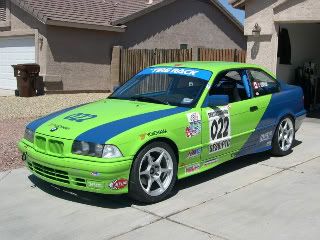
1993 325is - #022 2.8l project in the works.
Member
i crave updates!
BMWCCA #360235
Handling nerd
+1 Please
'95 E36 318tdS:
Bilstein Sport shocks; x-brace; H&R front sway bar; camber shims; M3 offset LCABs; Meyle HD LCAs; Z3 RSM reinforcement plates; ZHP shift knob.
Member
You have done a lot of great work since I last looked here!!
Love the attention to detail - great tube bending.

Always FUN TO DRIVE - Build Thread & Tech info - 79 320/6 track car build thread -- Videos of track car -Adam in car Auto-x video - Start-up video - 4/2011 Adam's TOP BMW time San Diego BMWCCA - 4-5-15 Dyno break-in run new M20B25 - Exhaust Thread - Link
HandPlant Sensei
More updates! NOW NOW NOW!
2001 540i 6-Speed / 1989 325i M20 / 1994 Suburban 2500
"You gotta fix the nut behind the wheel before you fix the bolts on the car"
LoveClub Member #23
Member
+1
Updates Please!!!!!!!!!!!!!!!!!!!!
racecar
Just read the whole thread, every single post ... I am pretty speechless: amazing house and cars and most of all a very amazing build. I can only hope that I can do that one day.
btw, You're local too ... I think I might have seen your e46 m3 (or at least one like it) around town a couple times.
Member
This thread deserves a bump. OP you need to update PLEASE!
i just wanna go fast
seriously, this needs an update! this is the most entertaining build thread on the forum!
VEERRRYYYYY NICE cage too btw
-Mike-
BUY MY FORGELINE WHEELS!
Member
PLUS 1 - Long time no pictures of this car most be on the track by now? right?
Last edited by OLD MAN; 12-28-2011 at 08:16 PM.
Always FUN TO DRIVE - Build Thread & Tech info - 79 320/6 track car build thread -- Videos of track car -Adam in car Auto-x video - Start-up video - 4/2011 Adam's TOP BMW time San Diego BMWCCA - 4-5-15 Dyno break-in run new M20B25 - Exhaust Thread - Link
Build it!
Wow I had forgot about this one.
Updates?
 Posting Permissions


 Reply With Quote


Bookmarks