

 Member
S54 Oil Pan & Oil Pump Upgrade for the S52 Motor.
I’ve been plagued with oil starvation issues ever since I started tracking my car. The factory S52 oil pan is more than adequate for a street car. However, the single pick up point design of the S52 oil pan doesn’t lend itself to perform well under high g-load cornering. I ran a common aftermarket oil pan baffle and an extra quart of oil for track days and races, and it helped address some oil starvation issues but my data acquisition confirmed I was still seeing significant intermittent loss of oil pressure under race conditions. I decided the S54 oil pan and pump was a worthy upgrade to address the issues.
The S54 oil pan and pump have similar profiles as the oil pan and pumps found on Euro E36 M3s and Lightweight E36 M3s. The pan and pump is a “bolt on” upgrade. However, there are some noteworthy differences. I’ll try to cover the issues based on my experiences with the upgrade.
The parts list:
(1) S54 Oil Pan - Part # 11-13-7-838-130
(1) S54 Oil Pump – Part # 11-41-1-405-123
(1) S52 Oil Pump Sprocket – Part # 11-41-1-719-935
(1) Oil Pump Nut – Part # 07-11-9-905-857
(1) Oil Pan Gasket – Part # 11-13-1-437-237
(1) S54 Dipstick Tube – Part # 11-43-7-832-140
(1) S54 Dipstick – Part # 11-43-7-831-140
(1) Dipstick Flat Washer – Part # 11-43-7-838-127
(1) Dipstick O-Ring – Part # 11-43-1-707-164
(1) Dipstick Bracket – Part # 11-43-7-500-374
(1) Dipstick Bracket Hex Nut – Part # 07-11-9-905-534
(1) Bracket Oil Pipe – Part # 11-41-1-405-847
(1) Bracket Oil Pipe – Part # 11-41-1-404-645
(1) Return Pipe – Part # 11-41-7-834-889
(1) Suction Pipe – Part # 11-41-7-834-887
(1) O-Ring – Part # 11-41-1-401-769
(2) Fillister Head Bolt – Part # 07-12-9-903-041
(1) Cover – Part # 11-13-7-834-885
(1) Gasket – Part # 11-13-7-834-886
(8) Hex Bolt w/ Washer – Part # 07-11-9-904-524
(1) E36 Cover Lid (replaces Oil Level Sensor) – Part # 11-13-1-726-357
(1) Gasket Ring – Part # 12-61-1-277-129
(3) M6x25 Hex Bolt – Part # 01-11-9-905-400
(1) Male 12x1.5mm to 8AN Male Fitting
(1) ½” Barbed Hose End – 8AN Female Straight Fitting
(3ft) ½” Oil Resistant Hose
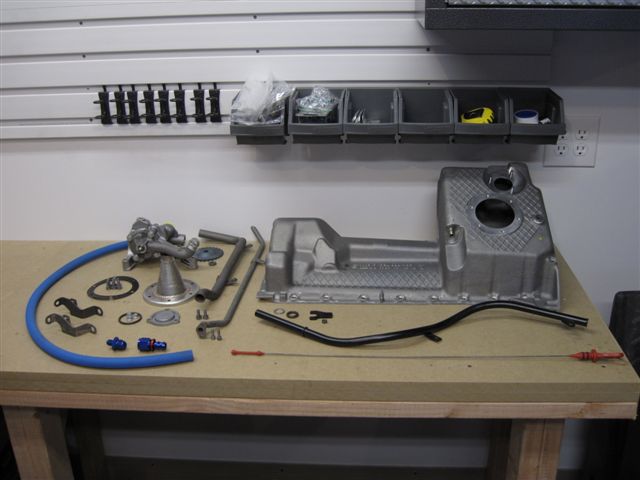
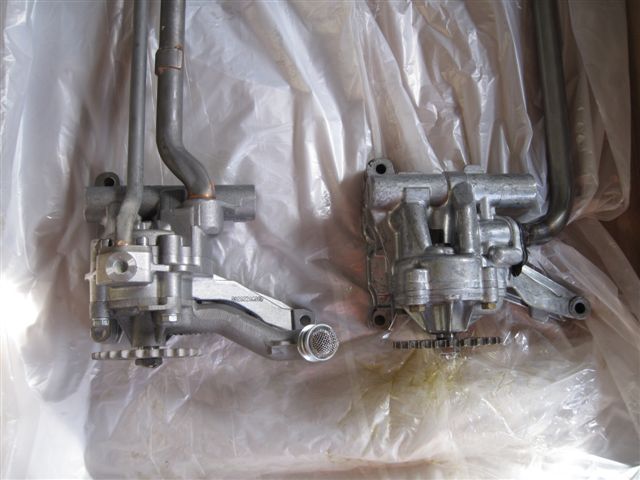
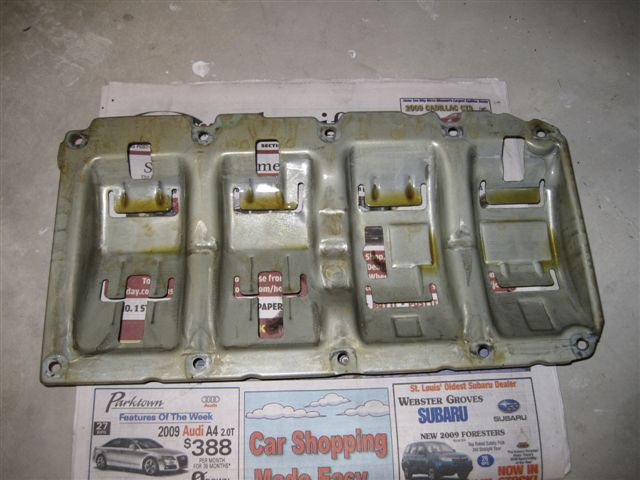
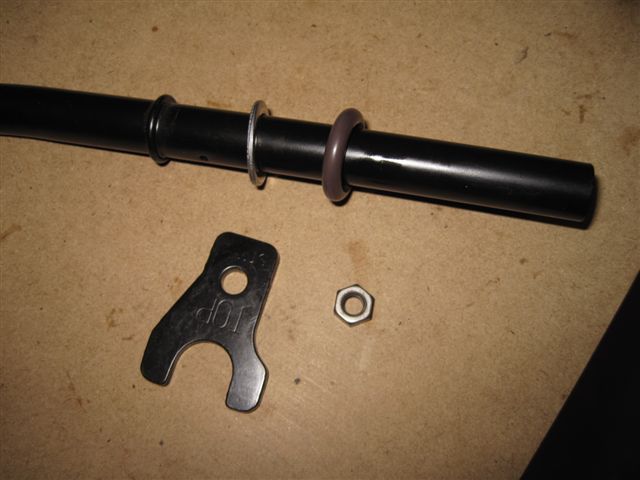
Here are some pics of all the parts:
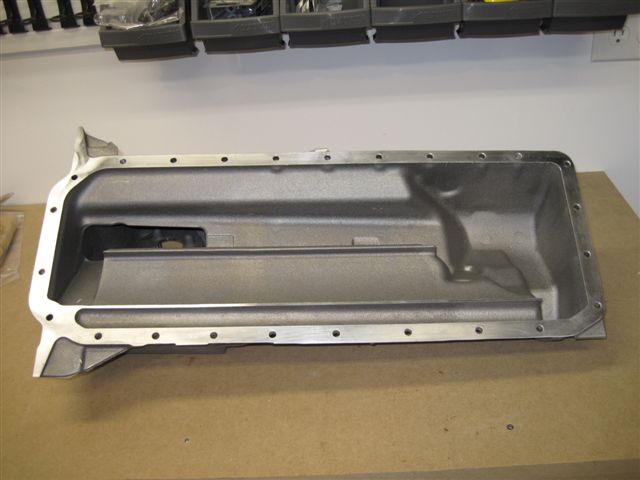
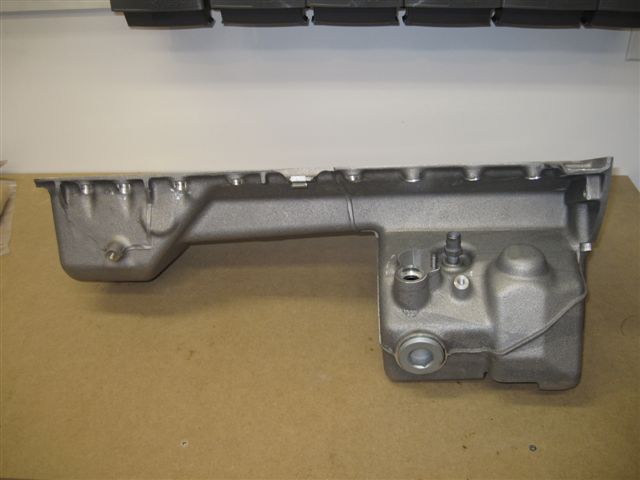
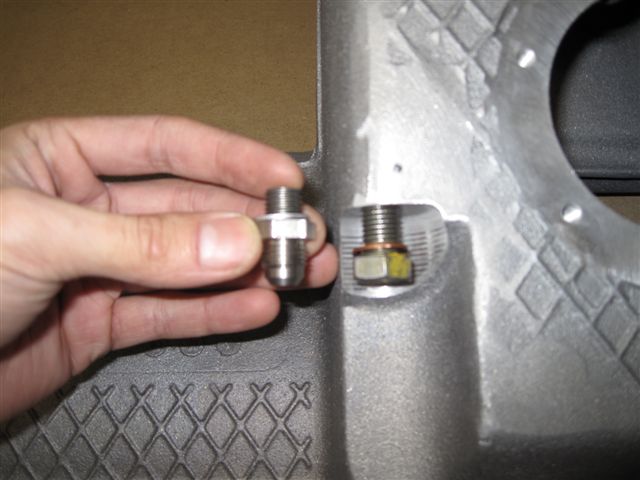
There are a few modifications needed on the S54 pan to make it function on the S52. The pan comes from the factory with an AN-fitting at the bottom of the pan. I replaced it with a standard 17mm oil drain plug.
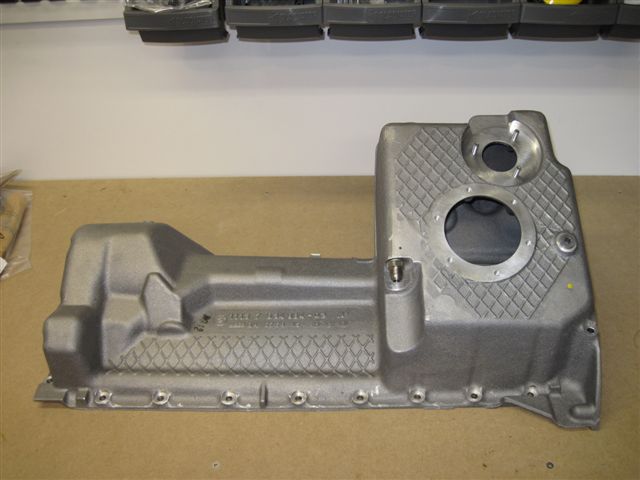
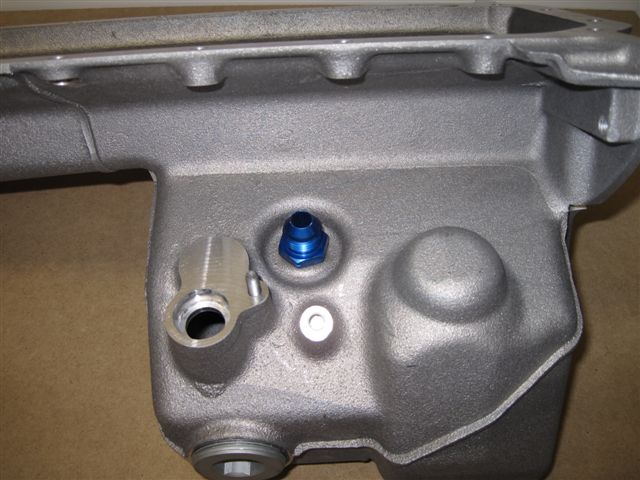
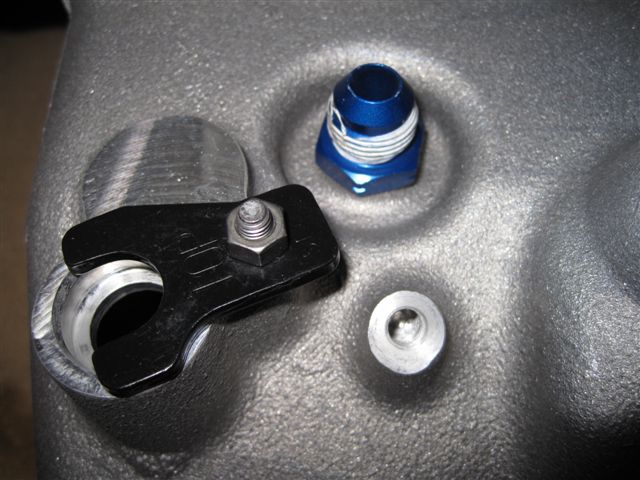
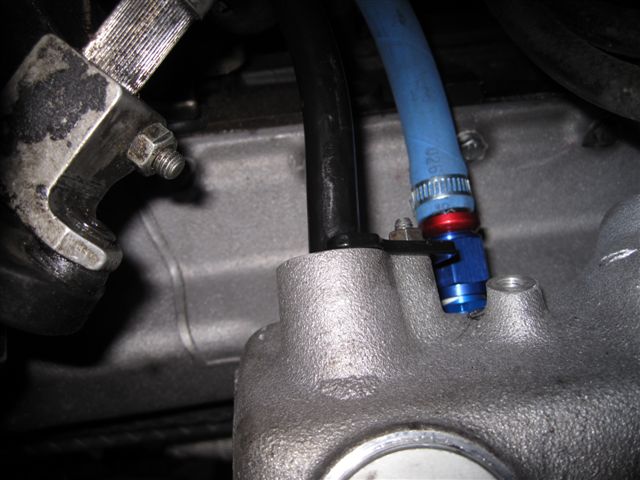
The top of the rear housing, by the dipstick opening, has a drain nozzle for the crankcase drain. This is where I attached my crankcase drain. I removed the factory fitting and replaced it with a 12x1.5mm to 8AN male fitting and used a ½” barbed hose end to 8AN female straight fitting to attach 3ft of ½” ID oil resistant hose.
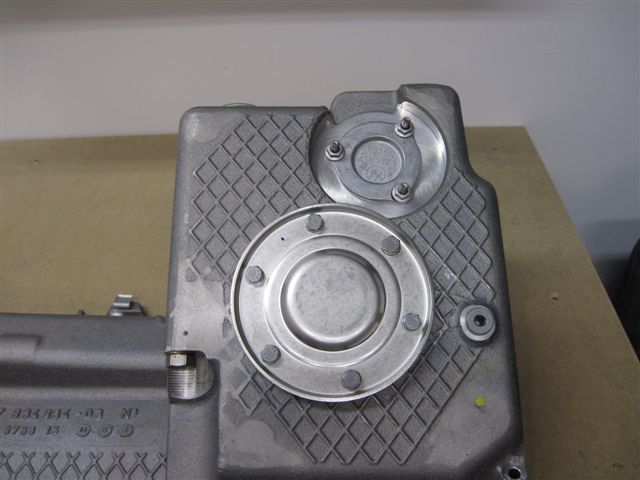
The bottom of the rear housing has two openings that need to be sealed. The larger opening is sealed with part # 11-13-7-834-885 and part # 11-13-7-834-886. The smaller opening is where the S54 oil level sensor goes, and there are a couple options to seal this opening. You could use an actual oil level sensor ($100) and not connect it. There are aftermarket covers with a threaded port (for a temp sender) available for approximately $80. However, I decided to go the least expensive route ($7) and used a cover lid from an E36 325 (part # 11-13-1-726-357).
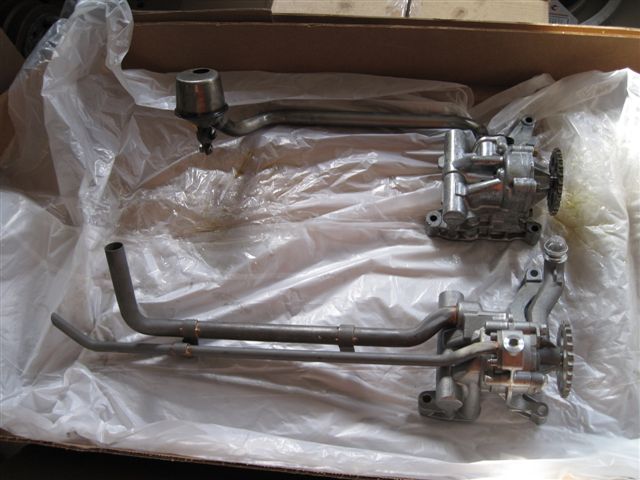
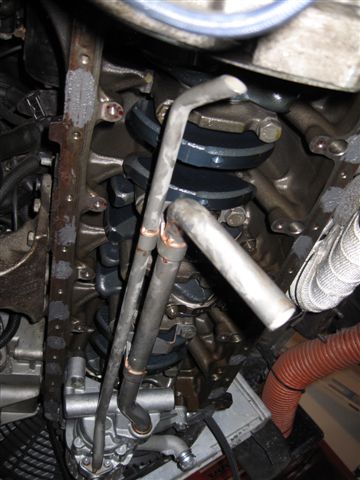
The S54 pump and pick up tubes will need to be assembled. There is one larger pick up tube and one smaller scavenging return tube. The larger pick up tube has an o-ring and is held in place in the pump by the mounting brackets. The smaller return tube is held to the pump by two small fillister head bolts. Here are a few comparison pics of the S54 vs S52 oil pumps.
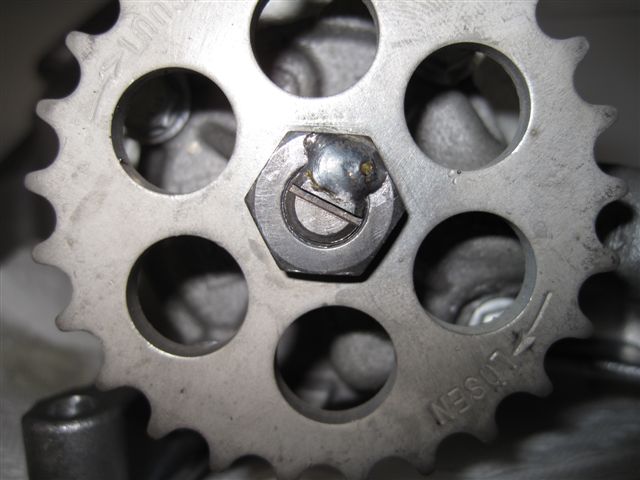
One really important thing to do is securing the oil pump nut before installing the pump. There are many options including safety wire, loctite, aftermarket oil pump shaft/sprocket upgrade, or a tack weld. I decided to go with a simple tack weld.
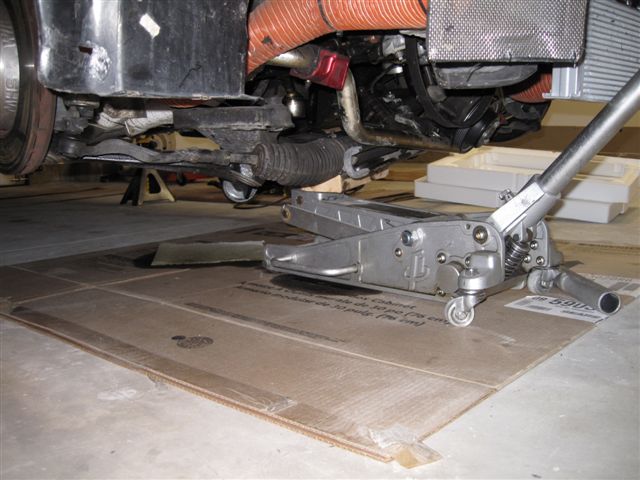
The install itself is not very complicated. However, you have to gain access to the oil pan and that starts with lowering the front subframe. I suggest you disconnect the following:
- (4) front subframe bolts
- (2) lower motor mount nuts
- steering column linkage (remember to mark the alignment!)
- power steering pump bracket from the oil pan
- power steering reservoir hose (if you want extra clearance to lower the subframe)
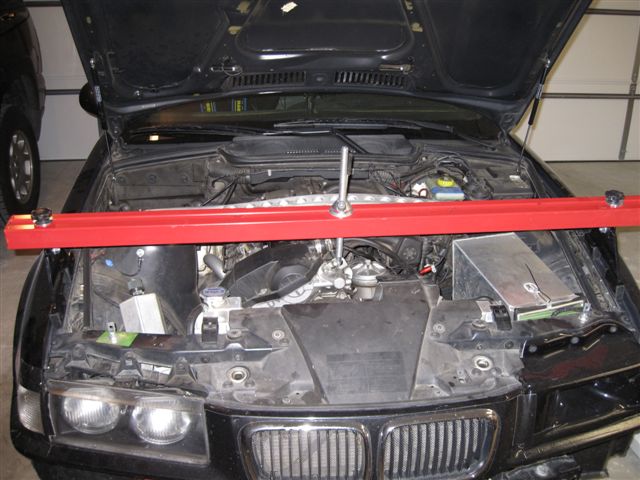
I supported the engine with a brace and used a floor jack to lower the front subframe.
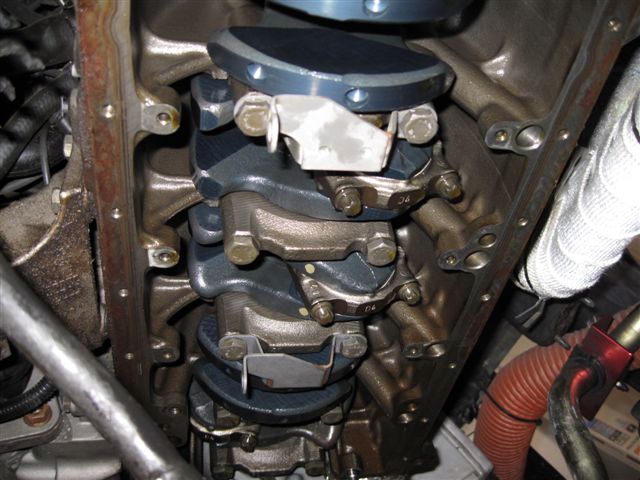
There are (25) hex head bolts securing the oil pan to the engine block and (3) e-torx bolts securing the rear of the pan to the transmission. The S52 has a windage tray that can be removed.
I removed the single S52 pick-up tube bracket and installed two two pick-up and return tube brackets for the S54 pump. The S54 brackets look nearly identical except one has a slightly larger opening for the bolts securing the pick-up and return tubes. Part # 11-41-1-405-847 is the bracket closest to the oil pump and Part # 11-41-1-404-645 is the bracket towards the rear of the oil pan.
The oil pump bolts on directly with the original S52 mounting bolts.
I used a new S52 oil pan gasket and some RTV silicone and installed the new oil pan. You reuse most of the S52 oil pan bolts. The S52 oil pan has (21) M6x20, (2) M6x100, and (2) M6x64 bolts. You will install (2) of the M6x20 bolts on the S54 oil pan where the M6x64 bolts mounted the S52 oil pan. There are (3) bolt locations on the S54 oil pan where the casting is slightly thicker compared to the S52 oil pan and that is where you will need (3) M6x25 bolts. The (2) M6x100 bolts and the e-torx bolts for the transmission install in the original locations. It’s less confusing than it sounds.
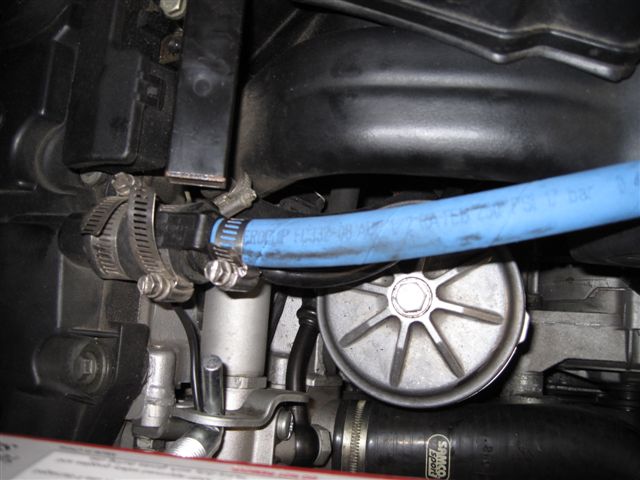
The crankcase vent and dipstick are the only remaining items to finish. My S52 is OBD1 so I have an S50 Positive Crankcase Vent and ½” ID hose slips right onto the connector at the valve cover and the other end connects to the 8AN fitting installed on the oil pan. The dipstick tube has a washer and o-ring secured by a bracket and hex nut. The S54 dipstick tube is curved and relocates the dipstick closer to the HFM.
The rest of the assembly is just a reversal of all the things I disconnected. The only challenging thing I found was trying to line up the subframe bolts, motor mounts, and steering column linkage all at once. So, I disconnected the steering rack from the front subframe and reinstalled the front subframe and motor mounts first. The loose steering rack made it much easier to line up the steering column linkage.
The S54 pump is rated to circulate oil at 0.7 bar (10psi) at warm idle and 4.0 bar (58psi) under full load. I found my oil pressure to be slightly higher than my original setup with warm idle at 12psi and 65psi under load. I have not taken the car on track yet, but I hope this upgrade finally addresses all oil starvation issues.
Last edited by vinnymac; 07-30-2010 at 03:25 PM.
LSD addict
Very nice write-up, well done!
Did you buy all of the parts new? What was the total cost, if you dont mind me asking.
thanks
Josh
AirborneDEN
Nice write up.
I see you're using a braided line for your power steering hose too. What size did you have to use for that?
Member
Did you use the Bimmerworld Kit? Back when I worked there they had just worked it up and started keeping them in stock. It worked really well for the faster prepared cars. They had started to see oil starvation in higher G corners despite baffles and such in the stock pan. This fixed that problem and gave them better operating pressure overall too.
I like small engines, so what!
Member
Would a $300 automatic Accusump have been easier?
Done watching.
An Accusump done right is considerably more than $300. I think I spent near $300 on plumbing and fittings alone. I run one in addition to the S54 pan.Originally Posted by pbonsalb

Garage sale coming soon, watch this space.
Member
Thanks for the comments. Yes, I bought everything new. My sponsor is Autohaus BMW and they give me great deals on parts. I spent much less than the usual $1,500 this upgrade would have cost.
I'm prett sure I used 8AN braided hose. The bottom fitting was a very tight fit but I guess that's what you want. It's been bone dry every since I replaced the rubber hose.
No, I put my own list of parts together since I bought everything from a local sponsor. I saw Bimmerworld's kit on their website but there were not any details on what was included and it was going to take longer to get parts delivered.
Actually...no. I considered this option but $300 just gets you the Accusump. I would have still need quite a few fittings and braided hose along with additional hassles getting it plumbed into my system. I considered using the VAC remote oil filter housing, but then I would have need to run an inline filter and even more plumbing. The cost difference became trivial after everything was added up. I'm hoping the S54 pan solves all my oil starvation issues so I can avoid installing an Accusump.
Last edited by vinnymac; 02-27-2009 at 04:44 PM. Reason: Automerged Doublepost
Member
Really nice write up, Vinny. You've saved folks a lot of research time.
The S54 pan doesn't look too much different from the euro pan. The clamp at the bottom of the dipstick is a nice touch. I don't recall that on mine. I made a custom bracket for the top half that allowed the dip stick to bolt to the intake manifold support brace. I also unbolted the rack from the sub-frame to allow everything to come back together easier, great tip.
Again, great job on the write up.
For anyone contemplating doing this themselves on jack stands in their own garage, like I did, this is a definite 5 out of 5 stars on the PIA scale.
GrifM3
Dinan S2
Last edited by GrifM3; 02-17-2009 at 01:08 AM. Reason: spelling, yes please
Member
BMW E36 M3 Expert
Just for comparison, here's my Euro E36 M3 pan. It's clearly in the same family as the S54 part, but Vince's E46 version has different external features for its application and seems more production optimized. The Euro has three separate internal windows to the sump area, has its drain plug on the driver's side and doesn't have that clamp-on arrangement for the dipstick tube. There's a cast-in boss at the front to accept a second drain plug, but the pan hasn't been drilled and machined for it.
I can't be absolutely sure, but I think that the way the whole system works is that the forward pickup acts as a scavenge pump intake to transfer oil from the front of the pan, where there's sort of a mini-sump under the cam chain tower, and then discharges that oil into the main rear sump via the smaller of the two rear oil pump tubes. This serves to keep the rear sump full of oil so that the main pickup tube never gets starved and sucks in air. In addition the rear sump is partially covered over, tending to prevent oil being forced out under g-loads.
There's also an internal drainage channel on the passenger side of the pan that looks as if it will capture oil flung off the crank throws and flow it forward to the scavenge pickup.
Neil
Last edited by NeilM; 02-17-2009 at 12:17 PM.
Member
Thanks for the comments. The S54 pan definitely has similarities to the Euro pan. I had a Euro pan and pump for a whilte and ended up selling it when I thought I was going the Accusump route.
Doing this job without a lift was definitely a PITA.
Thanks for posting the pics. It's interesting all the variations of dual sump pans that are available for the E36. The Euro pan I had did have two drain plugs. I wasn't sure if it came that way or the previous owner have it drilled and tapped.
The smaller pickup on the S54 is a scavage that pulls oil from the smaller front sump and transfers it to the rear main pick up.
Last edited by vinnymac; 02-17-2009 at 02:08 PM. Reason: Automerged Doublepost
License Revoked
extremely clean great write up, if you dont mind me asking
what type of exahust are you running, do you track
outside your state?
Member
Thanks for the comments.
The exhaust is a Kromer Kraft header and full race exhaust. http://www.kromerkraft.com/
It's wrapped in header wrap so you can't see the collectors. It's a shame because it's a beautiful system. The piping from the headers to the muffler is oval and ceramic coated.
I run races in a bunch of different states around the Midwest.
Member
BMW E36 M3 Expert
RealOEM shows the second drain plug. I suspect that BMW cost-reduced it away.
Neil
Member
Mine has a drain plug in the front and rear.
I'm not sure how you would get the oil out of the forward sump without one. If you haven't put yours on yet, I would definitely git r done.
GrifM3
Dinan S2
Member
I drain the oil on the race car frequently so I can live with a small amount remaining in the front sump. I figure enough is left in the oil cooler and lines after every change and it's not worth sweating over a little more left in the pan.
Member
Nice job on the write up Vince.
Steve E.
Member
I'm currently in the process of doing the dual p/u upgrade on my euro S50B30 with an used euro 3.2 pan & S54 M3 pump. However, I'm not sure if I can reuse the dipstick tube from the S50B30
Member
Thanks Steve. Looking forward to Autobahn this year!
I'm not too sure. Does the tube fit in the opening on the pan? If so it should work as long as the tube extends to the bottom of the oil pan and reads the oil level correctly.
Last edited by vinnymac; 02-18-2009 at 12:35 AM. Reason: Automerged Doublepost
Well Educated Idiot
OH SHit......another Must do mod...or so it seems.....
Maybe if I just stay slow .....I won't need this.
And you missed your calling as Tim's assistant on Tool Time Vinny...you would have been way better than Al......
Last edited by BobWright; 02-18-2009 at 07:40 AM. Reason: Automerged Doublepost
..."keep a little love in your heart and a taste of jazz in your soul."
Member
BMW E36 M3 Expert
I have an oil cooler too, so that's exactly my thought.
I could drill and tap the boss easily enough, although it would have to be faced on the outside surface to make a decent seal with the aluminum crush washer. But all in all this would add up to what an old friend from Tennessee used to call "Trying to pick fly sh!t out of the pepper."
So I think I'll leave well enough alone... unlike most of my other car projects!
Neil
Member
great writeup!!!
i see one potential problem. the blue hose you used, is to drain an oil separator on the s54. any liquid oil in the separator flows to the pan and the pcv is still sent to the intake.
the way you have it routed flows crankcase pressure to the oil pan, which is like having a sealed pcv system. this would build case pressure untill you found the weakest seal. i see the little line under the valve cove fitting is still hooked up. i forget where it goes, but it is not enough flow for pcv. i have my little one plugged and run my pcv to the atmosphere, under the car.
i'd hate to see you blow out a main seal at high RPM.
David Ortiz
Member
BMW E36 M3 Expert
I'd been wondering about that. However Vince's S52 engine has a full OBD-I conversion, and as far as I can tell the S50 plumbing doesn't have an oil separator like the S52. (The S54 has an entirely different arrangement with the oil separator on top of the cylinder head.)
This diagram shows the S50: http://www.realoem.com/bmw/showparts...84&hg=11&fg=15 but is doesn't make clear where #4 and #5 go. My S52 is shown here: http://www.realoem.com/bmw/showparts...87&hg=11&fg=15. The connection at #3 goes into the intake manifold.
Neil
Member
Why did you run the crankcase vent to the pan versus the TB to MAF boot?
Member
I'm not sure I understand. This is the exact same setup I have had for the past 2 seasons. The only difference is the oil drain (blue hose) used to be black hose and it connected to my S52 dipstick drain (S52 pan only had one opening for the dipstick and oil drain). I simply used new hose and connected it to the S54 drain and did not change the PCV configuration. The small hose from the crank supplies vacuum from the intake boot...same as before.
I'm using an OBD1 crankcase vent and the large hose is the oil drain and the small hose goes to the intake boot...same as it has always been.
#4 is the oil drain and #5 is the vacuum line to the intake boot.
Last edited by vinnymac; 02-19-2009 at 10:54 AM. Reason: Automerged Doublepost
Member
oh. i was comparing to my s50us. my dipstick tube doesn't branch.
David Ortiz
 Posting Permissions


 Reply With Quote


Bookmarks