
 BMWCCA 484984
Tools and Supplies
- Duralast 49-DL Automotive Battery
- Battery Vent tube kit
- 10mm socket or open ended wrench
- 13mm socket or open ended wrench
- Memory Saver (optional)
- Flash Light
__________________________________________________ __________________________________________________ _______
Time to complete procedure
- Approx. 30 minutes
*It's recommended to wait approx. 16 minutes or until the car goes into sleep mode before disconnecting the battery. This allows all modules to shut down and prevent any damage. BF.c member edjack mentions opening the trunk then waiting until all lights turn off (including "Park" light on center console for auto tranny owners) before disconnecting.
__________________________________________________ __________________________________________________ _______
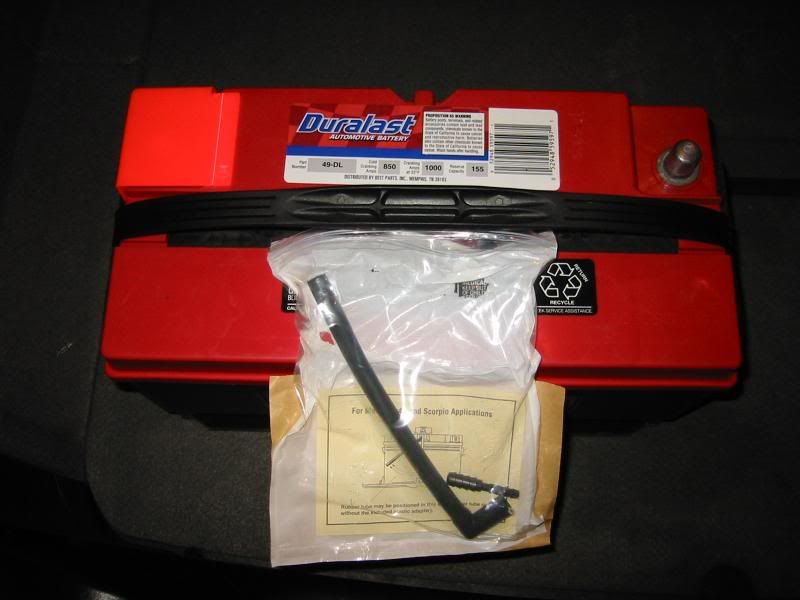
- Here's the Duralast 49-DL automotive battery and the vent kit that you should be sure to ask for if it isn't included.
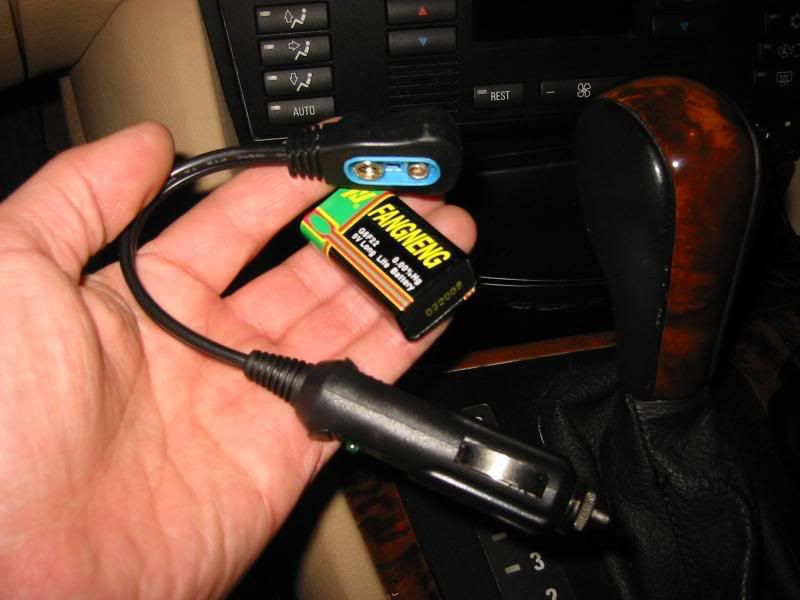
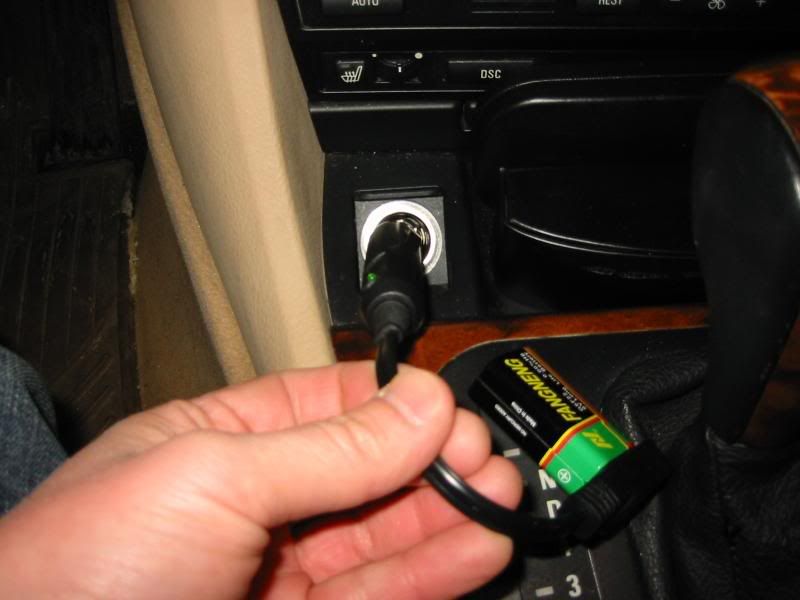
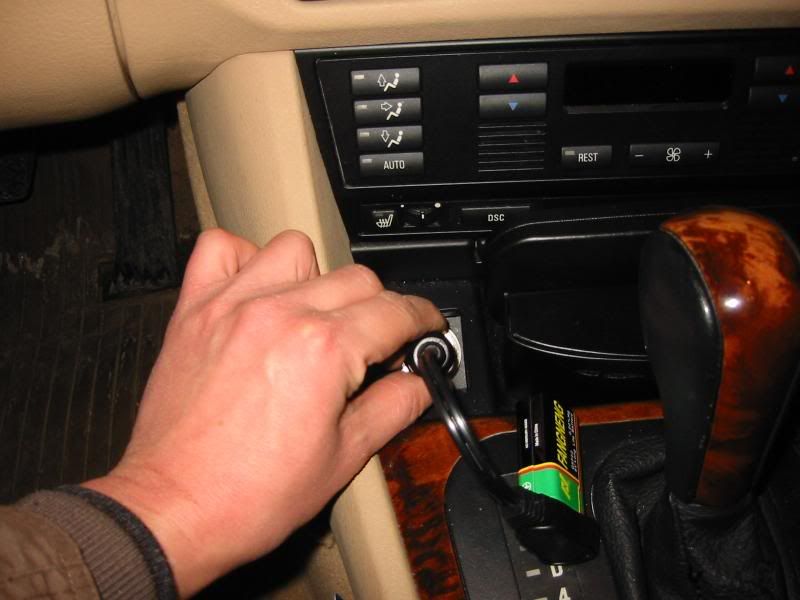
- Here's a NOCO Settings Keeper, generic memory saver I found at Autozone for $5.00.
- Pull it out of the package, attach the 9 volt battery (the green led will illuminate if the battery is good) and plug it into your cigarette lighter.
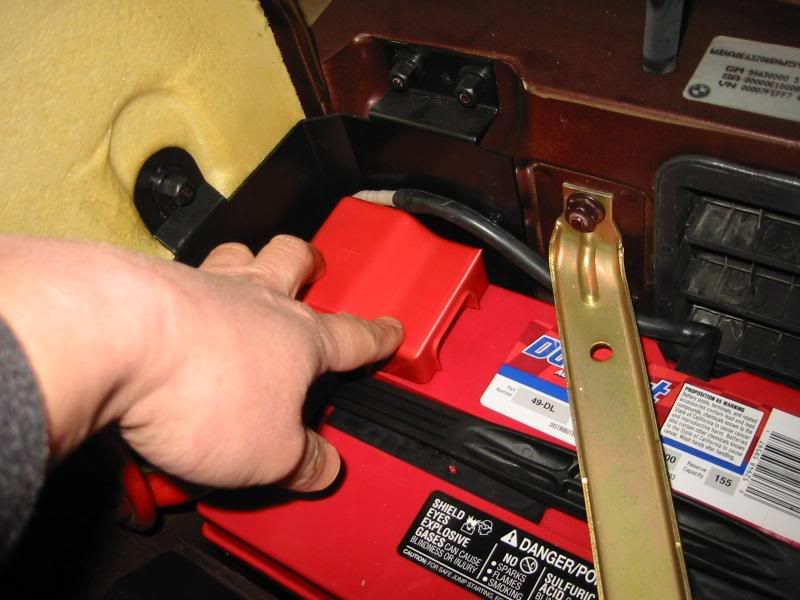
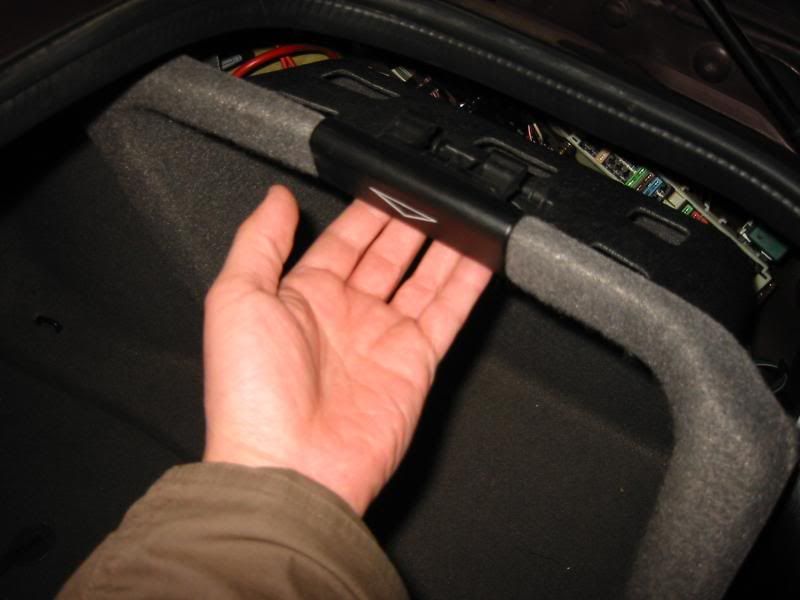
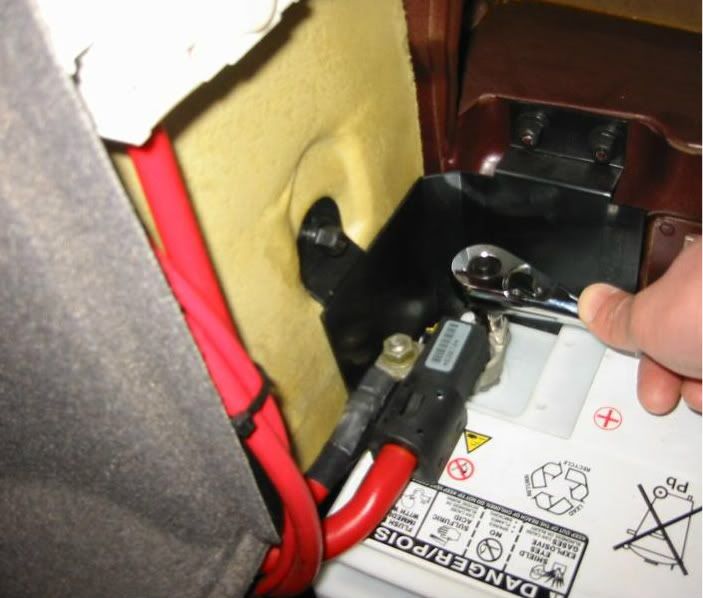
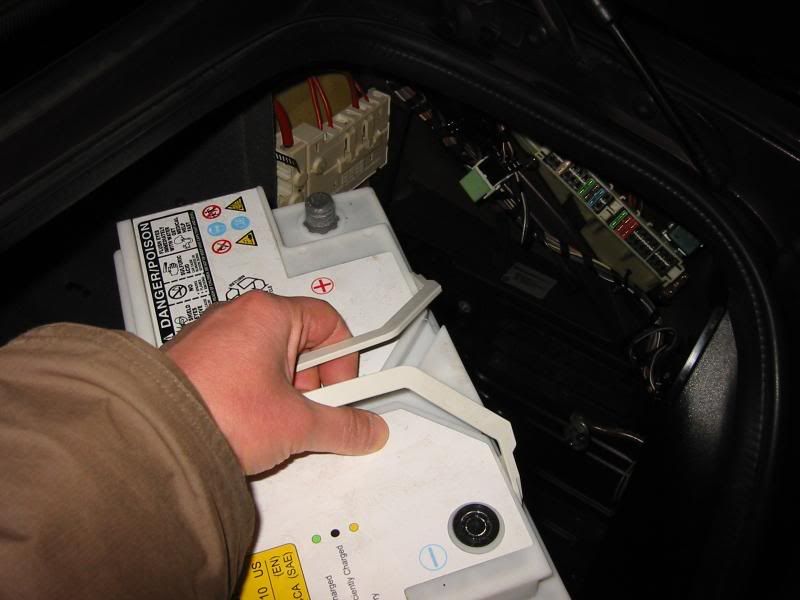
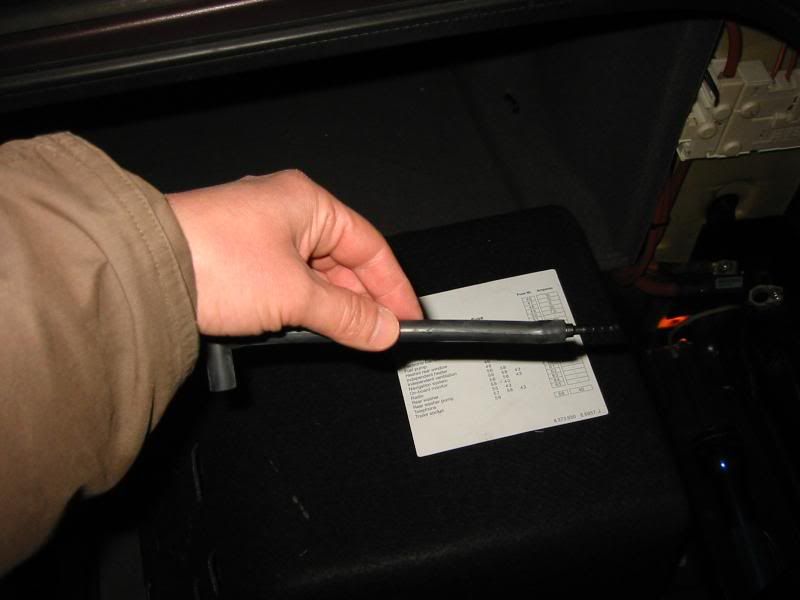
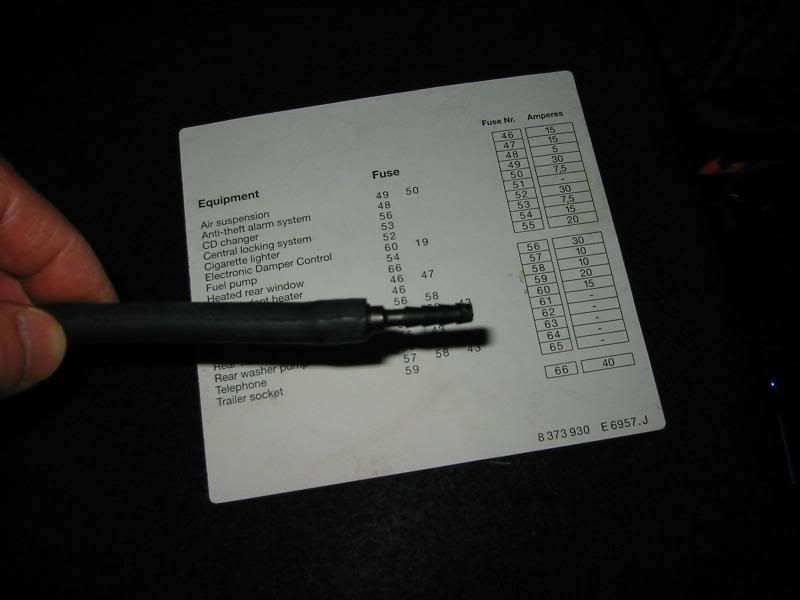
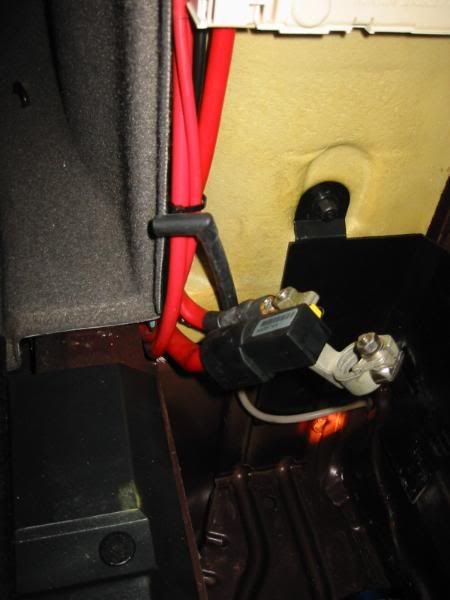
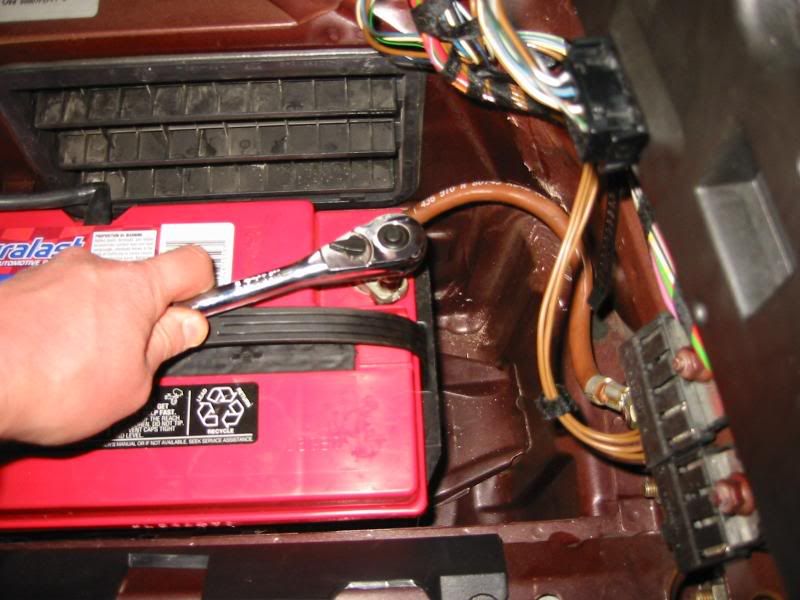
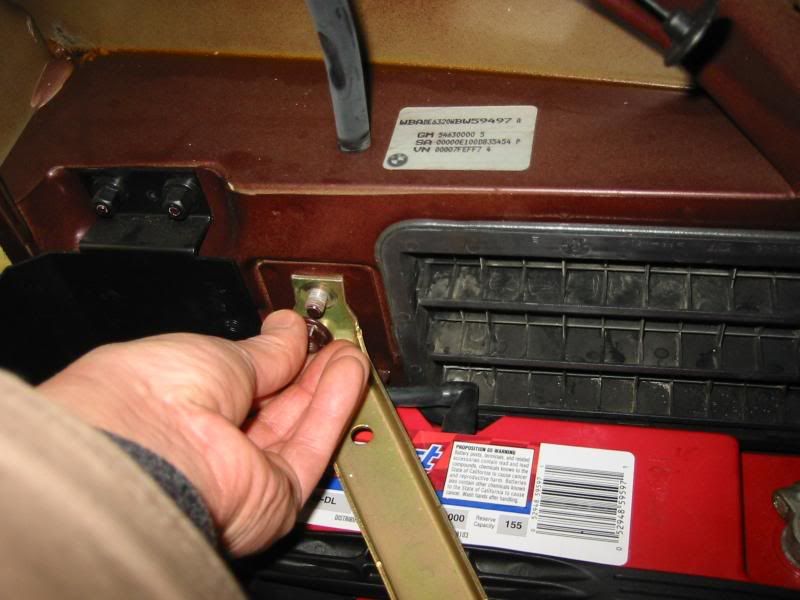
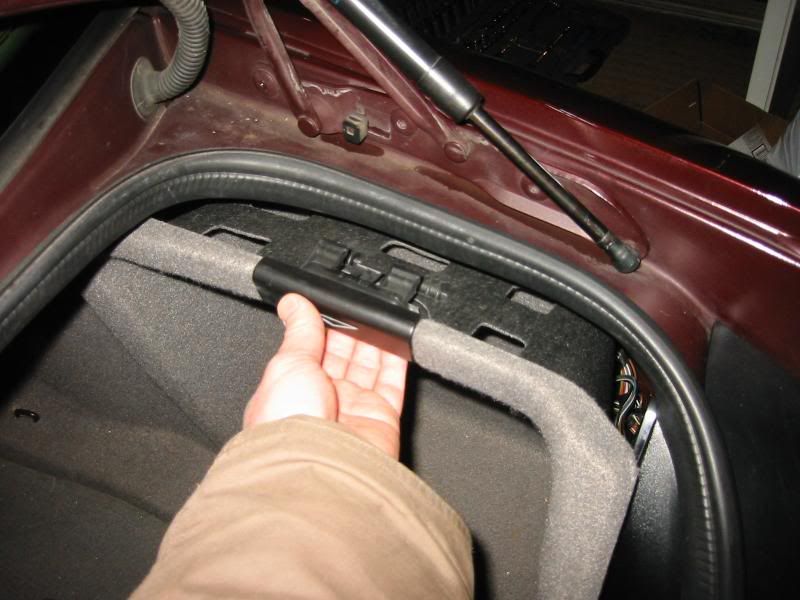
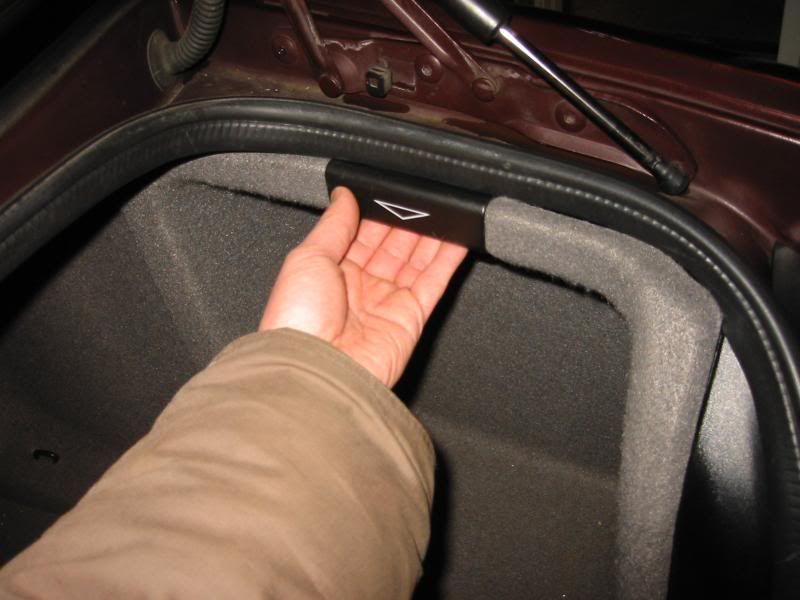
- Open the trunk and pull open the passenger side battery/ fuse compartment.
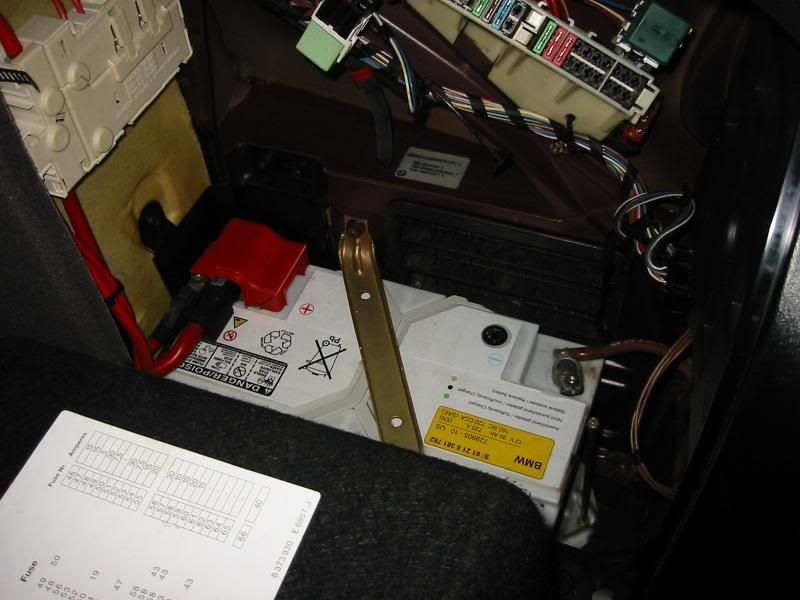
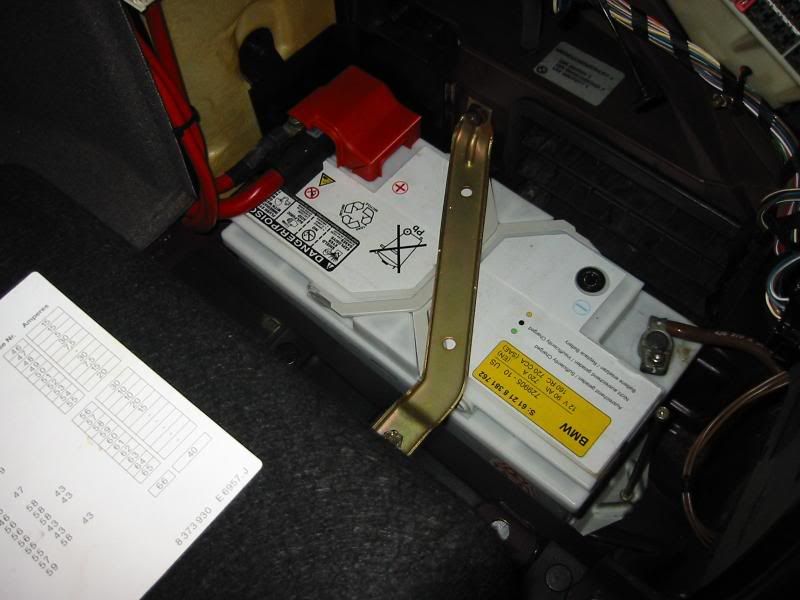
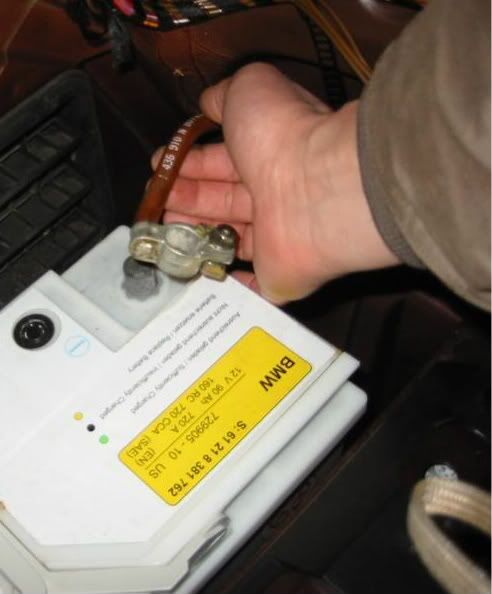
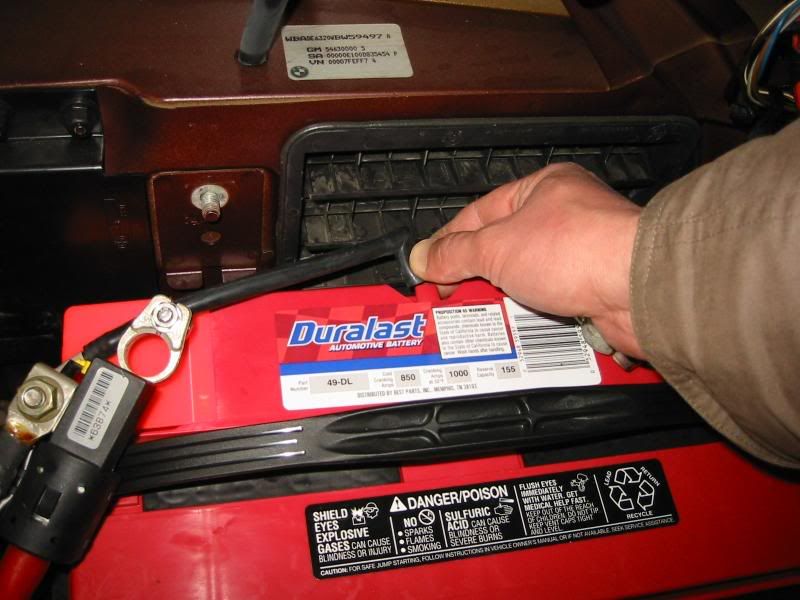
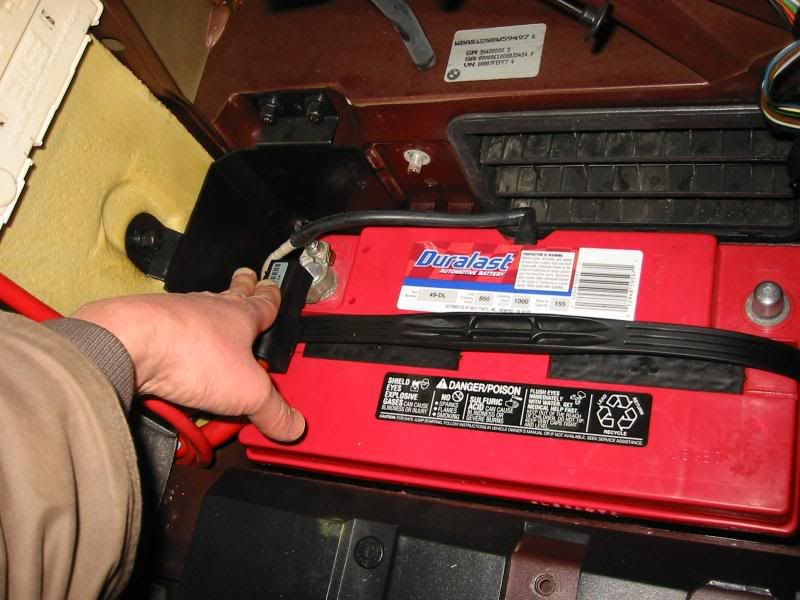
- These photos give you an idea of where you are going to be working. You can easily see the battery, positive, negative terminals and the cross brace. The vent tube, however, is not visible at all (it's tucked between the positive post side of the battery and the black protective shield).
- Take the 10mm socket and loosen/remove the negative cable from the battery post.
- Tuck the cable and connector up and away from the battery.
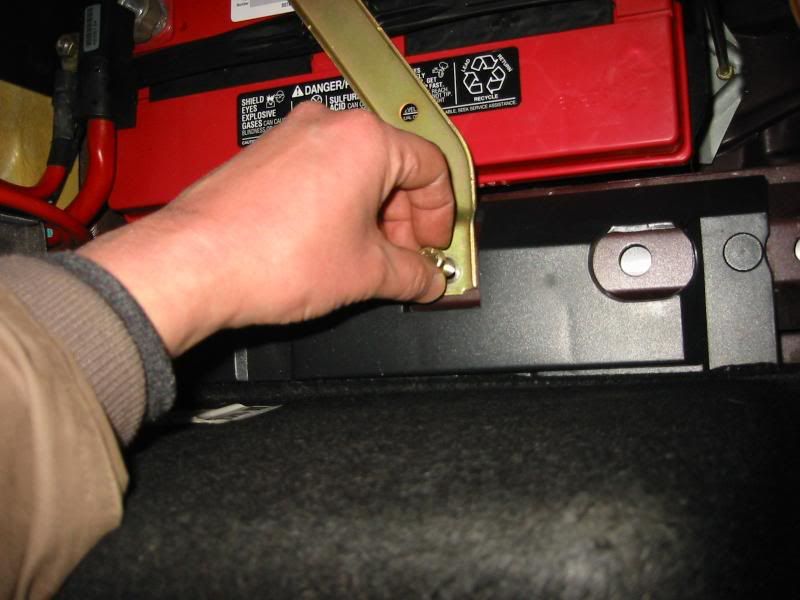
- At this point, remove the cross brace using a 13mm socket.
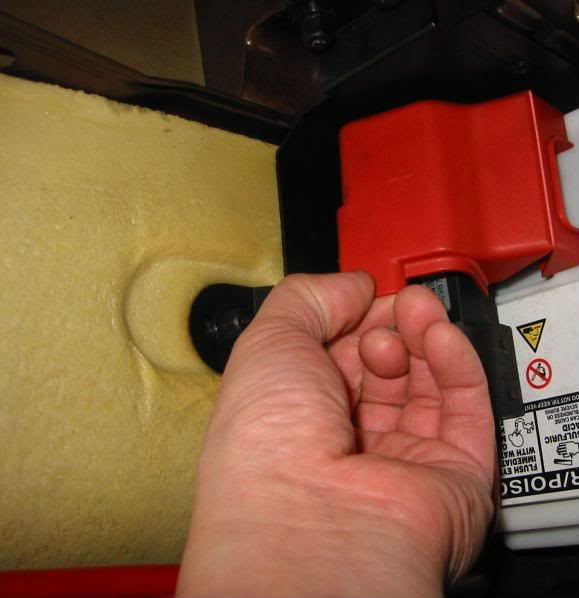
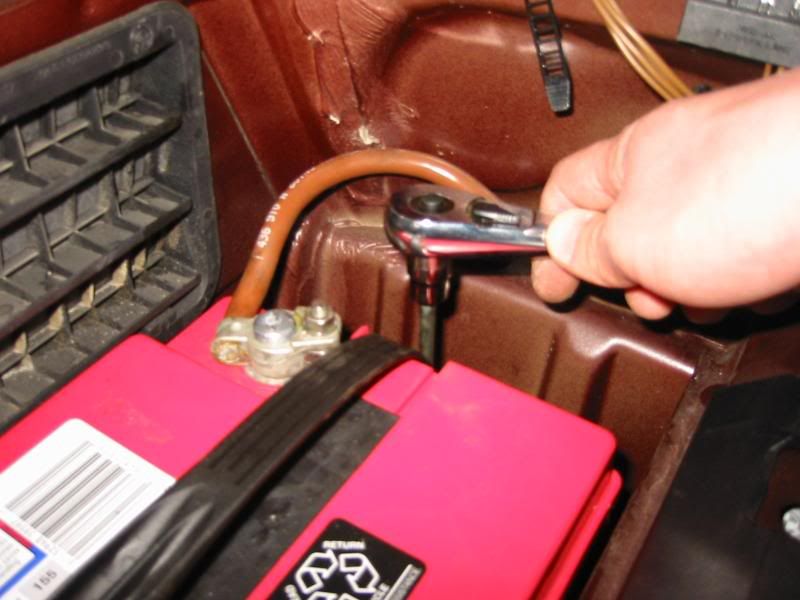
- Remove the red protective shield covering the positive terminal of the battery.
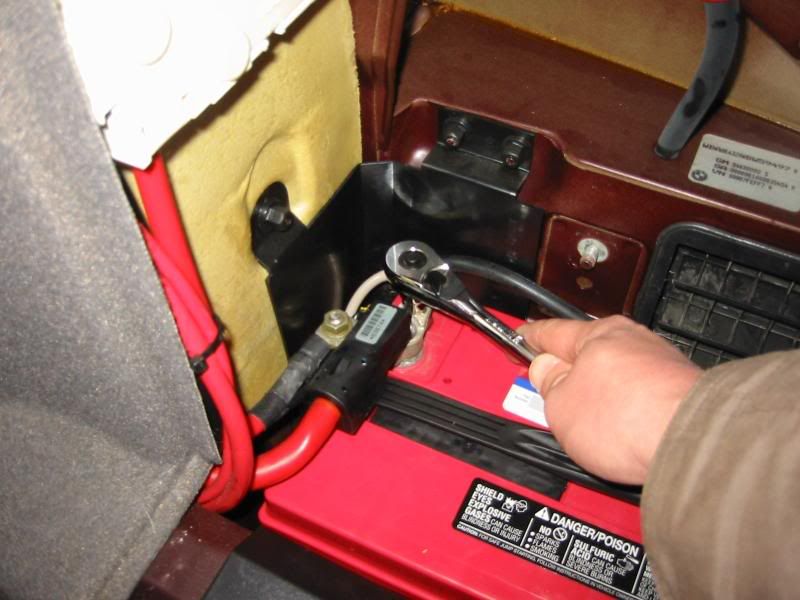
- Use the 10mm socket to loosen/remove the positive cable from the battery.
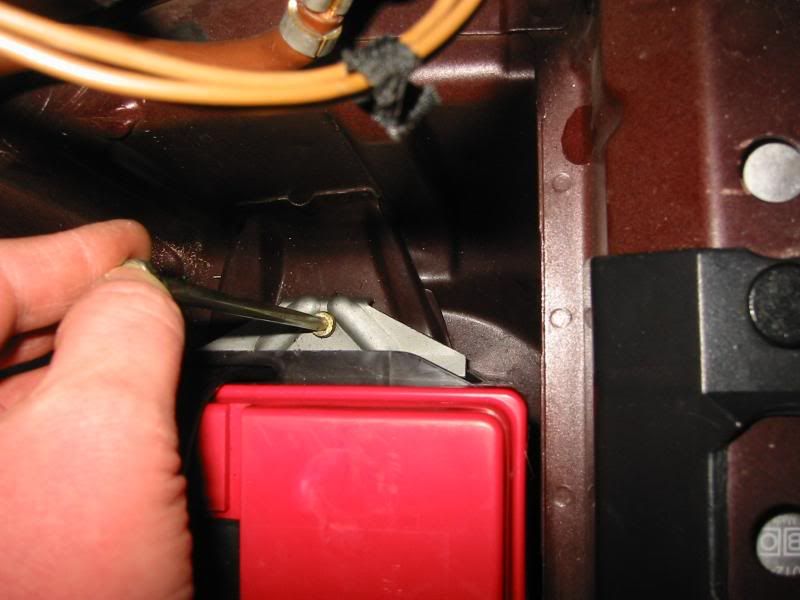
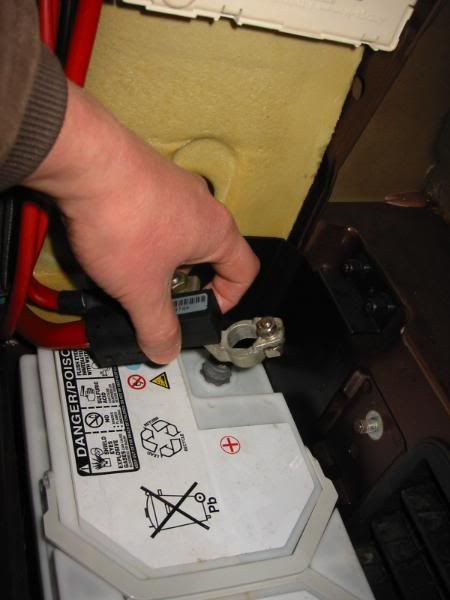
- Now is a good time to use the 10mm socket (or philips head screw driver) to loosen and remove the hold down clamp on the negative terminal side of the battery.
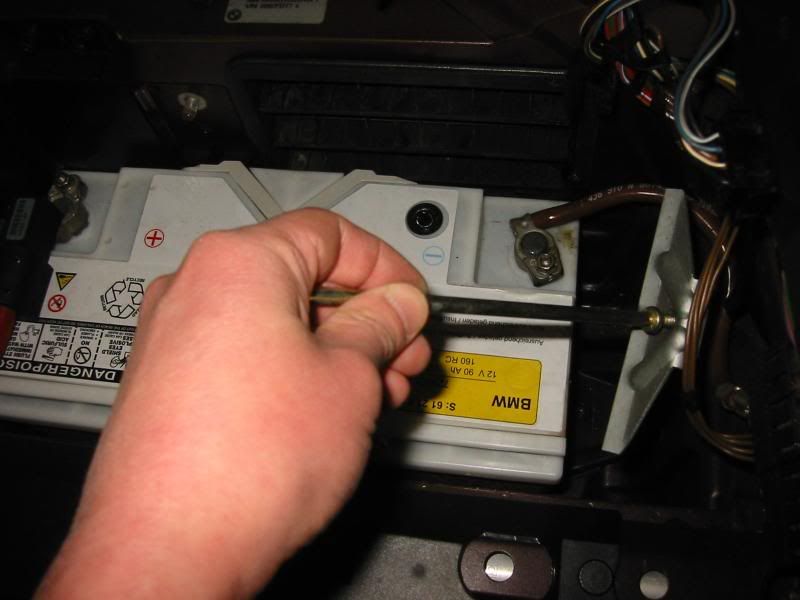
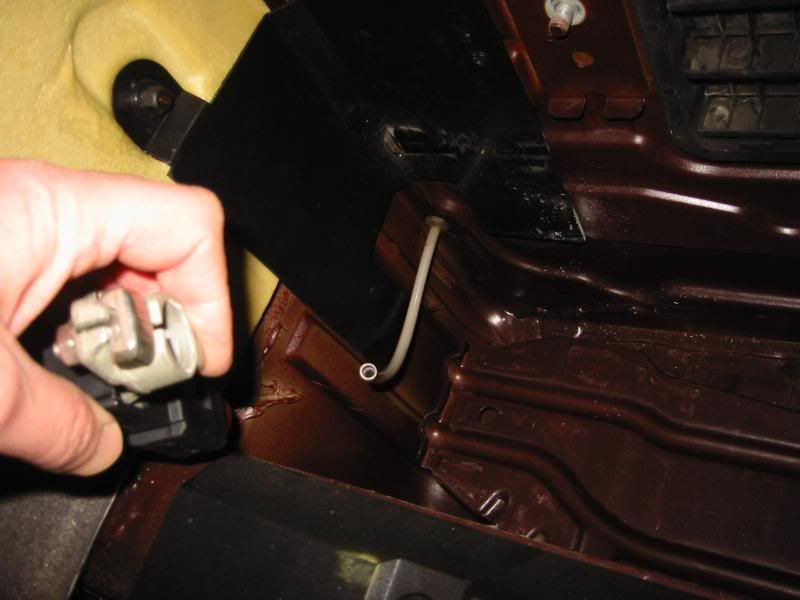
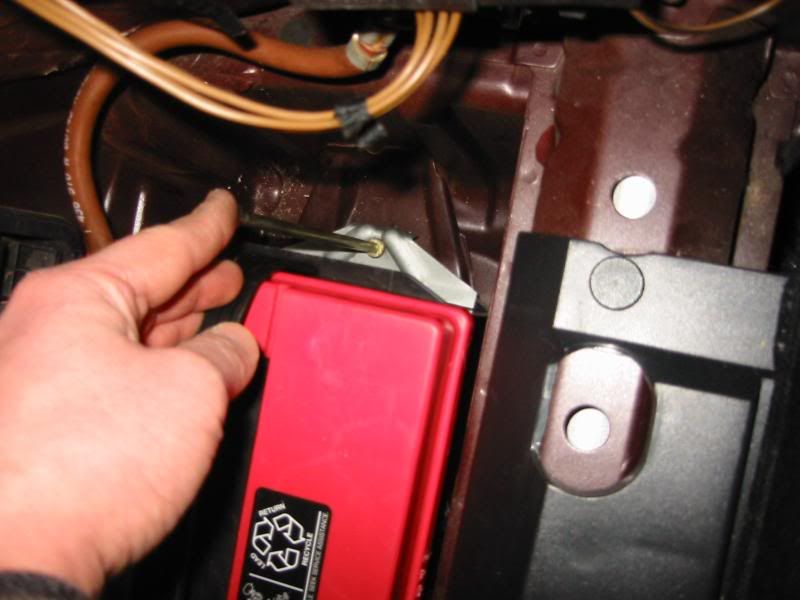
- Here is a pic of the vent tube connector on the positive post side of the BMW battery. I couldn't see it so I pulled the battery out without disconnecting it first. Luckily, it disconnected without breaking. I recommend sliding the battery towards the back of the car to access the vent tube for disconnection.
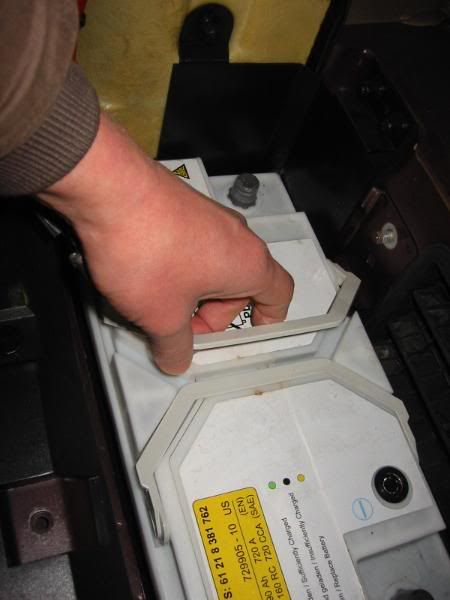
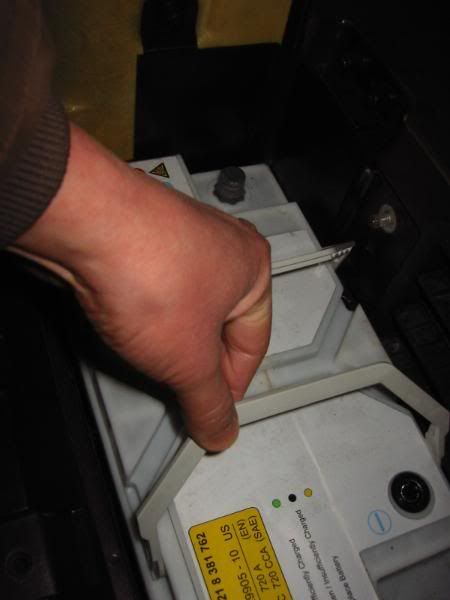
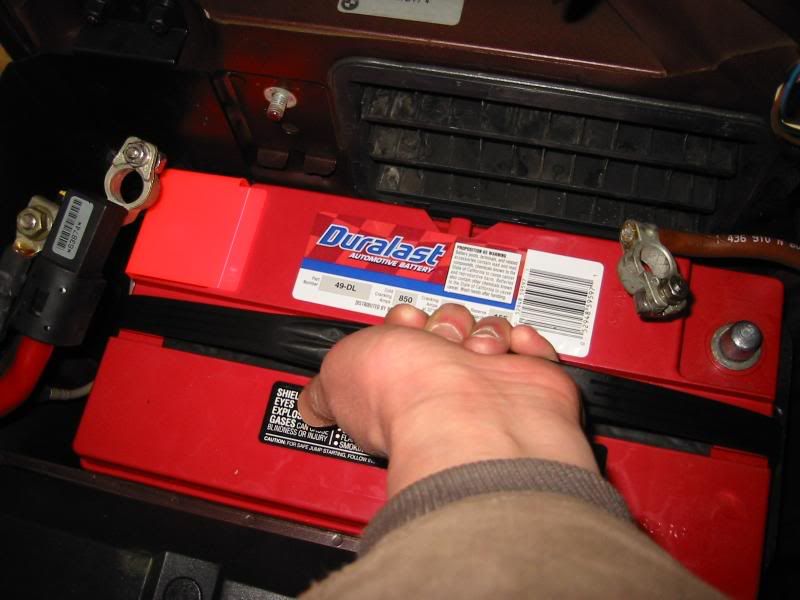
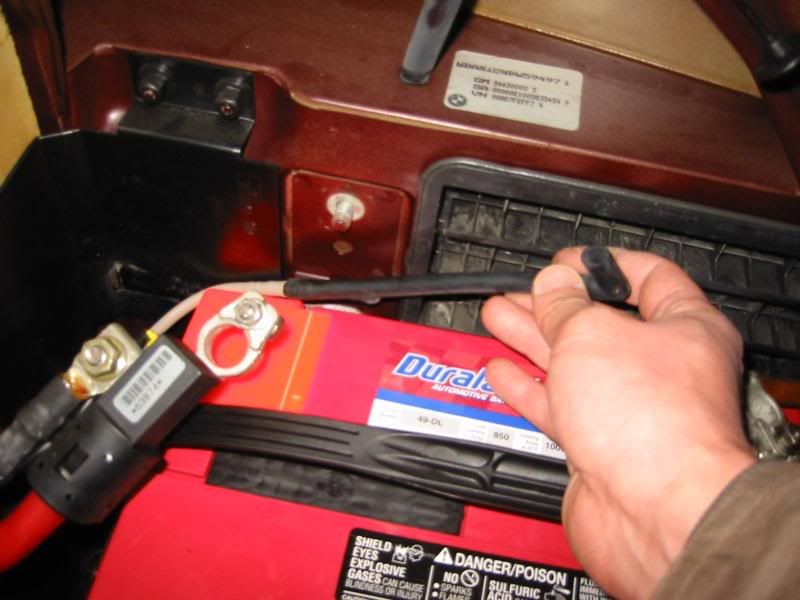
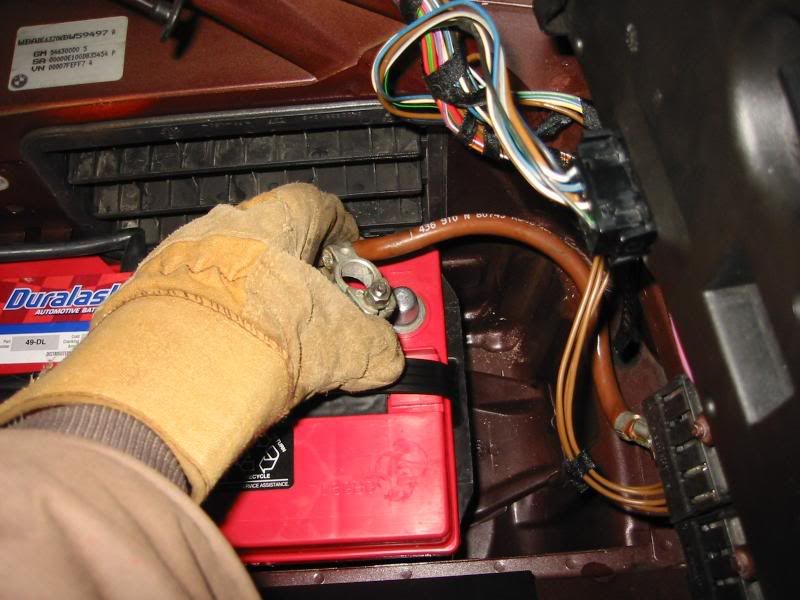
- Now it's time to pull the old battery out. There are handles that are stowed stealthily on the top of the BMW battery. They pop out easily.
- Pull the battery out carefully so as not to damage any of the fuses, wires and connectors that also reside in the compartment.
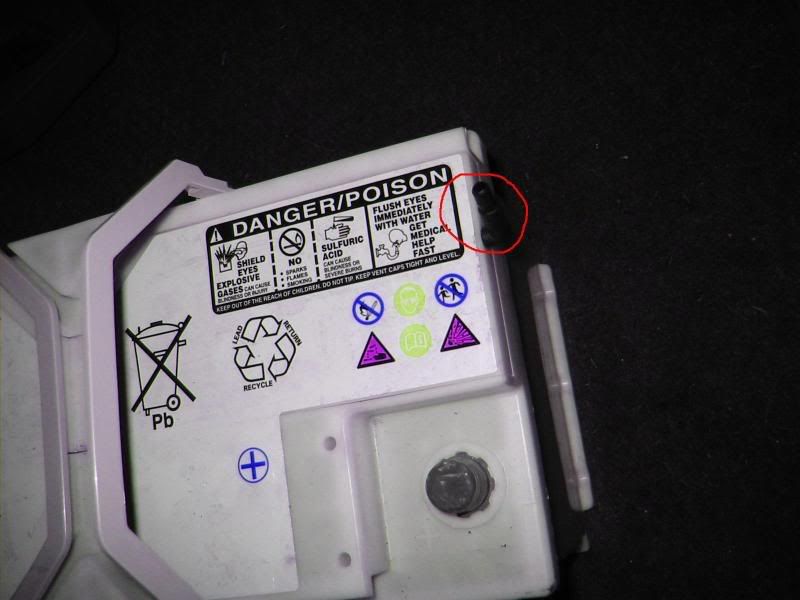
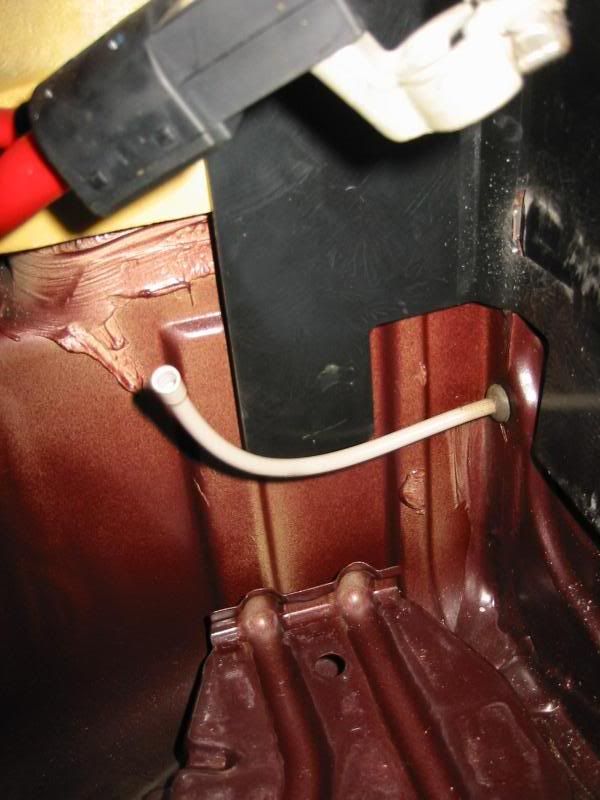
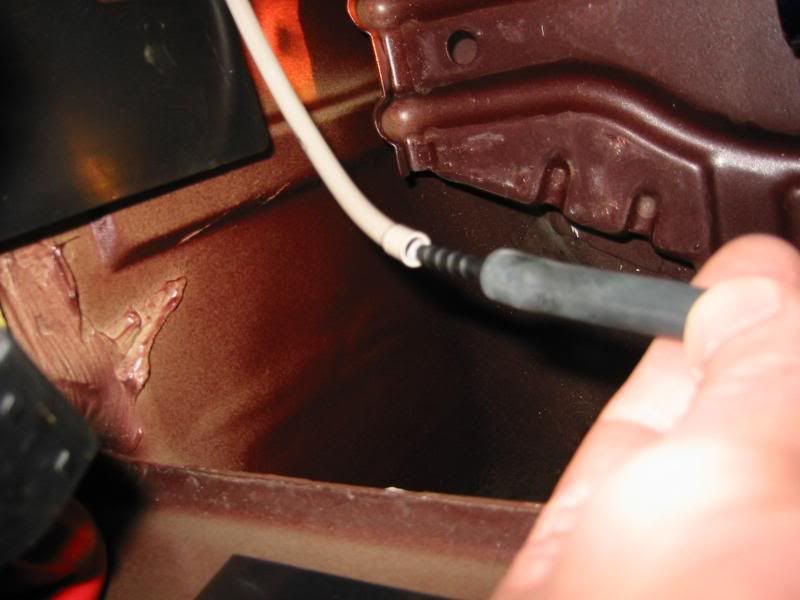
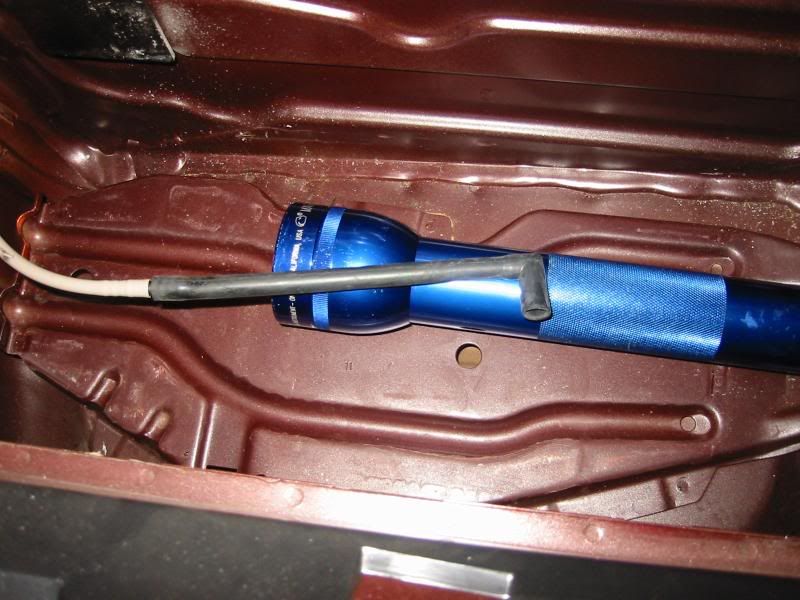
- Now the vent tube is quite visible.
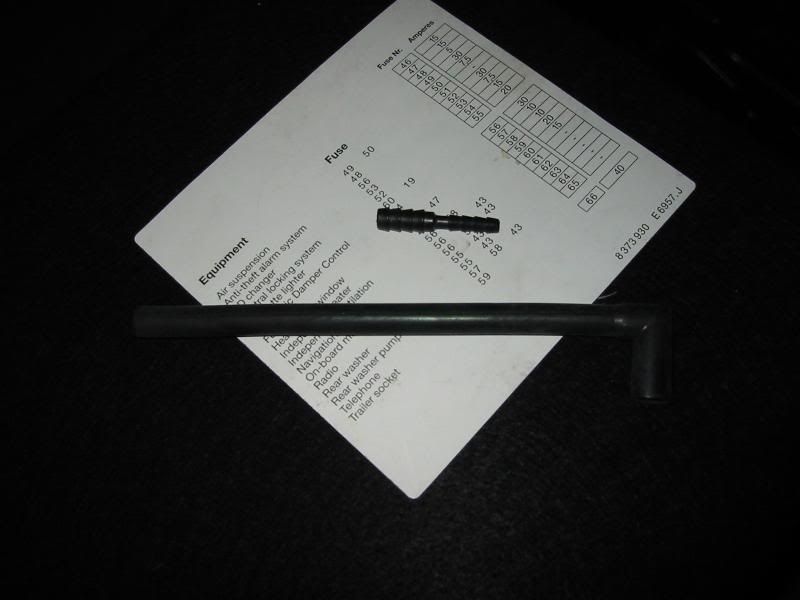
- Open up your vent tube kit. You should have a tube and a connector.
- Insert the larger side of the connector into the new vent tube.
- Insert the smaller end of the tube into the car's tube.
- Now, stow the completed vent tube up and out of the way to make for easier installation of the new battery.
(continued vvvvv)
Last edited by jamesdc4; 04-23-2012 at 06:06 PM.
BMWCCA 484984
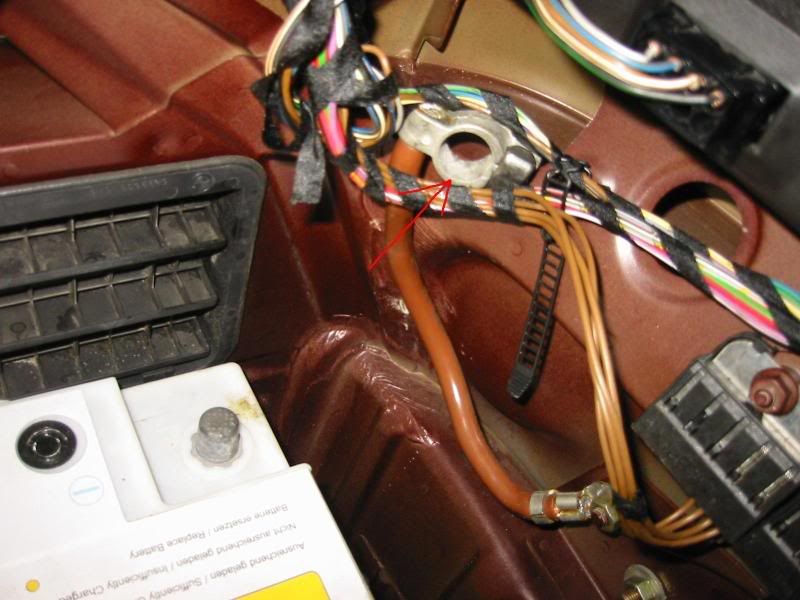
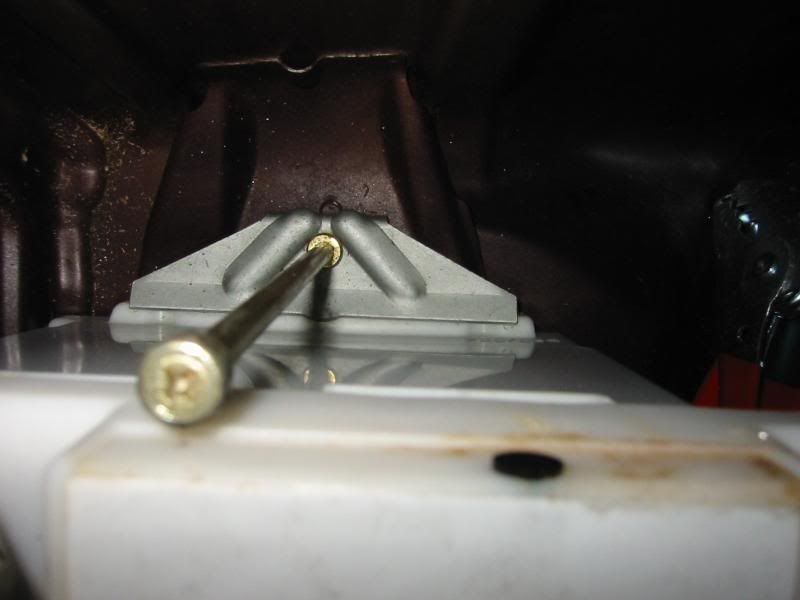
- Once the battery is out, you can see three holes (indicated by red arrows). These holes offer three different anchor points for the hold down clamp. The one on the right side of this photo is the one used for this installation.
- Slowly lower the Duralast battery into the battery compartment. Leave a little room to work on the positive post side.
- Pull the vent tube around and connect it to the battery.
- Pull the protective shield off the positive post side of the battery.
- Reattach the positive cable and tighten with 10mm socket.
- Reattach the negative cable and tighten with 10mm socket.
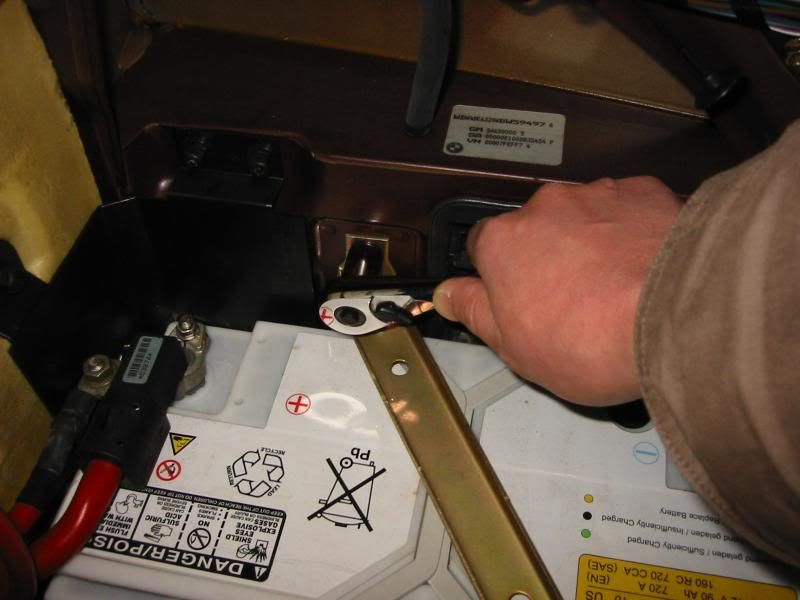
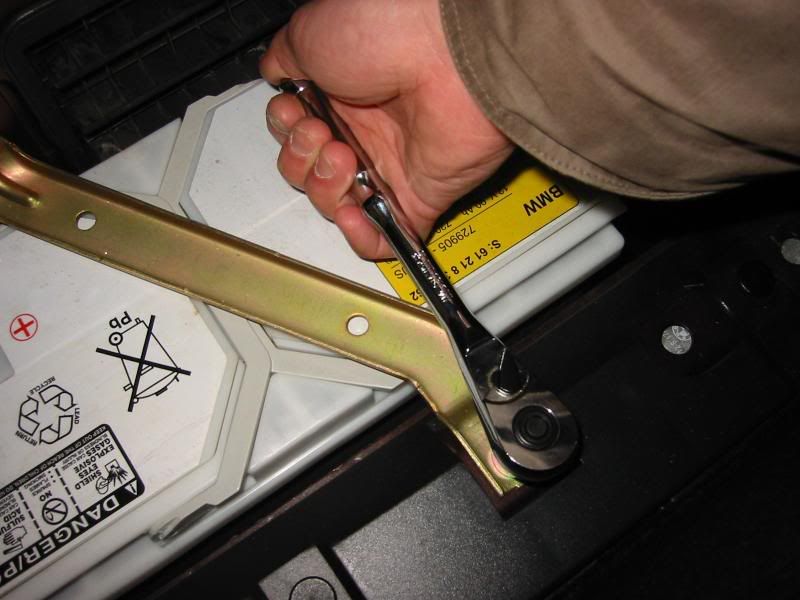
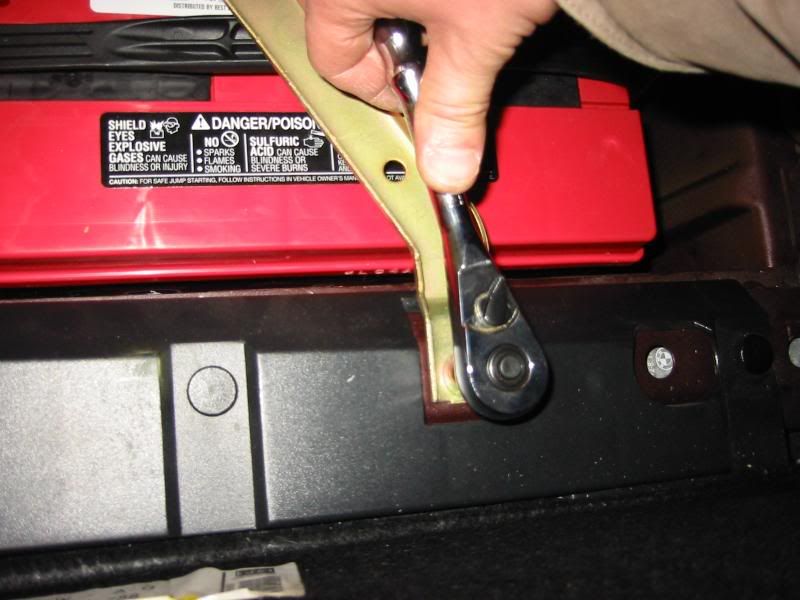
Using the flash light, thread the hold down clamp bolt into the far right anchor hole.
- Tighten with a 10mm socket.
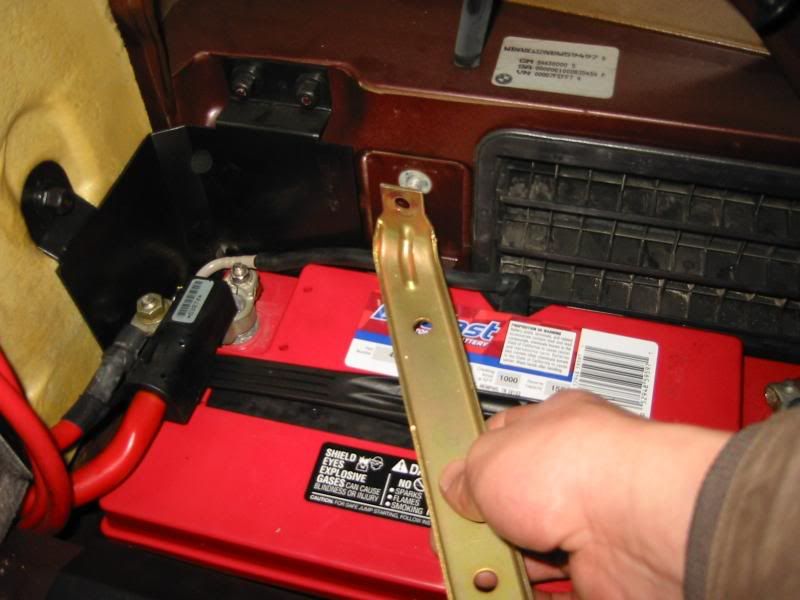
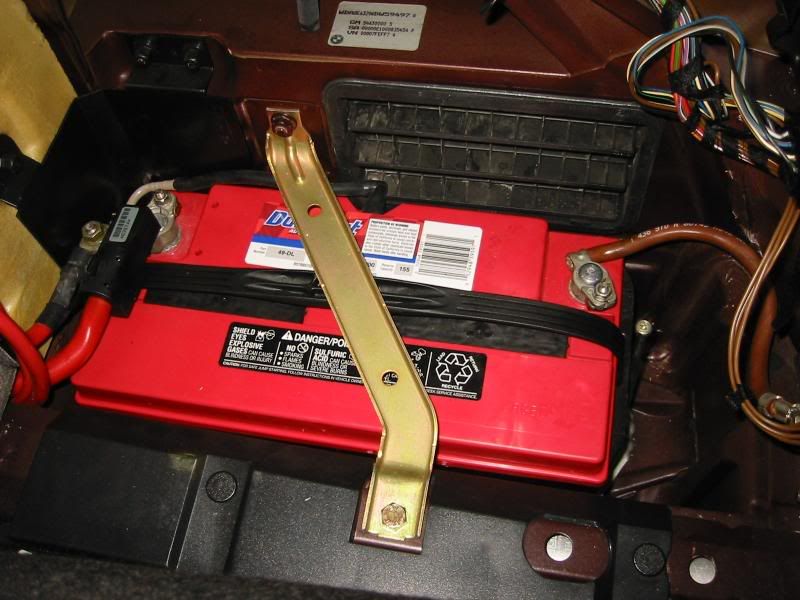
- Reattach the cross brace and use the 13mm socket to tighten nut and bolt.
- View your handy work and make sure everything is snug and all tools are removed from battery compartment.
- Take the red, plastic shield from the OE battery positive post and install it onto the new battery.
- Button everything up.
- Disconnect the memory saver.
- Confirm that you have properly installed the battery by checking for power and starting the engine.
Good luck.

Last edited by jamesdc4; 01-25-2009 at 03:45 AM.
Member


Become a BMW CCA member! Click HERE to join and feel free to use my BMW CCA member #191509 as a referral.
2015 650ix GC (Moonstone/Cohiba Brown) <<~>> 2014 X5 50i (Space Gray/Mocha)
Member
Thanks for the writeup! Now I know that I'm missing that hold down clamp next to the negative terminal. No wonder my battery moved.
BMWCCA 484984
Thanks, Q.Originally Posted by Qsilver7

You're welcome.
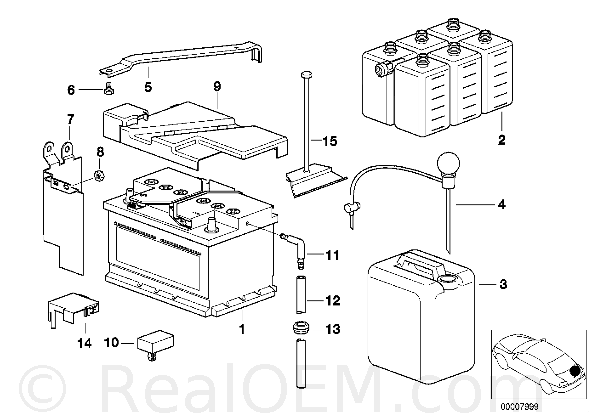
cnn originally posted regarding this diagram. I don't know what year his post was specific to, but I went to realoem.com and found this for your year model...part #15.
It looks pretty much identical to the diagram cnn posted.
Member
Very well done. Detailed with excellent photos. Thank you!!!!!
Last edited by gtxragtop; 01-25-2009 at 06:59 AM.
Member
A great, detailed & thorough post!!! Perfect timing too, as I just installed a 49DL last week and did not put part 15 back in because the 49DL is longer than the OEM battery. I never looked to see if there were additional threaded holes to accomodate different size batteries. I am going to put that part back in now. Many thanx!!!!
I have boost envy...
I nominate the OP to do a writeup on 540 cooling system overhaul
Last edited by atl540i; 01-25-2009 at 11:30 AM.
99 540i/6 - 18" Breyton Visions, LED tail lights, Hella Euro Angel Eyes, ATE Rotors, Hawk HPS Pads, K&N filter, CDV-delete, ZHP Weighted Shift. Making life in traffic a little easier...
Member
I did the same thing. For Duralast 49DL, put the #15 back exactly like realoem picture above, i.e., small end toward battery.
Note that in this write-up, with the OEM battery the wider part of #15 goes toward battery.
Eitherway, the #15 simply holds the battery from back and forth motion from accelerating and braking.
What holds the battery downward is the metal bar on TOP of the battery. If you ever invert your car in an accident, this bar ill prevent the battery from falling down...hehe.....
Member
I actually was able to get the wider flange side against the battery. Not sure why I have the space, but it fit nicely. I just pushed the battery close against the forward wall. The cable screw doesn't contact the wall but there's a plastic sheet on the forward wall that prevents the positive terminal screw from contacting the forward wall. I kept the vent tube atop the battery to keep it from getting squeezed.
I doubt this makes any difference, one way or another.
Member
Great writeup Jamie.
I bet it took you 4 or 5 times longer than it should, just to take the pics.
Anyways, here I salute you - this is my toast to you
It will go in the DIY hall of fame
BMWCCA 484984
Fudman,
1- The DIY shows the hold down clamp with the wide side towards the battery. Using the third anchor hole allows for a perfect fit.
2- Exactly.
Last edited by jamesdc4; 01-25-2009 at 02:26 PM.
Member
Copy that. Mine is exactly like your first photo.
However, in the second photo, I had to modify my positive terminal cover, by drilling a hole in it, to allow my clamp screw bolt to fit under it.
BMWCCA 484984
Were you not able to get the clamp down fully onto the positive post? My red shield popped right on.
Last edited by jamesdc4; 01-25-2009 at 11:56 PM.
Check twice, fix once...
Nice job James! I'm looking for your shock and strut DIY now! Kidding, but if I don't find one, I'll take pics when I do mine for the touring.
When I did my battery, I put down a acid pad absorber under the battery, JIC something spills. It never should, but JIC. Also, I see I need to order the brace for the battery Part #5 on RealOEM as mine was missing.
1999 540it - Schwartz II/Sand Beige, style 5 rims, Conti DWS 235/45 tires, Billy HD/Sports, Stoptech S/S BL, F1 Pinacle 35% tint, Zionsville Cooling kit
1998 318ti Cali Sport - Schwartz II/Schwartz Anthratz, staggered style 23
1997 318ti Sport - Schwartz II/Schwartz Anthratz, staggered style 68 ,
1995 318ti Active - Alpineweib III/Schwartz, squared style 32
1994 325i - Bostongrau/Tan, Billy Sports, H&R springs
1991 318ic - Schwarz/Anthratz Stoff, Bilstien HD, Z4 3.0 SS, Magnaflow, S/S Stress bar, x-brace, M20 FW, Elipsoid/HID, K&N
BMWCCA# 160411
1995 318ti Sport Schwartz II/Schwartz Anthratz - Sold
1985 635CSI - Schwartz\Sand - Sold
1984 533i "Max" - Schwarz/Schwarz, - Sold
1984 318i - Champagne/Tan, Stock - Sold
BMWCCA 484984
I'm not due for either of those yet and I hope I don't have to do them for a while.At least not until my, as of yet unborn, son is a toddler.
Thanks, Doru.
It took a little longer to take the pics, but the most time consuming part was figuring out the order of and organizing the photos. Typing in the text took a while, too.
One thing that made everything just a little harder was how SLOW photobucket's servers were last night.I might have to start looking into another image hosting site.
Last edited by jamesdc4; 01-25-2009 at 05:01 PM.
Status Quo!
Nice!!!
BTW the replacement M5 battery at Autozone is the premium battery but is smaller with a lot less CCA's. I found that quite off. The 49-dl is a beast of a battery slaughters the CCA's of the original.
Another FP5241 Creation
Parting out M54 Engine. Intake and all. Cats avail as well. PM ME!
Member
Cnn...if you turn #15 with the wider section toward the battery (like BMW sent them over from Germany)...not only does it prevent the battery from sliding forward and back...but it prevents it from being able to be pulled upward (hence the name "battery hold down clamp").
That hold down clamp (#15) is used in multiple BMW applications (see the images from my e38 below when it still had its original battery from the factory) which doesn't have the brace bar across the top...it only has the hold down clamp...and note the direction of the clamp and how the wider side clamps down on the foot/base of the battery which holds it down as well as from sliding forward and back. If the e38 goes shiny side down (flips)...the only thing holding the battery is the hold down clamp and battery cables!
(E38 battery compartment & hold down: wider side is turned toward the battery and clamps down on the foot/base of the battery)
-
Also note that in the diagram for the e39 battery...there are several of the items that are NOT drawn in their correct position:
- the top brace #5 - is upside down and drawn in the wrong direction
- the hold down clamp #15 - is not facing the correct direction & is on the wrong side of the battery
- the cover that none of us seem to have #9 - the groove in the top is also drawn in the wrong direction...it should point from the positive battery cable post toward the rear license plate
If your battery is tall enough, the brace (#5) will secure it...or one can do as was mentioned in the other thread and use a small block of wood between the battery and the brace...and that can help secure the battery...but I would highly suggest turning the hold down clamp around (#15) so that it clamps down on the foot/base of the battery for extra security.
Become a BMW CCA member! Click HERE to join and feel free to use my BMW CCA member #191509 as a referral.
2015 650ix GC (Moonstone/Cohiba Brown) <<~>> 2014 X5 50i (Space Gray/Mocha)
BMWCCA 484984
Ken,
Thanks.
I saw that, too. The premium gold-duralast had an 8 year warranty and a 3 year free replacement warranty, but the CCAs make the 49-DL the better pick.
That's amazing. That diagram sucks. I'm never using it again.
Last edited by jamesdc4; 01-25-2009 at 05:40 PM. Reason: Automerge
Member
That's perfect, thanks again!
Status Quo!
Btw why did you feel you had to use a battery settings saver? I remember I changed out my battery twice last year and the settings remained. I changed the battery within 10 mins of course.
Another FP5241 Creation
Parting out M54 Engine. Intake and all. Cats avail as well. PM ME!
BMWCCA 484984
Let's take an even closer look at the diagram...
- The bolt (#6) is upside down.
- The plastic shield (#7) is positioned on the wrong side.
- The battery itself (#1) shows the positive and negative posts reversed.
- The cover that no one has (#9) is not only positioned incorrectly, it is impossible to position the positive post cap properly (no matter how you orient it).
WOW!
Paranoia.
Actually, I knew it would take me longer to do the swap because it's my first time and also because I was going to document it. I was also curious to see if the thing works. It may have taken me longer than 40 minutes to change the batt. out, so I guess it works, but I still had to reset the clock and date. Radio settings and seat memory settings were preserved.
Maybe I need to cut the power completely and see if my alarm problem goes away. Otherwise, it looks like maybe a new EWS module.
Last edited by jamesdc4; 01-25-2009 at 11:59 PM. Reason: Automerged Doublepost
Member
did you find that the battery was not as tall as the oem battery and that there's a gap between the crossbrace and the top of the battery?
2011 WRX Limited w/ Nav, Tach Motor Works & JR Tuned - Stage 2+ ~ 306 awhp 328 ft/lbs @ 19psi
AEM Intake, Process West TMIC, GFB Respons BOV, Invidia Q300 Turboback, Grimmspeed EBCS
AEM Wideband & Boost Gauges, SMY Cluster, SPT Short Throw Shifter/Bushing, 30% Tint
BMWCCA 484984
Asharus,
As per our conversation in this thread...
Duralast 49DL battery install - Advice please.
..., it is not as tall as the OE battery and there is a gap.
The plastic cover (#9) in the diagram above seems to be an indication that cnn is right about the top support brace's purpose being to secure the battery in the unfortunate event of a roll over hence the slot for the brace.
I'm not too worried about it though because the hold down clamp seems pretty secure.
been there done that...
what will happen if the vent kit isnt utilized? I have interstate in mine that was there when I bought the car. Idk if the used the vent kit or not, hence the dumb question
(oOO\(|||)(|||)/OOo) /00=[][]=00\
 Posting Permissions


 Reply With Quote
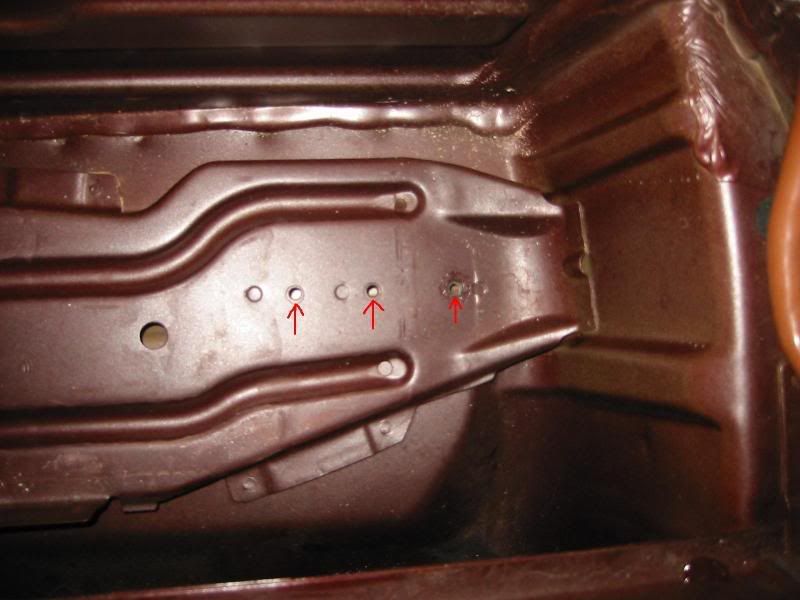


Bookmarks