
 Poser -In Training-
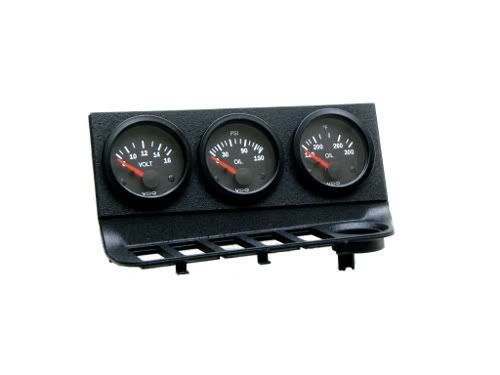
This is a DIY for those interested in building/buying sensor bungs in order to monitor vital engine items (eg: oil pressure, oil temperature, water temperature), as well as create a custom, factory looking gauge mount for the sunglass-holder on an E36 utilizing 3 standard 52mm gauges.
If anyone has any questions feel free to ask! I also am making the oil distribution blocks that I will be showing as a “made to order” basis. I am also open to ‘group buy’ scenarios if the market exists..
Without further ado –
Due to some unfortunate events earlier on this year, I decided that I needed 3 gauges while auto-crossing regularly.. oil pressure, oil temperature and water temperature. I utilized the TRM water temp sensor adapter in order to add a 1/8” NPT sensor bung directly to the head of the engine (Can be found here: TRM In-Head Water Temp Sensor Adapter.
Picture of the TRM in-head water temp sensor adapter, immediately to the right of both factory temp sensors
For the oil portion of the system, due to limitations of the M50’s design.. I had no easily accessible bungs or locations that would allow for the addition of 2 oil sensors while avoiding drilling new holes [in the oil pan/filter housing] or removing the OEM pressure switch (located on the rear of the oil filter housing). That being said, I designed and fabricated an entire oil distribution block that is both smaller, and more efficient than anything that was currently available (in my opinion!). I have placed an oil temp sender in the back of a custom made banjo bolt, and both oil pressure senders (or oil pressure sender and factory oil pressure switch) in the distribution block, held in by the banjo bolt.
Several views of the oil distribution block that was designed:
The banjo bolt + 1/8”-27 NPT sensor bung was turned out of a standard M12x1.5x50 steel ‘shoulder bolt’ (DIN 960 I think, meaning partial threads) and a piece of steel to weld to the back of the original bolt. The overall thread length on the original bolt ended up being too long, so they were later shortened (adjusted by ‘fitment test’).
Start with a bolt like this... (M12x1.5x50mm grade 8.8 'untreated):
And turn it into a banjo bolt, with a welded 1/8-27 NPT sensor bung on top! (make it small enough that you can still get a deep socket over the bung too!
Sender set in place for illustration:
Alright, so that's the fancy banjo bolt - All sealing surfaces were machined to assure shape/form. Copper M12 crush washers were purchased to seal these faces.
So now you've got your banjo with oil temp sender, a new oil pressure sender, and a factory oil pressure switch.
Add in your new aluminum bung, and you have yourself a sweet setup that retains the stock pressure switch [read: idiot light] and 2 additional sensors!
Alright - overhead view to show how compact and non-intrusive this sucker is... (Mind you, this is all in the factory oil pressure switch location!)
Voila! Now you have the sensor and sensor bungs finished..
Now, before you go wiring all of these up right away, something to consider – I chose to wire mine towards my gauges with a removable harness that would allow engine removal without having to cut any wires.. I’m glad I did, as the engine has been out of the car multiple times in the last 6 months..
Ok.. So here’s the wiring that I implimented... I'll let the photos do the talkin' for a little bit..
Connector/mount towards the rear of the engine (just below the head under cyl 6 intake runner)
The connector is actually a 4 lead microphone connector – I chose this because it was a metal connector with threads instead of a plastic pinned clip together style. Seemingly very secure and durable (Note, you should only need 4 leads MAX if you’re running 3, 2-lead sensors).
Car side cable (3 leads interior - 1 signal wire for each gauge).. Hanging loose, ready to be hooked up when the engine gets re-implanted.. One note, it is not necessary to have the engine removed in order to install these wires! They are pulled through the grommet that runs from the clutch pedal to the reservoir/slave cylinder. The grommet is below the brake booster, on the ‘driver’s side’.
Up close of the connector..
The engine side was wrapped in 1/4" stainless expandable mesh and heat shrunk at ends to prevent fraying/spreading. The interior side is wrapped in the same stuff, but in a black nylon plastic version...
More on interior wiring later.
Ok, so I took a break from the knuckle busting work (cause they actually are starting to hurt... ) and moved my attention to the gauge part of this install..
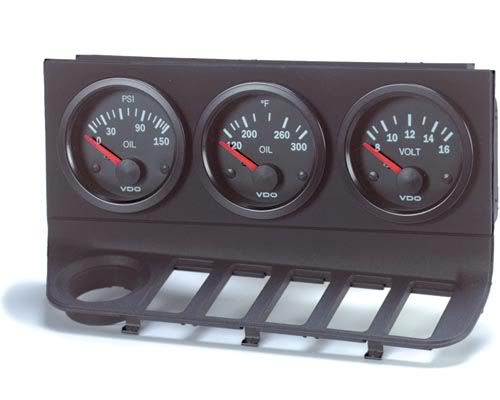
I've decided to go with a triple gauge setup as was previously mentioned, in the sunglass holder area. I am using 3 Prosport gauges.
Step 1, measure up your sunglass holder, find a friend who's got a CNC plasma cutter, and send dimensions and stock size out to let the magic happen.
Acquire this:
This blank is actually slightly larger all around than neccessary, and the holes are slightly small, which is a perfect starting place for a factory finish.
Start with a clean, stripped sunglass holder module (remove the rubber lining in your holder, as well as any switches, blanks, metal clips and the cigarette lighter so as not to damage anything during this process!)
Notice the "step size" in the sunglass holder face against stainless steel plate – I’m going for a FACTORY finish..
Next step - get rid of the step. I used both a fine and a course dremel sanding drum, as well as a plastics/wood cutter piece (looks like a brown, abrasive cutoff wheel with small round holes missing out of the face).
Take your time, as you can always remove additional material - you can't put it back. Furthermore, make damn sure you don't catch the plastic on the other side of the 'sunglass holder opening' closer to the switch panel for much the same reason - You can't put it back once you take it off.. take your time and you'll end up with something like this...
Finished product:
Fitment test?
Straight edge for comparison -
And a rough test fit, including proper spacing (not fastened down)

Last edited by HotDoggin; 08-10-2010 at 12:43 PM. Reason: Automerged Doublepost
Poser -In Training-
So this should look very similar to what you have... or does it?
Ah wait - missing some bits..
So, The sunglasses holder is ALMOST perfect for 3 gauges across, however it just needs a little tweaking..
The back side needs to be cut off/in half. This is to allow you to get your gauge retention clips on to the back of the plate. (Notice cut line).
I tried to cut out as little as possible around gauges to eliminate any wire-snagging hazards when placed back in the dash, but after an hour of careful trimming and planning, I gave up... Below is the cleanest, most efficient (without weakening the frame too much) method I could come up with.
At the same time, the location where the gauges are going to sit (check it against your mounting piece!) needs to be clearanced along the top of what you haven't removed to allow the gauges, which will be mounted on the front plate, to slide in and sit flush with the face - (Notice 3 round reliefs carved into the top of the holder). Be careful not to remove too much plastic! (Remember!!! You can always take more off). It is a good idea to use your dremel sanding drums again for the gauge clearancing. Also, use your plate to guide you in how much material needs to be removed…
[IMG]http://i2.photobucket.com/albums/y24/HoT_DoGgIN/BMW/Gauges/IMG_3116.jpg[/IMG]
(Rear clearance demonstration)
Ah - Almost forgot... One area that is particularly tight is the very outer edges of the unit. If you look straight down on the sunglasses holder, it actually gets narrower the farther away from the open side you go. That being said, the edges of the compartment need to be slightly clearanced to allow for the retaining clip to pass up to the plate. - notice on the side of the gauge, right where it disappears into the covered section, you can see a relief that has been carefully carved into the remaining plastic to allow wiggle-room for the bars/clips.
(Top clearance demonstration)
-One thing worth mentioning in this picture, you can see a hole cutout in the lower left that looks like a trapezoid. Indeed it is! This is a clearance hole for my connector that is going to be placed in the gauge "pod".
I went to Radio Shack to see what sort of 'high density connectors" they had, and I ended up with a 15 pin D-Sub connector (M + F). Total cost was <$5. Oddly enough, the 9 pin D-sub connectors were the same price, but at the time I did not know how many wires i was going to need, and had considered running all wires independently before they exit the pod. That idea has since hit the drawing room floor. I am planning to wire all of my leads into the connector (Combining likes, of course) and nut/bolt it into the back of the housing, followed by a matching connector in the dash feeding 12V+, 12V Acc, 12V parking lights, ground and sensor leads. This is a total of 7 leads (9 pin would be ample!) for my ProSport gagues. These connections in my system will allow me to remove everything at any time and not have to worry about re-running the wires that have been fished in through the clutch-line grommet hole and through the dash. Plug n' play baby!
A quick look at the front.. The gauges appear black when off - The flash on my camera is making it look, well, not black..
Reminder - These are Prosport Amber/White Performance series gauges. So far after looking at the lighting color during a test, I think these are going to be a perfect match for the factory dash coloring in the E36. My additional disclaimer is going to be that if you choose to do this, make sure you have your gauges before you start cutting clearance holes/cavities in the back of your piece, as other gauges may be far smaller or a different shape all together!!
Up next is panel finishing. I’ve painted the gauge panel, and glued/clamped the front face onto our prepped sunglass holder:
I Used some Rustoleum satin black 'fine textured' spray paint (VERY close match to the texture on the black plastic trim pieces!)
MAKE SURE YOU LET THIS DRY! It suggests 48 hours... I gave it <12. That being said, when I glued my plate on and used little clamps as pictured above, I had a few marks form because the paint was still sorta soft.. boo. Good news is they're small enough not to worry about and blend when in the car.
Slide em' in for a quick preview -
Ok, hook up your gauge wires (Make sure you have the correct wires for the correct gauge!)
Slide all in, tuck wires under, and tighten gauge detents..
Into the car now -
Remember the wiring in the front? Here's the "interior side" poppin' out of the center console.. It has had all matching wires identified and soldered into the matching D-sub connector. Appropriate power and ground leads have been added as well. I now consider this wiring harness a permanent feature of the car, never to be removed unless Armageddon hits..
Hook em' up, slide em' in and away you go.. (don’t slide your OBC in just yet!!!)
So, you have just put these bitchin' gauges of your choice into your sunglass holder, wrapped up your install and just slammed the OBC back into the console. Shit. You forgot that your convenient finger hole is gone so you can no longer push it out!! GAH.
Solution? find some black ribbon (or your color choice... Mine was matching blue because this is all I could quickly find), and tie it around the light bulb access holes on top of the OBC.
Make sure you loop it around well and tie secure knots. A great failsafe that I learned from model rocketry is to tie your knot, then use thin CA glue (Superglue) to soak the ribbon/string to set and hold the knot forever.. Also, make sure you leave enough that you can either grab with your fingers or a tool, but keep it minimal!
Put it back in the dash, and you're good to go. Also - don't forget that the bronze colored clip that you removed towards the beginning of carving out your center gauge hole needs to go back in to effectively retain the OBC above the gauges. Luckily, the clip that it holds onto on the computer is ~3" wide, so you can pull it off, and slide it to one side or another on the sunglass holder where it won't interfere with the gauges and still work well.
Assuming you’ve made it this far, this is what you’ll see in your car..
…sorry for the blur, but a dark garage and point and shoot without a camera introduces some blur – You get the picture for brightness of the prosport gauges I chose..
Ok – One last step… Stick a fork in it, cause your install is done!!!
Like I said earlier - If anyone is interested in an oil distribution block (the aluminum bung, banjo bolt bung, and 2 copper crush/seal washers) please PM me!
Rock on!
Last edited by HotDoggin; 08-10-2010 at 02:50 PM. Reason: fail-automerged Doublepost
Member
WOW! Very nicely done. One of the cleanest and well thought out gauge installs I have seen.
resident
VERY well done. i may be borrowing some of your ideas. I REALLY like the harness. mind posting up a schematic for it? i'll add this to the DIY forum as well! again, great job man!
-ducky
Senior Member
Supporting Vendor
Nicely done.
A comment on the oil solution though, you won't have any flow through where the oil temp sensor is now located.
We will sometimes use a temp sensor (and pressure sensor) inline from our ODB when feeding a turbo, but without oil flow, it won't ever have an accurate temperature reading. Pressure readings from an ODB is fine, and we use them for conventional pressure sensor installations on M50 based motors very often as well.
Your best location for oil temp is generally the oil pan. Next could be the oil filter housing (usually the lid). The vanos line could work as well as there is flow through that line, or inside the banjo bolt that feeds the vanos line.
Michael McCoy TRM
Poser -In Training-
I realize this is true.. This is why the oil temp is located as close as possible in that tree of sensors (only has to transmit the temp through the stem of the banjo) Pressure should be linear (so long as there is no obstruction). Now, from what I understand, water temp will most likely rise faster than oil temp (in the event of an overall issue - not something like individual component failure) will... That, and the fact that I personally am not running a turbo meant that I was less concerned with the accuracy (not to say "not" concerned).. Additionally, my water temp is obviously, directly in the head so it should be the fastest to respond to overall temp changes. I guess to add one more bit... wouldn't a major oil-related issue usually provide a spike or dip in oil pressure at the same time?Originally Posted by techno550

If I had a turbo or a real need for a 100% accurate oil temp, the oil pan would have been my choice - there is, after all... a perfectly arranged area on the pan that when cut out and tapped, would allow for a recessed bung without any risk of decreased ground clearance.
Member
extremely well done and very interesting
i'm starting to look into doing this on my car, but i've got some other issues to sort out in the mean time. you have some serious fabrication and electrical skills.
Senior Member
Supporting Vendor
I tap (or weld a bung on) the pan for sump temp. On my track car (stock 325is drivetrain with aggressive software) I can get the oil temps to 240+ if pushing hard enough, and the water temp stable at 200ish. At a standard DE pace oil temp will stay below 220 on this car.
For a non-track car (or short sessions) oil temp is less important. In general, it is more often used as a "I know what temp I want to stay below", but a "relative" measurement can be very useful as well. (if you know it usually reads X on the highway, and today you are X+20, it could mean a problem such as low on oil, etc.)
I'm concerned that, given the airflow around the oil filter housing area, you may get more influence from radiator wash and ambient temp than you would want. It will be a tough battle between the cooling airflow around the sender and distribution block (which will vary with radiator temp, ambient temp, fan speed, and vehicle speed) and the heat transfer rate of the oil (and possibly air) in the block. If the readings vary based on driving, it may lead to some incorrect conclusions on the data being presented. (ex: car being driven hard but fast, and the oil temp increase being approximately equal to the heat loss from the added airflow around the sensor, and an overtemp condition existing with the oil that reads as "normal" to the sensor itself.)
Its a very elegant solution, but possibly slightly flawed. Perhaps you could move the temp sensor to the vanos banjo location instead?
sorry for the nit picking.
Michael McCoy TRM
Member
Mine's a little crooked, but do you mean like this? Very professional installation BTW.Its a very elegant solution, but possibly slightly flawed. Perhaps you could move the temp sensor to the vanos banjo location instead?

Gave away my BMWs, driving a VW and an Audi now.
Off-Topic King
stop making DIYs and get your motor in your car dammit!
-Rich-
Member
Nice write- up.
+1 on the temp sensor- it'll actually tend to track cylinder head
temp, not a bad thing in and of itself.
And my personal pref. is for a mechanical oil pressure gauge-
I just don't like the granularity of a VDO, or the sluggishness of others...
that's me, though.
If you get the right size countersink for Allen (inhex) bolts,
(or a spotfacer)
you can use that to set a sensor into the oil pan-
there are a few places that are thick enough and low enough
to be pretty accurate- and then, an extended reach sensor is good, too.
I use VDO stuff, just because it's readily available to me,
and it works pretty darned well for small dollars.
jus' me chattering,
t
Off-Topic King
OP,
we'll have to do my setup when I gather my gauges and senders...at least the latter to get em wired up
I had missed the part where you used a serial port to connect the wires from the gauges to the wire harness.............that's slick
I picked up the oil distribution block from OP and it's a good design
mechanical engineer-approved
no put that motor back and come race dammit!
-Rich-
Poser -In Training-
I can absolutely see where you're comin' from. I have little to compare to, however the electronic oil press sender and gauge from ProSport seems lightning fast - It'll actually register pressure the second I crank the engine, and will pretty much identically mimic engine rpms (up to the regulated 57psi cap)..
FYI, I believe the idiot light pops on at 9psi or less if I am not mistaken... bad news if you see that guy!
BostonGrun
Great job...one question though...what causes the gauges to go from amber to white?
'95 BostonGrun Metallic on Sand 325is
Koni/Eibach - VDO gauge panel - UUC TMEs - RS SSK - RE RSMs - GC RTABs - MBQ/NEXT VRz 5.5/Clarion 745 - Brembo/Akebono
I need one Contour spare with tire...and a brown/tan passenger door panel...pm me if you've got one to sell.
Poser -In Training-
Prosport offers many different varieties.. (color combinations, sizes etc)
ProSport Gauges
Their gauge wiring requires the following for my Amber/White Performance Series application (non peak/warning gauges... non 'premium')
Black –Ground
Red - 12v ign. power-meaning power when the ignition is on.
White- 12v ign. power (for me, the same as red)
Orange -Headlight switch.
Green - Sender lead
The gauge illuminates white as soon as you turn on the car... as soon as I flip on my parking lights/headlights, the gauges immediately flip to amber, as does everything in the car. ProSport also offers a higher dollar peak/warning function with their gauges that will flash the fash dramatically when the reading crosses a determined threshold.. This gauge requires slightly different wiring (red is 12v constant) in order to maintain memory for the selected "warn/peak" settings..
Member
Well done!!
For those you might like to do the same but not spent the time on making the gauges holder a replacment unit is available.
This is available from BMP Design for either LHD or RHD cars, either with or without VDO gauges.
My Drip Loops Are Better
Looks great!
Poser -In Training-
This is where I got some of my inspiration... but look closely - That gauge face looks like thick plastic that has been glued on the face of a replacement sunglass holder without any modification!! Definitely not a factory finish..
Thanks to all for the kind words! This took a fair amount of work to pull off the way I had envisioned it... I'm really happy with the way it turned out!
Last edited by HotDoggin; 08-11-2010 at 03:17 PM.
Member
I have 3 prosport gauges in the sunglass holder, but was disatisfied with the visibility while driving. I remounted the gauges with angled gauge rings. Lost access to the lighter socket, but can monitor the gauges better now while driving.
Member
Thank you so much for the tip. I just assumed it was a sinle moulded piece. I will certainly check with them before I buy. I would be very annoyed if I found out after opening the package that the quality is not up to scratch.
It is a bit hard to tell from the pictures. Here is another angle.
Member
I had my gauges mounted there too, but were hard to see. So I was able to swap them with the OBC because I cut the cubby off.
[ame="http://s196.photobucket.com/albums/aa243/jmo68/Gauge%20DIY/?action=view¤t=Gaugeinstall001.flv"]http://s196.photobucket.com/albums/aa243/jmo68/Gauge%20DIY/?action=view¤t=Gaugeinstall001.flv[/ame]

Gave away my BMWs, driving a VW and an Audi now.
Member
ooo, I like that positioning...
t
Member
I'm so impressed with your work. Well done!
'96 e36 318is
Member
Very impressive ! Nice work
1999 Audi A4 1.8t
Upgraded turbo-forge motorsport diverter-HIDs-s4 wheels
Poser -In Training-
I completely forgot to mention that the distribution blocks that I have designed include the threaded hole for the factory pressure switch (M12 x 1.5) as well as 2x 1/8"-27 NPT tapped holes for a standard sender..
If anyone wants one, lemme know! I've got materials lined up and ready to go!
 Posting Permissions


 Reply With Quote


Bookmarks