
 forever an autodidactic..
I was recently shopping for a HID covnersion kit for my ProjectorZ H9 headlights and came across a group buy from understeer. The deal was so good, I decided that I'd also get a kit for my fog lights. I'm not necessarily into the "bling" of matching the color of my fogs to the headlights, but I've always felt halogen lights just didn't light up the road enough. I'm not sure the "white-ness" of the HID lights will do well in a fog situation, but I use my fog lights on the freeways here just as additional lighting of the road. If you're primarily using your fogs in foggy situations, you might want to reconsider a HID conversion of your fogs.
I originally thought that this was going to be a simple plug-n-play conversion. I wasn't initially thinking of doing a fog HID conversion so I never did any research on this. When I got the HID kit and took out my fog lamps, I realized it was going to take a little bit of work to get this conversion done. I also have a particular rule about doing modifications: either the modification has to look completely factory stock, be completely reversible, or easily reversible with the replacement of a few (not so expensive) components. This implies that I do not want to cut any wires in the factory harness. I originally thought I'd have to cut the electrical plug for the fog lights to convert to the 9006 connector. At this point, I was leaning towards just putting up the H7 HID kit forsale. But upon a closer examination of the fog lamp housing, I found a solution that required no cutting at all.
The kit I ended up with was the XTec H7 that puts out 3400 lumens @ 4500K color, using a 35W ballast. This kit came with everything (and more) that I needed: 35w ballast, H7 re-based HID bulb, 9006 connector to H7 wire harness, double sided tape for mounting the ballast, and some zip ties.
The tools I needed were:
<ul>
<li>1/4" drive ratchet wrench
<li>8mm socket
<li>19mm stubby open end wrench
<li>1/4" drive 6 inch extension
<li>flat head screw driver
<li>tool mangetizer/de-magnetizer
<li>pliers (might need two)
<li>dremel tool w/ hole grinder + drill bits
<li>Windex wipes
</ul>
<ol>
<li>Remove the fog lamps
To remove the fog lamps, first remove the rectangular cover next to the fog lamps. They fit straight in, so try not to pry it open, but instead get a flat head screw driver underneath it and pull straight out. Once the cover is removed, two 8mm nuts are revealed. There is also a phillips head screw. Don't touch the phillips head screw, as that is your fog light angle adjustment screw. Remove the two 8mm nuts and the fog lamp assembly should come right out. Disconnect the fog lamp power/electrical plug, which is a simple two pin plug. Make note of which pin is connected to the ground (brown) wire. This is for later use.
<li>Making room for a HID bulb
The fog lamp reflector housing has a deflector shield to prevents the bulb from sending light out directly; the light is reflected out. This shield only allows a standard halogen H7 bulb. Because the HID bulb is taller than the halogen bulb, the HID bulb will not fit unless you remove this deflector shield.
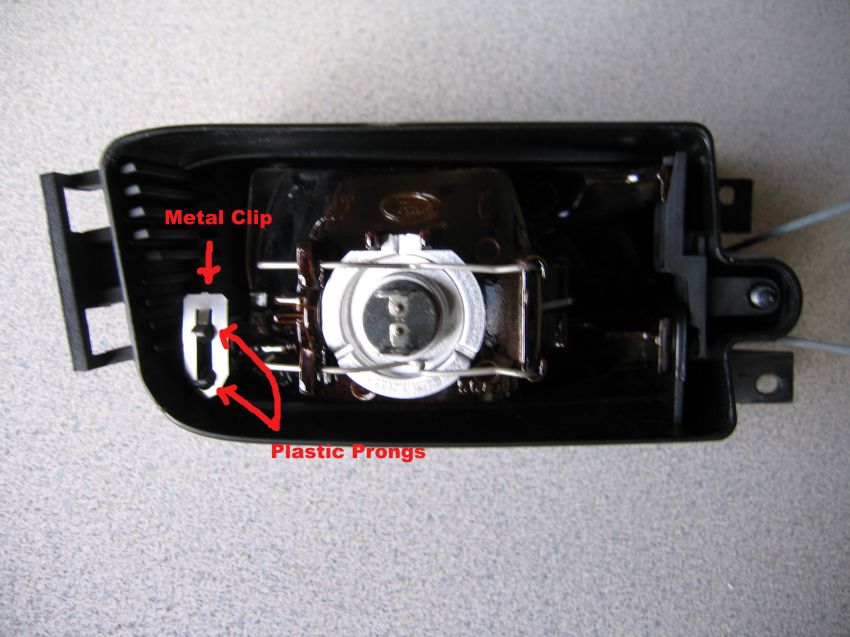
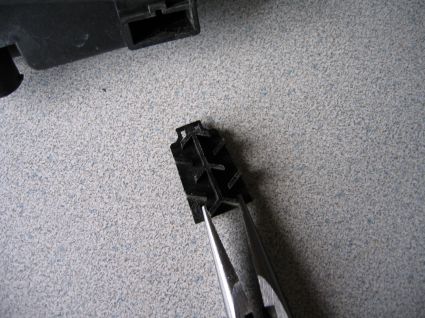
To remove this deflector shield, open the back of the housing by removing the spring clip and the back side should open up. There is a metal clip that secures two plastic prongs that hold the fog lamp reflector on the outer edge. Remove this metal clip; just pull it off. Use a set of pliers and gently spread open the two plastic prongs while pulling the fog lamp reflector out.
Next, remove the pin that holds the deflector shield and remove the deflector. Install the fog reflector back into its place and secure the metal clip back on. Now there will be plenty of room for a H7 HID bulb. Here is a picture of the reflector without the deflection shield:
<li>Getting the HID H7 bulb fitted
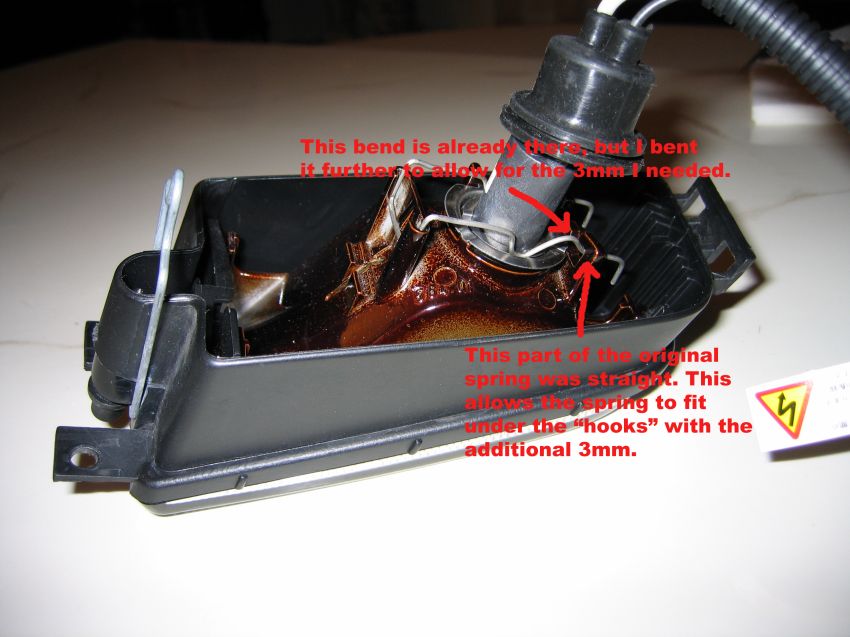
The standard halogen H7 bulb has a round base and on the back side is a groove where the spring clips hold the bulb in place. The HID H7 bulbs I got with the XTec HID kit had a groove that was 3mm too shallow. When I tried to force the spring clip to hold the HID H7 bulb, it popped right off. With some finess, I suppose you could get the spring to hold. But then you'd have to worry if a bump in the road might pop it off again or if the extra tension might cause enough stress to break something.
To solve this, I decided to bend the springs in two places on each side to accommodate the extra 3mm clearance the HID bulbs needed. You can see where I bent the springs with pliers in this picture:
Wiring for the HID ballast
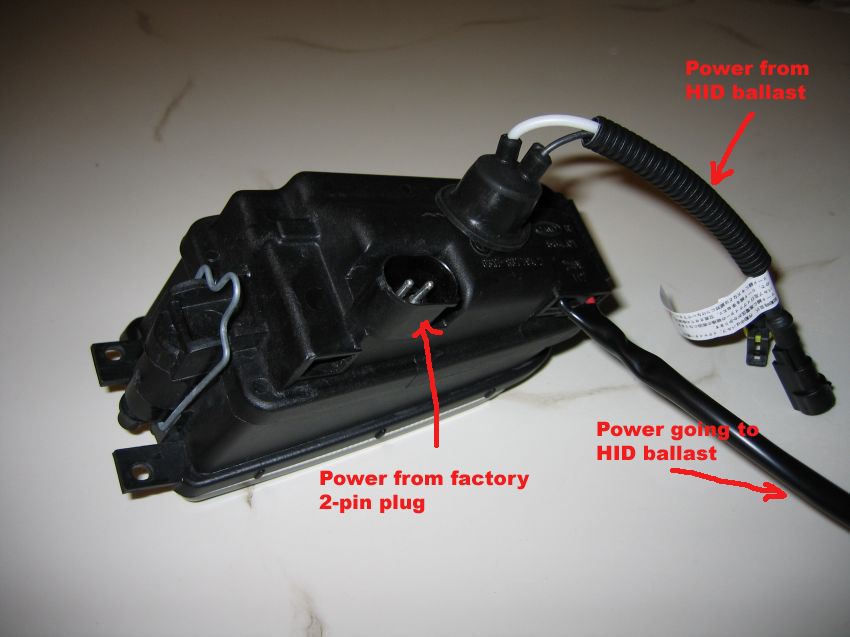
The XTec HID ballast has standard 9006 female connectors for power input. The standard H7 halogen bulb uses 2 electrical tabs. The XTec kit comes with a wiring harness that takes the electrical tabs on one end and a 9006 male connector on the other end. While this is simple plug-n-play for doing most headlights, the fog lights have a 2 pin electrical plug that connects to the fog lamp housing. On the inside of the housing these wires connect to the actual H7 halogen bulb via electrical tabs.
My first thought was that I'd have to cut the 2 pin plug off, solder those to the harness that came in the XTec kit to convert into a 9006 male connector. However, I don't like cutting into the factory wiring. And although I could always reconnect to factory 2 pin connector, there would be signs of tampering. Replacing the entire wire seemed too much of a pain.
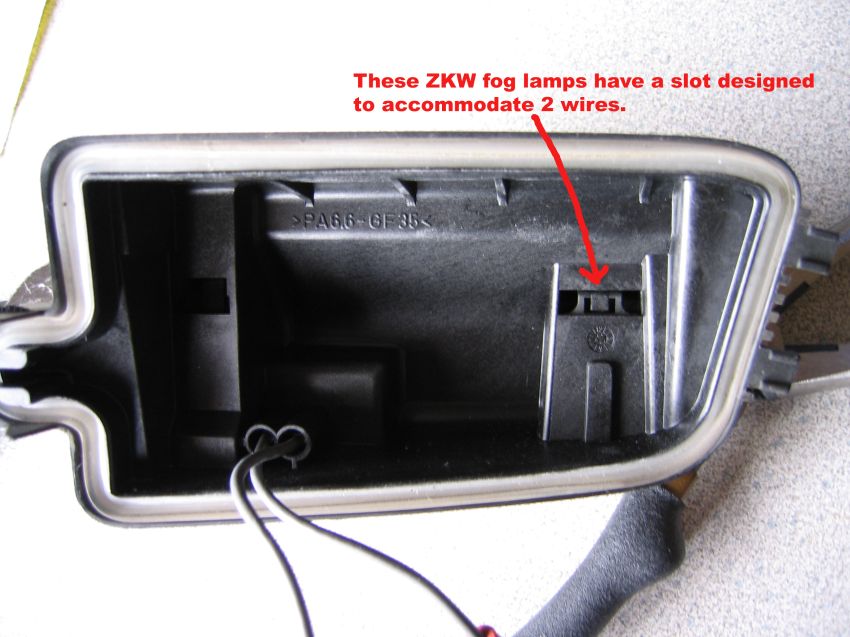
However, as I took a closer look at the back cover of the fog lamp housing, I noticed that ZKW (the maker of these fog lamps) had designed a slot where two wires could be routed into the housing:
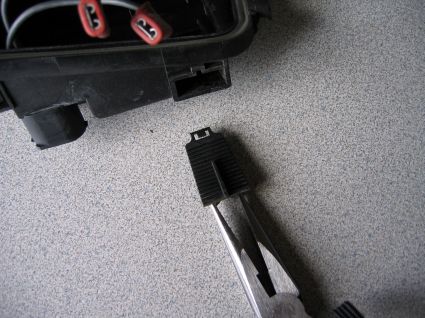
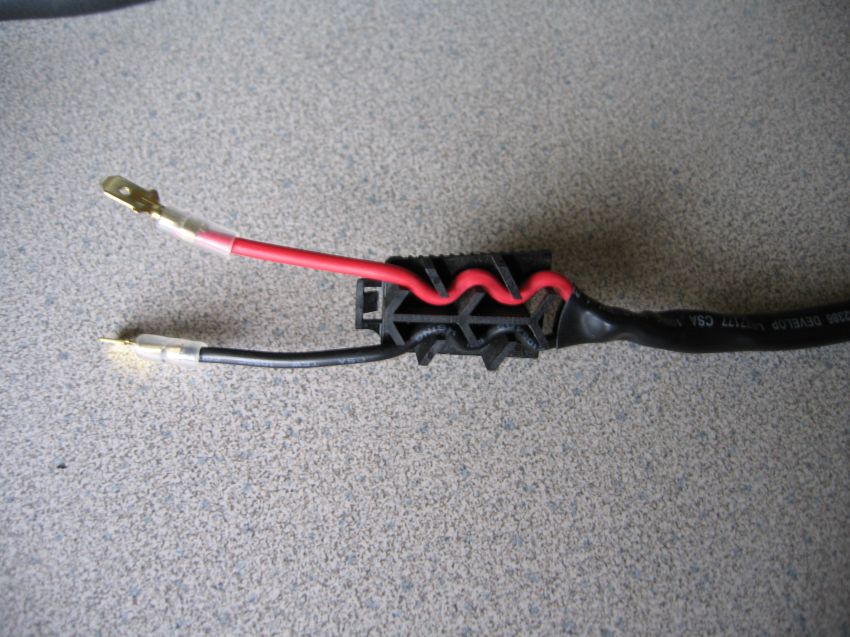
There is a plastic wire guide piece that you can pull out from the bottom. Turn it around, and you'll see a zig-zag pattern for routing the two wires from the XTec H7 to 9006 harness. Here are pictures of the wire guide being pulled from the bottom and its backside:
A picture of the wires from the XTec harness being routed in the guide:
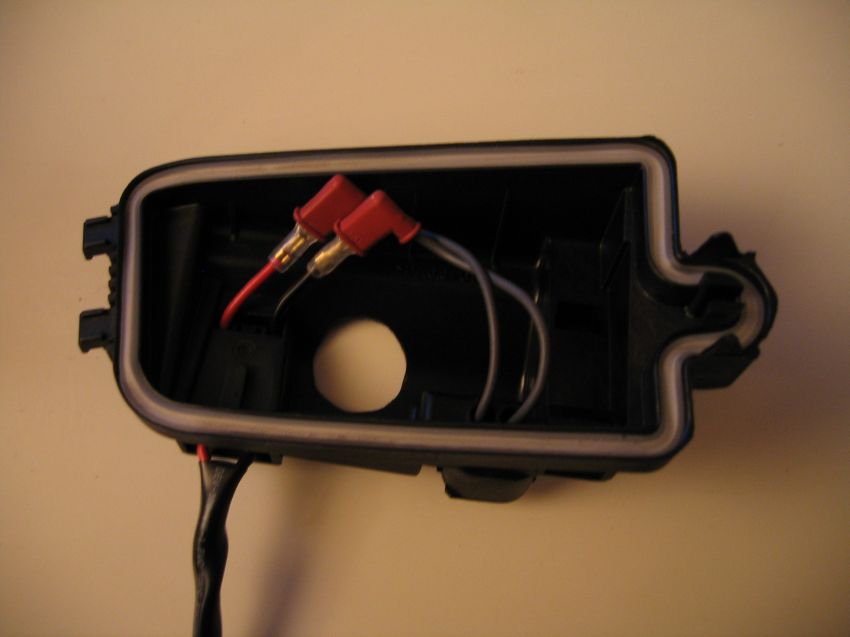
Once the two wires are inside, connect them to the two wires that normally connect to the H7 halogen bulb. This is where you have to make sure that the black wire from the XTec harness goes to ground (BMW typically uses brown) as the two wires inside the housing are the same grey color. Halogen bulbs aren't polarity sensitive, but the HID ballast likely are sensitive to polarity so it is safest to make sure ground goes to the black wire.
This way of doing the wiring allows you to use the factory 2 pin electrical plug which you plug back into the fog lamp housing. Plug the wire that comes out from the bottom of the housing which has the 9006 connector to the HID ballast. There is no cutting of any wires here.
<li>Drilling holes for the HID H7 bulb
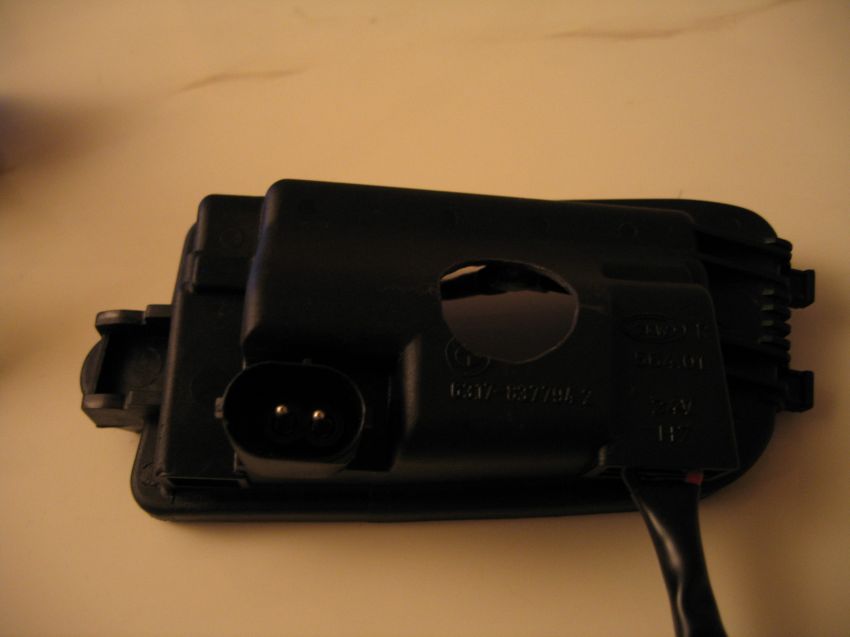
The HID H7 bulb is much longer than the halogen H7. To accommodate this and to allow the HID bulb's wires to come out of the fog lamp housing to be powered by the HID ballast, you're going to have to drill a hole in the back cover. (These cost $25 to replace if you ever want to revert back to stock. BMW P/N 63-17-8-381-975 (Left) & 63-17-8-381-976 (Right))
This is where I used my dremel tool. I started by using a drill bit at the center of where I thought the hole would center. Using that hole has a pilot, I then used a hole grinder bit and enlarged the hole until I got it just right. There was a few cycles of "grinding, fitting, grinding, fitting,..." Once I was done, this is what it looked like:
Once the holes were done, I re-assembled the fog lamp housing with the HID H7 bulb and wiring. Now it's ready for plug-n-play:
<li>Installing the HID ballast
I mounted my HID ballast on the inside of the front bumper. (not the bumper cover, but the metal bumper. feels like aluminum?) To reach this area, you'll have to remove your headlights and this is where you'll use your 19mm open wrench, and 6" 1/4 drive extension with the 8mm socket. The headlight housing is held to the car via 4 screws. 2 are on top and you can see them. Hold the 19mm plastic nut on the backside and unscrew the 8mm nut on the front side. The other 2 screws are on the sides. If you peak into the slot between the headlight and the center grill, you'll see it towards the bottom. Since you can't reach a 19mm wrench in there, I use a screw driver wedged in to hold the 19mm plastic nut still while I unscrew the 8mm nut. The last screw is hard to see, but if you use a flash light and look straight down near where the turn signal connects to the headlight housing, you should see the 4th. Once these screws are out, disconnect all the wires (low beam, high beam, turn signal) and remove the headlight assembly.
With the headlight assembly out of the way, you can reach the backside of the front bumper. I used the flat surface to mount the HID ballast with double sided tape. To insure good adhesion, I cleaned this area first with a wet rag followed by windex wipes (which are mostly alcohol). After the area is cleaned, mount the HID ballast as close as you can to where the fog lamps would be. I was able to mount them almost directly on top of the fog lamps. The close proximity is because the wires from the HID ballast in the XTec kit aren't very long.
<li>Finishing up
Once the ballast is mounted, reinstall the fog lamps and connect all the wires together:
<pre>
[factory fog lamp 2 pin plug] --> [fog lamp housing] -->
[H7 to 9006 wire harness (coming out of fog lamps)] --> [HID ballast] --> [HID bulb]
</pre>
At this point, you might want to test them before you reinstall the headlight assembly. If everything is working, reinstall your headlights and you're done!
</ol>
Pictures...
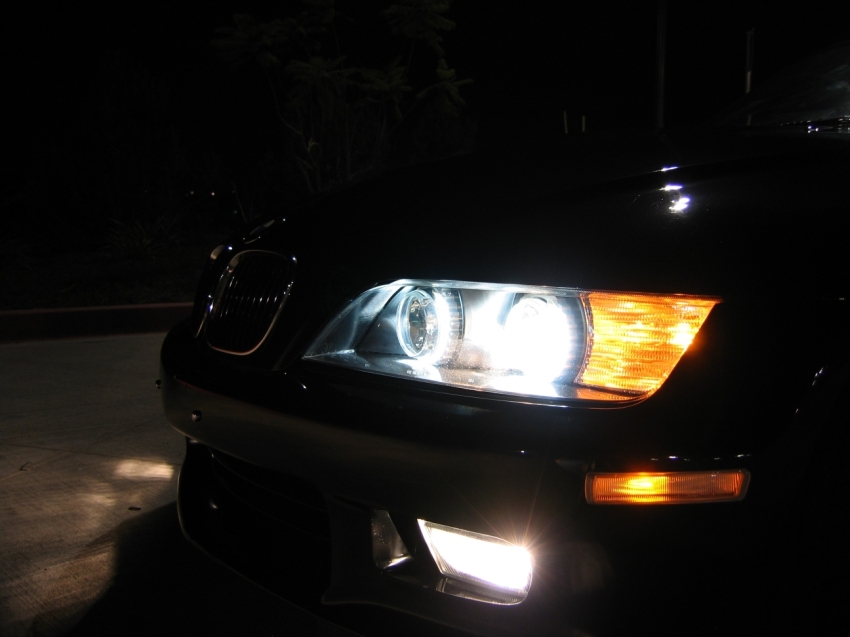
What's the fun of doing any modification without a before and after? So, here is a picture of when I had halogen H7 fogs:
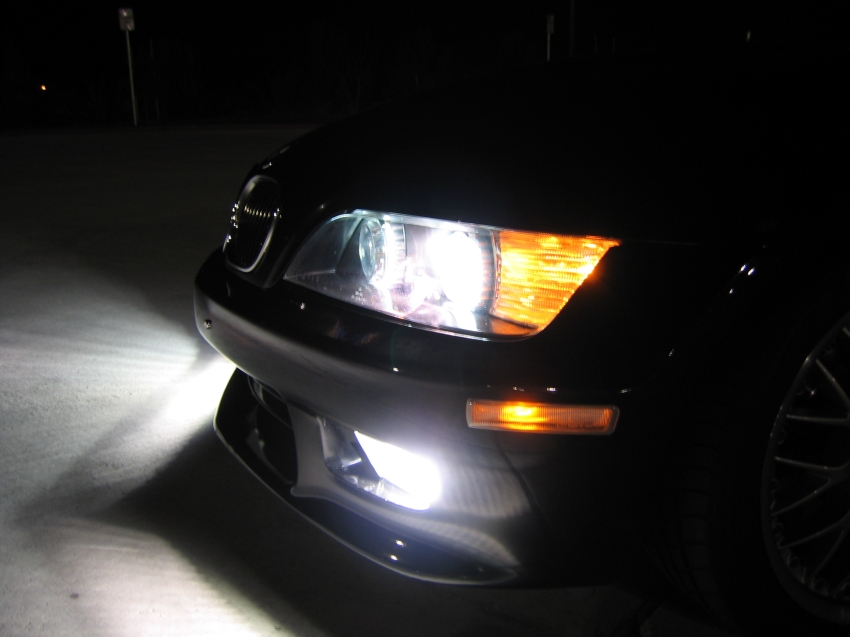
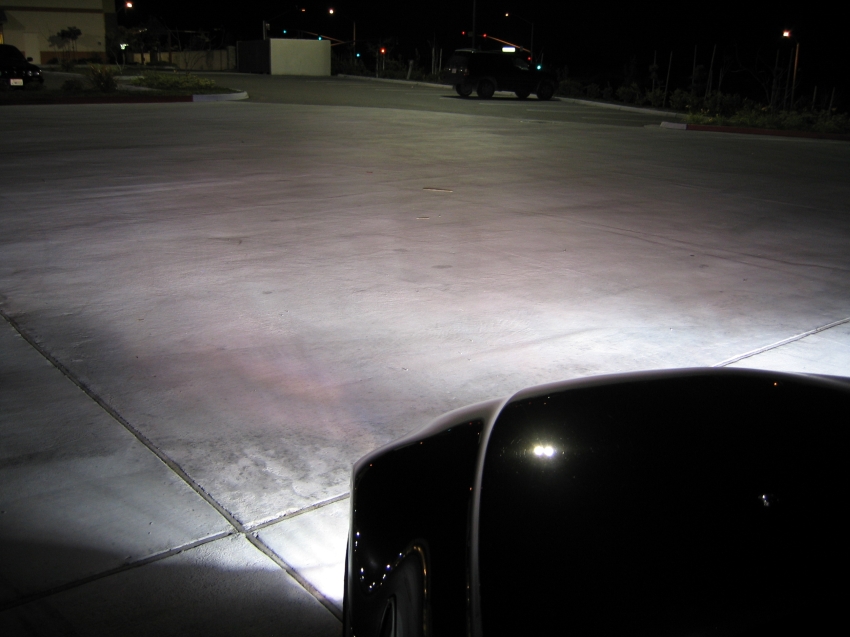
Here is a picture of the new XTec H7 35w HID @ 4500K:
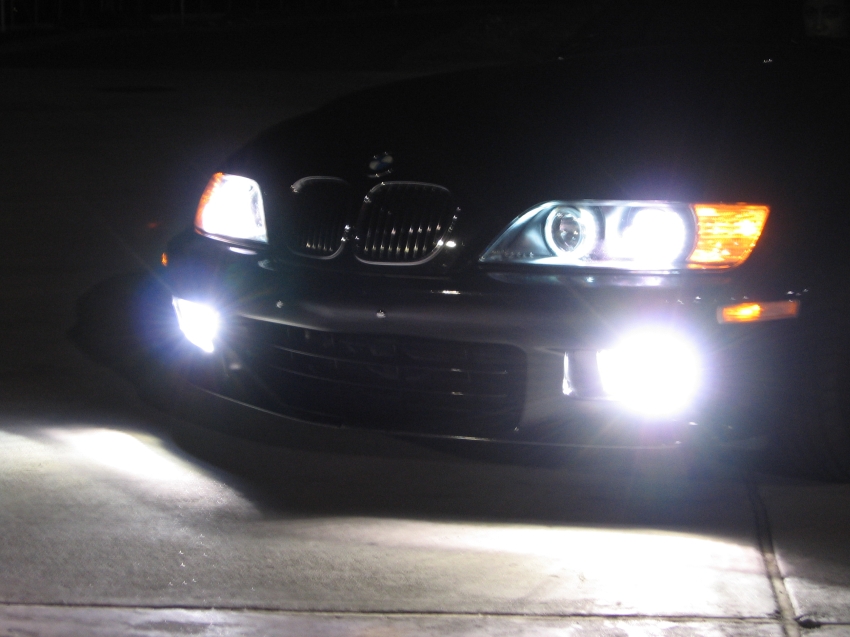
And more pictures...
Enjoy!...
Last edited by bimmerZ5; 02-22-2008 at 01:59 PM.
valley boredom
very nice looking and excellent writeup.
just to warn you, you're about to get crap from some internet police on this forum about the glare, even if it isn't a problem. some people need to stop bitching and worrying about other people, i swear.
DO IT YOURSELF.
Those look really nice. Much better than halogens. The overall light coverage looks great!
In regards to the glare, if they are properly aimed, glare should be no more a problem with HIDs than with halogens. Glare problems stem from people adjusting their lights too high.
forever an autodidactic..
Thanks.Originally Posted by Vinci
Regarding glare, i actually try to be a courteous driver; i've been blinded by SUVs with HID kits improperly aimed too many times, I wouldn't want others to have the same experience.
Halogen reflectors aren't ideally suited for HID lights in general. Halogen reflectors have a much wider range and with the uniform brightness of HIDs, you really have to aim low (lower than w/ halogens) to avoid glare on other people. This is hard to do correctly with headlights since you still want to see what's in front of you. I was comfortable doing HID on the headlights because I already have the ProjectorZ lenses. As for the fog lamps, you can see they are aimed 3-4 inches on the ground forward of my bumper, so the glare isn't so much an issue. I stood about 30 feet in front of the car kneeled down looking straight at them, and it was okay; so I feel they are aimed low enough not to bother someone driving in front of me. Well, not that SUV/Truck drivers ever notice other people driving around them....
 Posting Permissions


 Reply With Quote
Bookmarks