RESERVED. 
Here's my attempt to document my troubleshooting experience regarding the A/C system from a self admitted novice with zero experience. I had a brief conversation with HitmanX who instilled some confidence in me, so here we go. I will add and edit the first and second posts as I go along, so it won't be perfect. I would appreciate any form of help as I go along.
What tools you need?
First off, you need to purchase an A/C manifold gauge + vacuum pump. I'm leaning towards buying this one from Amazon for about $129.
https://www.amazon.com/XtremepowerUS...tag=chri0e2-20
How to use the A/C manifold gauge and pump?
Next, you will need to check the vacuum system for leaks. The link below explains how to use the A/C manifold gauge + pump. On my car, all air flow goes through the defroster which indicates I have a vacuum leak somewhere.
https://www.youtube.com/watch?v=Pdq8JAlct6s
Where are all the vacuum pods located?
Pods can either be single or double stage but both are rebuildable. It is easier to rebuild the single stage ones. Before you can rebuild them, you will first need to purchase George Murphy's rebuildable diaphragms located here.
http://www.perfanalysis.com/climate-...cc-version-ii/
Here's DesktopDave's thread "how" to rebuild them.
http://www.bimmerforums.com/forum/sh...um-pod-rebuild
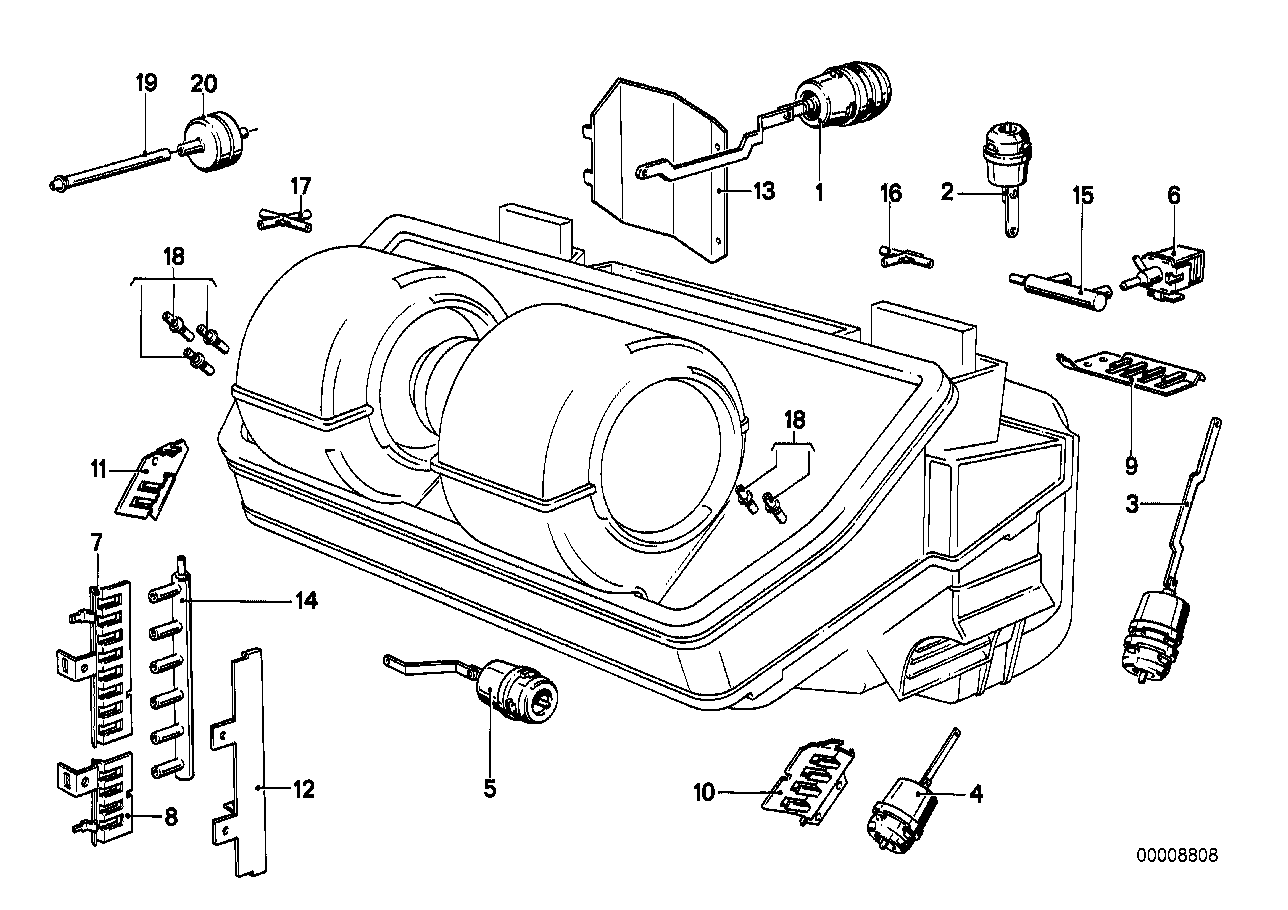
There are (2) HVAC pods located underneath the wiper cowl. One is single stage (white)... the other is two stage (violet/brown).
Use diagram below.
| 15 |
ACTUATOR FRESH AIR FLAP LEFT |
|
1 |
09/1979 |
|
64111368347 |
$54.19 |
2 stage |
|
| 16 |
ACTUATOR FRESH AIR FLAP RIGHT |
|
1 |
09/1979 |
|
64111368348 |
$54.19 |

There are 5 pods located inside the cabin. Use diagram below.
| No. |
Description |
Supp. |
Qty |
From |
Up To |
Part Number |
Price |
|
Notes |
|---|
| 01 |
ACTUATOR FRESH AIR FLAP |
|
1 |
09/1982 |
|
64111369309 |
$62.83 |
|
|
| 02 |
ACTUATOR REAR ROOM FLAP |
|
1 |
04/1980 |
|
64111361836 |
$62.83 |
|
|
| 02 |
ACTUATOR REAR ROOM FLAP |
|
1 |
04/1980 |
|
64111466190 |
$47.25 |
|
Rear passenger is not fun. You have to remove the center console to access it. Unless you are a glutton for punishment, just cap it at the vacuum branch. I removed mine to jam open that flapper door so I always have airflow to the rear seats on my 735i. This requires pulling the front of the heater box. Not as bad as it sounds once all the BS is out of the way.
The rear seat one is usually bad too. Too spendy to repair... pod is $70 now. Just remove it and plug vacuum line at the vac tree. If you need rear air flow like me, jam a piece of 5/16" fuel line in the flapper to keep it open. |
| 03 |
ACTUATOR DEFROSTER FLAPS |
|
1 |
04/1980 |
|
64111368440 |
$62.83 |
|
The worst accessible one to me is the defroster pod above the driver's foot (LHD) as the damned HVAC brain is right in your way along with a pile of linkage for the system. |
| 04 |
Actuator air recycling flap |
|
1 |
04/1980 |
|
64111367830 |
$30.41 |
|
Last is the recirculation pod above the defroster... not sure if you could access it in the car. Maybe if the pedal box was removed? Maybe the column? |
| 05 |
ACTUATOR FOOT ROOM FLAPS |
|
1 |
04/1980 |
|
64111367818 |
$62.83 |
|
|
| 06 |
Valve |
|
X |
04/1980 |
|
64111376325 |
$44.73 |
|
|
|
|
|
|
|
|
|
|
|
|
|
|
|
|
|
|
|
|
|
|
| 16 |
Distribution Piece |
|
1 |
04/1980 |
|
|
$1.55 |
|
I believe this is the plastic T connector that HitmanX suggests to replace with a 1/8" brass one from Home Depot. |
|
|
|
|
|
|
|
|
|
|
 Sponsored links
- - - Updated - - -
NOTES...
E23 HVAC info
Rebuild HVAC pods:
http://www.bimmerforums.com/forum/sh...um-pod-rebuild
Buy diaphrams:
http://www.perfanalysis.com/climate-...cc-version-ii/
George Murphy
Performance Analysis Co.
969 Oak Ridge Turnpike, Suite 258
Oak Ridge, TN 37830
865-482-9175 9 am to 5 pm ET M-F
Chasing hvac vacuum leaks and vacuum diagrams.
http://www.bimmerforums.com/forum/sh...C-vacuum-leak&
Misc info: Search on e23 hvac pod
Yes, they are pretty easy to replace all things considered. I have many photographs of me doing this operation on my 735i.
Access to a few is a pain in the ass, but you could easily do the important ones that have failed in a day if you work fast and the ambient temperature is not similar to the surface of the sun. I work very slow... documentation, pictures, diagrams, bag fasteners, etc.
The worst accessible one to me is the defroster pod above the driver's foot (LHD) as the damned HVAC brain is right in your way along with a pile of linkage for the system.
The front footwell is also not too fun. The one just behind the HVAC controls is pretty easy to pull out... this is for the center vents. Wiper cowl pair are not bad, just a bunch of crap to disconnect prior to access.
Heater valve is a breeze.
Rear passenger is not fun. You have to remove the center console to access it. Unless you are a glutton for punishment, just cap it at the vacuum branch. I removed mine to jam open that flapper door so I always have airflow to the rear seats on my 735i. This requires pulling the front of the heater box. Not as bad as it sounds once all the BS is out of the way.
Last is the recirculation pod above the defroster... not sure if you could access it in the car. Maybe if the pedal box was removed? Maybe the column?
I suppose if you only needed vents to work you could just disconnect the defroster and center vent pods and the system would blow out of there.
Most of the single nozzle ones will be fine (sans water valve), it is the dual ones that fail most often as they are used more often. The water valve and defroster move every time the car is started and shut off, regardless of HVAC operation. i.e. if you leave the system off, they still cycle.
If water valve does not close, hot ass coolant flows through the heater core... which points to a vac leak. The H2O valve opens and closes all the time just like the defroster. The valve should close when you turn the car on, just have someone watch for it to move when you crank that bastard up.
I have the tech files here somewhere, if you want to know how the system operates PM your email and I will send the files.
Seriously, pull the dash out and pull vac on stuff. The rear seat one is usually bad too. Too spendy to repair... pod is $70 now. Just remove it and plug vacuum line at the vac tree. If you need rear air flow like me, jam a piece of 5/16" fuel line in the flapper to keep it open.
ok let me see if i got them all
2stage fresh in the cowl(violet brown?
single fresh in the cowl(white
heater water valve (red/green
footwell (dark blue
2 stage defroster(blue/white
recirc air(pink?
rear(black
fresh air(yellow
what does orange run to?
the white line and the blue line at the valve body work and hold pressure
and yellow leaks down fast until it hits 3inHg and sort of holds
orange is slower leak
none of the others hold any vacuum
my fresh air pods in the cowl work( the second stage in the one doesnt respond though
my heater valve is no good... can it be rebuilt? or just replaced
i know you say that the rear is somewhat a lost cause but can i even think about repairing the rest in the car or do i have to pull the box out?
the mityvac works like a charm
i have a new vacuum pump that is currently disconnected so that it doesnt pump endlessly
the vacuum bombs holds vacuum
all of the lines seem good but the pods seem no good
i have been digging through everything i can on the forums
i saw where the diaphrams can be bought....
thanks for any responses
if i do a pod rebuild i will try and document...
all HVAC pods rebuilt
so far everything works well
still trying to get to the AC test/rebuild stage
get the M-B diaphrams from performance analysis
george is great. resist the 2020s tho just get the 2010s.... the 2020s only fit the cowl double throw.... the rest just use the 2010s for....
oh yeah a car press makes the double throw repairs really easy
Behr designed these pods. The singles rebuild well, the duals not well. You have a few duals, wiper cowl, defroster, center vents.
Do not waste your time with the rear seat pod rebuild... if you want it to work, just remove the pod from the heater box and prop the flapper open.
Recirculation is a PITA to access. Do this when the defroster nozzle is out.
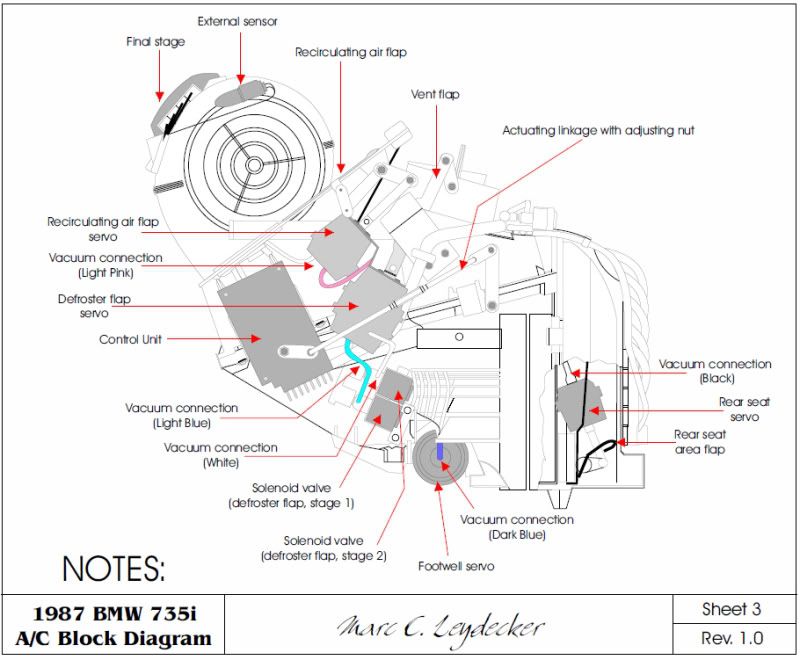
http://www.bimmerboard.com/forums/posts/135809
This is a pretty good diagram. There are actually 7 vacuum servos on the US 86 automatic HVAC system.
1. Fresh air flap, a two stage unit, is under the cowl, left side.
2. Fresh air flap stage 3 is under the cowl, right side.
3. Recirculating air flap is upper left side of HVAC unit.
4. Defrost flap servo, a two stage unit is just below #3 left side.
5. Footwell flap servo is underneath HVAC unit in front of heater coil.
6. Vent flap servo, a two stage unit, is in front of OBC.
7. Rear foot well flap servo is inside HVAC unit behind heater coil.
There are Eight - not 7 not 6 - There are 8 actuators.
two stage actuators on face vent, defrost and left side cowl.
When testing for leaks open the passenger side recirculate flap and you will see the 4 way tee. Apply vacuum and pinch off two circuits at a time to isolate which circuit is leaking.
The ETK shows the right and left cowl actuators reversed!
Keep in mind that many of the actuators are specific to manual or automatic HVAC systems and have different part numbers.
Tough jobs are face, defrost and footwell. Rear isn't worth doing.
For face actuator- drill the old and new actuators rivets and replace only the actuator and not the rod.
For defrost actuator- remove the HVAC control unit by gas pedal for better access.
For footwell actuator- two people with looong pliers and small flashlights.
BTW- the eighth actuator is the heater valve on the firewall.
The vacuum pods?
If your single throw ones are bad, they can be rebuilt provided the housing comes apart without exploding. The double throw do not rebuild well as the throw is reduced.
Do a search for me as the poster and HVAC, there is more information than you can imagine. I rebuilt mine last summer in the 735i. Not a hard job, just time consuming to test everything and find out what exactly is bad.
I need to check, but I think the cowl pods are a waste of money to replace. From what I remember, they are always open when the HVAC system is turned on and only close when the system is off... then they reopen when the car is switched off. I need to verify this for all settings, but I am pretty sure I observed this. If so, just plug all that stuff and save $100.1. Oh hey, I also forgot to recommend to you to replace the POS factory plastic 'T' at the vacuum reservoir... I had a NEW one last right under three years. Pathetic. Find a brass 1/8" fitting, they are about $7 each. Same goes for the one at the auxiliary vacuum pump on the driver side.
That's a good idea I'll make sure I do that. Can anyone confirm the vacuum hoses. One out of the intake manifold goes to the check valve. Check valve tee, one to the vacuum res and the other side to the vacuum pump. I should really take a picture but if my son sees me go out to the garage he's gonna want to go back out.
Does your vacuum pump work? What I do is turn the car on, key on engine off, and listen to the vacuum pump running. Then one by one start crimping off one hose at a time starting at the pump itself working your way all the way into the dashboard. When you hear the pump start to work or turn off you know there is no leak, if the pump continues to run when you have crimped off a hose then you have a on that line.
Using a auxiliary vacuum pump will also work such as a Mighty Vac.
+++++++++++++++++
Hitman's FYI/DIY - HVAC Diagrams and Pictures

Originally Posted by
Hit Man X


 Member

 Posting Permissions


 Reply With Quote

Bookmarks