
 Member
I decided to document my recent (ongoing) project. I know I enjoy looking at others' rebuild projects and photos (I've learned a lot from you all), so perhaps others might like mine...
First, a little background (sorry for the long story, but it IS a long story): I bought this 1989 325is (MYBIMR) in 2000, picked up from Allentown PA and drove home to Michigan.
When I bought it:
[/URL]
It has been my favorite of all the e30's I've owned (it replaced an '84 325e that I had owned since 1995), and I always told myself I will drive it till the wheels fall off. I had done a few things to it, like swapping to an M3 spring/shock setup, but it has been sitting in my garage for the last 6 years since the clutch went out.
Before I put it in storage:
[/URL]
The reasons for sitting so long??
After the clutch went out on the '89is, I took possession of an '88 IX from my father in-law, which needed a lot of mechanical work, but with very nice interior. My goal was to get it road-worthy again, and perhaps make some $. Well, the $ part didn't work out. I had also bought a rust-free parts car from Chicago which donated the doors and trunk. I sourced a new transfer case and front strut housings from Germany on one of my trips there. And after a lot of work, sold the car for my cost in parts...but my original goal was to see a classic back on the road, so I was happy (and so was the buyer)! Keep in mind, this was before the recent jump in prices for these cars. It would probably be worth double today.
The ix:
[/URL]
Early in 2011: I also got a great deal on a '90 325i vert in FL with 58k miles and a busted TB. Had it shipped up here, and put a rebuilt head, new exhaust, and tires on it with the hopes of flipping it for nice coin. Until my wife said "you can't sell that car, I love it!". So then "HERBIMR" became a companion to "MYBIMR":
[/URL]
Fall 2011 came around, and my oldest daughter (turned 16 that year) needed a car, and she decided she liked how the e30 drove. So I found a car in LA, flew out there and bought it, and drove it home to Michigan! It needed some new interior bits, which happen to be in my parts car, so that took some time to sort out.
My daughter's car, the parts car, and the ix:
[/URL]
I took the summer of 2012 off (from working on cars anyway), and started to pick at the '89 IS again in the fall. At the same time, I had an opportunity to work in Shanghai for two years, and just before I left for China, I had to re-do the head gasket in the vert since the Victor Reinz gasket was leaking (replaced with FelPro, and all is well). That was my Christmas break before moving to China. I had to get rid of the parts car before I could pick all of the tasty bits off of it, which I do regret today, as parts have gotten much more costly since I left for China.
Fast-forward to spring of 2015. I had returned from living in China, but then was asked to help out on some customer projects back in China for the summer.
Fall 2015: I replaced the wheel bearings in my oldest daughter's car, and then proceeded to buy another e30 (from Toledo) for my youngest daughter. This of course needed some work to get to my standard of "road-worthiness": I re-did the exhaust, put a set of Blizzaks on it, changed the transmission fluid, guibo, and output seal on the tranny.
Elise's car in the foreground:
[/URL]
So we are now in the present time. Just before Christmas, I was pleasantly surprised to finally pull off the cover of MYBIMR to find a nearly rust-free car with a great interior...my own little "barn find"!
I wrote all of this so that I wouldn't forget it in my old age, and so that you wouldn't think that I was a procrastinator on MYBIMR...I'm not lazy, I'm just ADHD for e30's!
So in the next post(s) I will document what I've done to bring MYBIMR back to the streets. Rather than simply replace the clutch, I decided it was time to re-do almost everything under the car. I hope you enjoy my journey!
Last edited by mybimr; 02-09-2016 at 11:57 PM. Reason: fixed the double url references
Member
BMW CCA Member
Nice to see that another old man bought his kids an E30 to drive (so I'm not crazy either right?)
Sons (IX) grey in back and daughters (IC) next to mine..
Family Pic.jpg
Wife loves the E46 - so that may be staying for a while..
Last edited by 95BMWIC; 02-09-2016 at 10:53 PM.
Member
MYBIMR had some known issues beyond a bad thrust bearing in the clutch. Besides the fact that it had not been driven in 6 years (which is bad enough for a car); the oil pan gasket leaked, the valve cover gasket leaked, the power steering reservoir/hoses leaked, the rear tranny seal and breather vent leaked, and the differential had some wetness around the output flanges. The used M3 springs and shocks were no longer in good shape. The sub frame bushings were shot (clunking from the rear). The center support bearing on the drive shaft also was shot, and it needed new summer tires. On the plus side, the interior was in good shape. I had already replaced the steering rack and the trailing arm bushings. The body and paint are in decent shape as well.
It was bullet-proof reliable, but showing its age, and I grew tired of the fluid spots in the garage, not to mention how filthy I would get any time I worked on it. It had 126k miles on it when I bought it, and 175k miles on it now. I was diligent in changing the oil, and timing belt, etc.
From what I was reading on the forums, the consensus was that the clutch work was easier if you removed the engine and tranny from the car. Over the years, I had done many of the required tasks individually and while everything was still in the car. This would be the first time for me to remove the engine, actually tear apart the head, and really dive into the bowels of the e30. So to all of you e30 junkies who do these things on the weekends for fun, bear with me as I am trying many things for the first time.
I don't plan to race it. I will be daily driving it (probably only in the summer from now on). I know that any suspension lower than the m3 setup I had (jut over 1" drop all-around) would be trouble since I was already scraping the front valence on parking lot entries. The roads here in Michigan are crap, so I do need some compliance if I want to keep my teeth. I was perfectly happy with the power of the stock m20. Of course, more power would be fun, but I intend to enjoy this car for what it is and not try to make it a rubber-burning fast and furious whip. Besides, it is now becoming more rare to see a good condition original e30. I had visions of doing a better-than-new re-build like Stuck, but I don't have the budget nor the patience or skill. I want to be into it for less than $5k. So in the end, my goal is to have a stock car with slightly modified/improved suspension, brakes, and tires, and no leaks...period.
This leads my to my list (unless I find more things as I tear into it):
Engine block:
- CLEAN EVERYTHING!
- front and rear crank seals and housing gaskets
- oil pan gasket
- intermediate shaft seal
- bitch tube o-ring
- oil pump secondary shaft cover o-ring
- new engine supports
- new starter
Head:
- CLEAN EVERYTHING!
- new gasket
- new valve seals
- new springs
- re-grind valves/seats
- re-grind mating surface
- new cam shaft seal and o-ring
- new valve cover gasket
- new rocker arm seals
- new o-ring on coolant connector
Intake:
- check, clean, and replace injectors as necessary- clean throttle body
- new gaskets all around of course
Misc. engine bay stuff:
- new power steering pump, reservoir, and hoses
- clean engine bay and touch up as necessary
- all new hoses
- getting a new HVAC blower fan since I used mine on my daughter's car
- new distributor cap/rotor
Suspension & Brakes:
- new control arms
- new sway bar links & bushings
- new tie rod ends
- new upper strut mounts/bearings
- H&R Touring Springs with Bilstein HD shocks or equivalent
- new sub frame bushings
- new stainless brake lines
- rebuild calipers
Transmission & driveline:
- new clutch
- new pilot bearing
- new thrust bearing
- new pressure plate
- refinish flywheel
- new input and output shaft seals
- new shift rod input seal
- new breather valve/vent
- new shift rod actuator parts
- stainless clutch line
- new master clutch cylinder
- new transmission mounts
- new flex disk (guibo)
- new drive shaft
- re-seal differential
- new wheel bearings and front hubs
I'll leave this as a stand-alone post and edit as needed when I find other things to replace :o)
- - - Updated - - -
As I describe what I've done, I'll try to highlight some lessons learned rather than a complete step-by-step. If someone has questions, feel free to ask. The Bentley manual is a must. The forums and youtube are also helpful, but sometimes you have to filter the advice from the forums as it's not all good or correct if it is coming from a couch mechanic rather than someone who's done it a few times. Also realoem.com is a must for part identification.
After removing the drive shaft and disconnecting the transmission mounts and shifter linkage (don't forget the reverse light wire on top of the tranny), I turned to the engine bay.
A few notes:
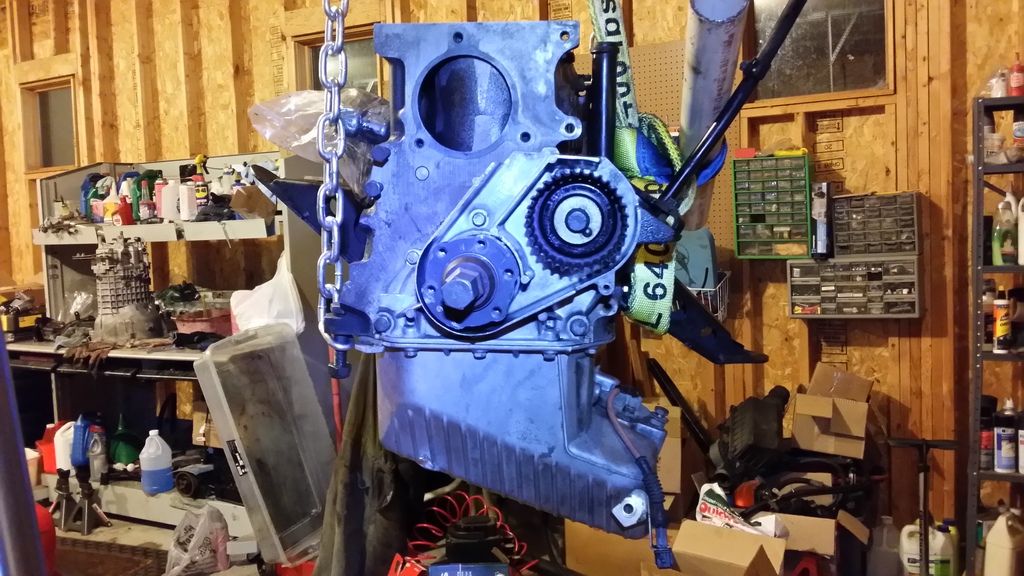
I had access to my neighbor's hoist, but had to search a lot on-line to see how others attached their chains to the engine. As you can see from the pics, I connected to a lifting hole at the bottom right front corner of the block, and used a strap around the transmission. There is another hole at the top left rear corner of the block, and in retrospect this would have been much better. the center of gravity for the engine/tranny combination is such that if you connect to these two points, it doesn't want to rotate as you lift the assembly. With my method, you'll see the engine "cock" sideways as it comes out.
Also, with the amount of suspension dis-assembly I'm doing, it would probably have been better to lower the engine/tranny on the front subframe and remove it from under the car. I might be re-installing with this method rather than from above.
You'll notice I left a lot of things assembled to the engine. I did remove the radiator, fan, and fan pulley. I left the power steering pump in the car as well as the AC compressor. I did end up having to remove the alternator and its bracket as it would have hit the AC condenser/radiator.
I bought a load leveler for the hoist, which makes a huge difference in the control-ability of the engine exit angle. Definitely well worth it if you take it out from the top. I have read some folks insist you need to lower the front of the car to the ground in order to get the right angles, but I suspect that this may be needed if you don't have a leveler. I didn't have to do that, and I was also working alone. They're cheap at Harbor Freight and work well (just make sure you lube the thread before you put load on for the first time). also notice what I was saying about the engine rotating.
I did end up putting a dent in the vacuum booster upon exit. I suspect this might have been because I didn't notice that the transmission was getting stuck on the sway bar. I would recommend removing the sway bar if I had to do it again.
All-in-all, I thought removal went pretty smoothly.
As you can see, I don't have an engine stand. I used jack stands under the engine mount brackets and at the rear of the suspension. I have no idea what stand would be used with the engine mated to the tranny...and the engine stands I saw would block my access to the rear crank seal. Later on, you'll see that I ended up leaving the engine on the hoist (connected at the proper lifting points) when the tranny was off. Seemed to work OK, maybe not proper though.
It was difficult to diagnose the leak sources, since they were coming from seemingly everywhere. But here's my take: The head gasket was not leaking, but the valve cover gasket was, and it seeped down the side of the block. The oil pan gasket was leaking, and the dripping oil would get blown back while driving, and completely cover the bottom of the tranny. You can see the leak at the breather vent, and the rear end of the transmission looks like a burning cigar due to the output shaft seal leak. I wasn't too concerned about properly diagnosis since my prescription was to replace every seal I could find!
Last edited by mybimr; 02-10-2016 at 06:28 PM.
Member
don't look for validation from me! I think we're both crazy 8*POriginally Posted by 95BMWIC

Last edited by shogun; 02-13-2016 at 03:57 AM.
Member
A little more on the diagnostics... notice the amount of oil blow-back that made it's way into the throttle body. When we get to the head, you'll see that the #1 outer exhaust valve spring had snapped. I suspect that this was the cause of the blow-back. The inner spring was strong enough to keep the valve from hitting the piston, but not enough to fully close the valve, letting exhaust back up into the intake or head? Could also have been worn valve seals...either way, enough pressure was being built up in the head to force gunk back up the intake.
Also notice the state of the starter. I seem to recall that quite a bit of brake fluid dripped down there when the master cylinder failed, and during it's replacement. That stuff is nasty!
lots of corrosion on the aluminum parts
You might think by looking at it that it's a lost cause
But keep in mind that the car seemed to be running fine, other that the noticeable leaks and the thrust bearing on the clutch going out. It astounds me on how robust this engine is! It wasn't blowing smoke out of the exhaust, and never had a hiccup.
As I disassembled, I was also cleaning as best I could.
Since I wasn't going to tear into the internals (crank, main bearings, rods, or pistons), I painted the block with high temp enamel while some things were still attached to keep the paint out of the inside. i know this is not the best way, but it turned out good enough for what I wanted.
Parts and hardware were put into boxes based on the area from which they were removed (i.e. front of the engine, top of the engine, etc.)
the pistons were quite dirty, but...
I was pleasantly surprised to see the honing cross hatch pattern in every cylinder!
After a lot of elbow grease, I think the top turned out pretty well...a straight edge check on the flatness revealed it was within specification (at least to the level of accuracy of my tools/guages on hand). But my measurements of the head turned out to match those of the machine shop that ground it. So my measurements might be pretty good.
- - - Updated - - -
***FRONT AND REAR OF THE BLOCK...CRANKSHAFT SEALS***
The biggest challenge for the crankshaft seals was the main crank bolt, which someone on youtube called the "jesus" bolt. I believe this is the highest torque fastener on the entire car.
I tried a few different amateur methods with no results. the 1/2" drive breaker bar I had didn't seem up to the task, and I didn't want to test it anymore. I tried to fabricate a holding tool out of angle iron, but the metal was so soft that the hub bolts pulled through the metal and bent the angle iron. I finally broke down and got the proper hub holding tool around $50-55 online. I also bought a 10ft long 1-3/4" rigid conduit pipe, and cut it in half. Finally, I borrowed a 3/4" drive ratchet and breaker bar set from the Development center at my work.
I had to mock this up because I didn't take a photo when I actually busted the bolt loose, but you get the jist of it. It only took 5 seconds once set up, and no muss, no fuss! Like usual, use the proper tools for the job and it's much easier!
Notice at this point, I had removed the transmission and oil pan. Most of the next few steps were done while the engine was on the hoist (remember I didn't have an engine stand).
New crank seals and seal housing gaskets front and rear (including the intermediate shaft seal)! The gasket and seal replacements went very smoothly, with lots of attention on cleaning mating surfaces.
- - - Updated - - -
***ON TO THE OIL PAN***
I removed the oil pan to find a lot of sludge in the bottom
I attribute most of this to the 6 years of storage...poor car!
I had to use a spatula to scoop the crud out!
Notice the portion under the oil level sensor. there's a baffle in there that won't let you get in from the side with and rags/tools. So even when you get the main pan clean, there's a lot of brake cleaner to use in this part to finally clean it
I eventually got it about as clean as I could...but nothing I tried was touching the stains
After cleaning the outside, I noticed some scuffing on the leading edge (remember my comment about not wanting to go lower with the suspension?).
One of the gouges looked pretty deep, so I thought I should check on the inside to see if there was any visible damage...Sure enough, there was a little crack! This would have also explained all of the oil that blew back onto the transmission
I took the pan to the development center at my work where someone could weld aluminum. it wasn't the prettiest job, but it was certainly better than JB weld or buying a new pan for a million bucks.
To those who replace the oil pan gasket while the engine is in the car, I salute you! I was sooo thankful I was able to do this with such easy access. for those who are about to tackle the job under the car, I know it's dark down there, so I took some pictures for you to see what it is that you're trying to remove blindfolded in order for the pan to clear the block and subframe crossmember. this is what only your hand can see while it's stuck in there trying to feed the bolts back on the oil pump!
I removed the oil pressure relief valve
there's not much to it, this little piston needs to float freely in the housing, and should make a "rattle" sound when shaken up and down. A bit of brake cleaner and compressed air loosened it right up
the oil pump is pure mechanical as well. there's no seals inside, so it's just clean (including the filter screen) and check for damage or wear. Once clean, mine looked pristine...the gears looked like new! The intermediate gears also turned as smooth as silk with no noticeable backlash. There's a lot of debate online on whether to automatically replace the oil pump "while you're in there". but it's mechanical, and shouldn't see much severe duty since it is bathed in oil all of the time. so I would say it's a "check and replace as necessary" item.
When re-installing the pan, I used the suggestion from someone on-line to hold the gasket with a few zip ties until you get a few bolts in, then cut the ties. This worked awesome!
I used a rubberized cork gasket (I'd have to check, it might have been genuine BMW or Felpro). I didn't like the idea of plain cork. Paper might not have been too bad either. Of course there's the yamabond gasket goo, but if they didn't need it when they built it, I didn't want to do it either. Honestly, after seeing how much work it was to ensure perfectly cleaned and prepared mating surfaces on the pan and block...and this was with free and clear access, I suspect most people's issues with continued leaks have to do with not being able to prep the surfaces properly due to access issues under the car. But that's just my opinion, and we'll see if I'm full of it in 10k miles. I also observed when removing the pan, that many of the bolts could be loosened by hand! The gasket I removed was cork, so there must be a bit of compression in that gasket material over time that would require re-torquing the bolts occasionally.
Here's the pan back on the block:
Last edited by mybimr; 02-10-2016 at 11:04 PM.
Member
***TRANSMISSION***
Ok, obviously I'm glad I took the engine/tranny out together for this, just as everyone suggested. Separating the two was a non-event and went very smoothly. In the bottom of the bell housing, you'll see the root cause of me parking the car so many years ago...
the thrust bearing was toast, and barely existed anymore!
The pressure plate and clutch disk actually look very nice. I have new parts to replace, but there's plenty of life in these. I don't know if anyone's interested in them, but I don't want to throw them away!
Instead of doing the "pack it with grease" method of removing the pilot bearing (blind hole)...I did the "pack it with wet paper" method, and it worked like a charm! I think it was much easier to clean up than grease.
I don't have as many pics of the tranny, but there was a lot of cleaning involved! I replaced the output shaft seal, shifter selector rod seal
The input shaft seal, and trust bearing, as well as cleaning and greasing up the non-rotating items per the Bentley manual
new shift linkage, o-rings for the linkage pins, and little foam pad that goes inside
I have new parts for the breather valve, but not sure how it's replaced. is it from the inside of the casing? I haven't had luck finding a how-to on this one
the flywheel looked quite glossy, and a straight-edge flatness check showed that it needed to be machined, so I took it to a local shop and now have a hypnotic spiral pattern for you to stare at!
new clutch disk and pressure plate assembled and torqued!
And everything mounted back on the block
The new starter was put on. it's nice that it has threaded mounting holes rather than a big thru-bolt that requires two wrenches to remove. Should help the next guy (likely me) if they remove the tranny while in the car
the next report will be the head...
Member
****update on the transmission ****
I never did find any write-up on how to replace the breather vent. But I learned some things while doing it that I'd like to share...
first, I ordered items 3, 4, and 5 on this list:
Item 3 (23137545703) SLEEVE & 4 (23131224084) VENTILATION VALVE look like this (the black plastic cap is item 4):
item 5 (23131204841) STEEL BREATHER looks like this:
The sleeve and ventilation valve looked the most similar to what was actually on the transmission, with the exception that the sleeve on the transmission was completely hollow, whereas the one I received had an enclosed end with a small hole in the bottom. Item 5 was totally different. It appeared to be a replacement to the sleeve/valve combo, the large metal "cap" was connected through the outer tube, and secured from slipping out by the flared portion at the other end. The smaller diameter portion of the tube matched the diameter of the sleeve.
As far as I can tell, both of these options must have been intended to be some sort of improvement over the hollow tube original. A way of keeping the oil from sloshing out the tube, but still letting air exchange to neutralize any pressure difference. the confusing thing is that the diagram showed all three items, when it's either #'s 3&4 together or just #5.
I elected to go with #5:
I did see a video on youtube where the vent tube was mashed with a big pliers, and pulled out, turning back and forth during the pull. that metal is very soft, and this method worked for me. Once you get the tube to rotate in the aluminum housing, it does work its way out OK.
- - - Updated - - -
**** rebuilding the head ****
Upon removing the valve cover, I was surprised by the sooty carbon black color of the valve train:
I believe this to be caused by a broken outer spring on the #1 exhaust valve. As I said before, I can't believe how resilient these engines are (with the exception of the timing belt as their Achilles heel)! I never noticed any odd engine behavior.
Notice I had the old style hex head bolts that were supposed to be changed to the torx head! I believe I had simply been extraordinarily lucky that this engine didn't have issues before I tore it down.
Underneath, a bit of carbon build-up:
And leaking seals:
Like the rest of the engine, this looked like a basket case to me:
A nice "before" shot...to contrast with the "after" shot to come!
Lots of cleaning by hand before I even attempted to remove anything:
the cam, rocker shafts, rocker arms, and bearing journals looked and felt excellent as they were removed
I did not have a good spring compressor, and the one from Harbor Freight doesn't do the job. That style will only grab the outer spring. I posted this method in another note, but here's the pics of what I did
The broken #1 outer exhaust spring
Once I had it disassembled, I measured the flatness with a straight edge and feeler guage and decided it needed to be machined. the machinist cleaned the head and valves, ground the seats and valves, and the bottom. Starting to look much better! Needed .002" off, down to 4.935" overall
new seals
new springs
not bad, considering what I started with!
And back on the block with new bolts...
- - - Updated - - -
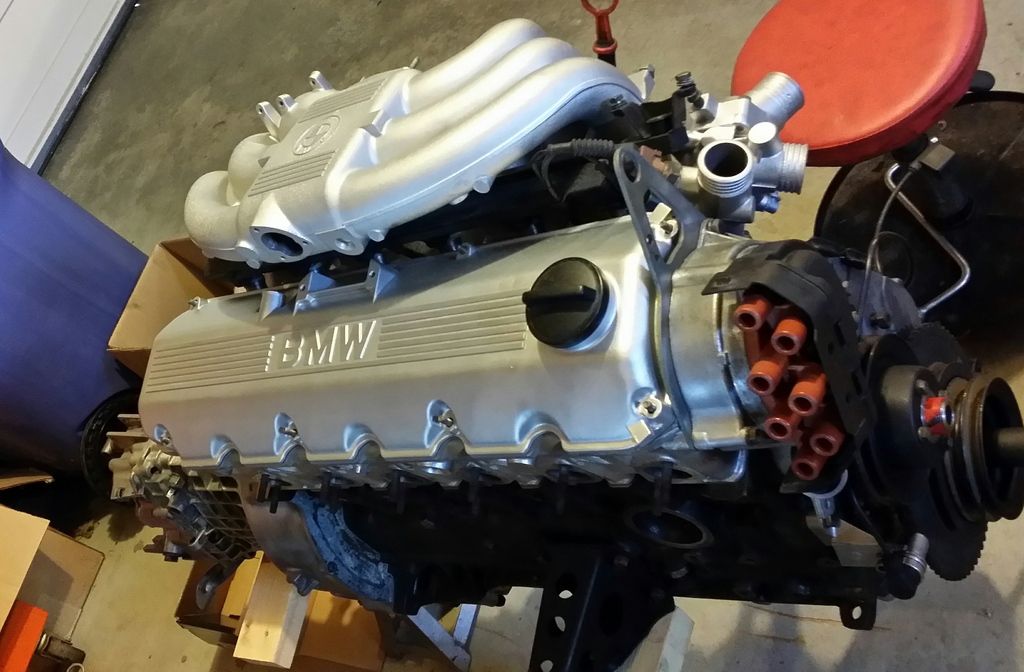
*** Intake, valve cover, and injectors ***
This is how my intake looked when removed:
Apparently, I didn't take a "before" photo of the injectors...but like everything else, they looked pretty nasty. but I thought I would take them to get cleaned and flow-matched. The injector shop cleaned them up, put new o-rings and filter screens and pintle caps on. They tested them all and said they worked perfectly!
I took the intake and valve cover (and a few other bits) to a guy in town that did vapor blasting....the finish on aluminum is fantastic, and it seals the pores in the metal to resist staining. These are unpainted as they came back from blasting
I sanded the raised lettering for a special accent
Overall, I'm quite pleased with how the engine turned out! I can't think of any seal or gasket I didn't replace, or surface that didn't get cleaned or re-finished.
Last edited by mybimr; 02-13-2016 at 01:19 AM.
Member
Why are my replies not showing up in this thread...
You're doing great work... glad to see people like you lovingly restoring these cars. Makes up for all the trashed ones you see.
The vapor blasting turned out really nicely. Thanks for all the pictures. I will likely be using this thread for reference in the future.
Member
I wondered the same thing...I saw your last post, and then today it disappeared? wierd
Member
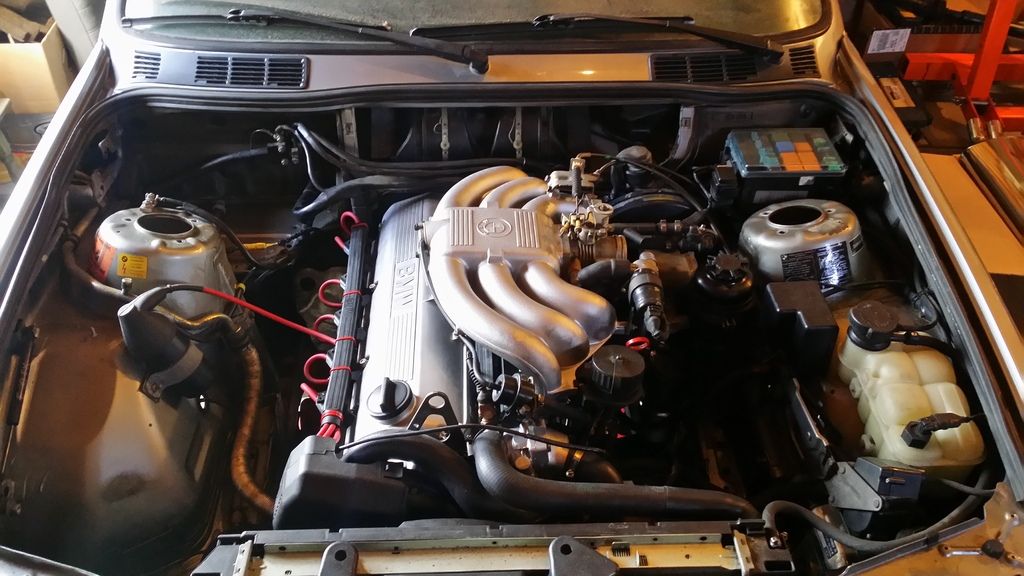
*** Engine Install ***
Well, it's been a while since my last post! I've been super busy with frequent trips to Europe lately.
so I decided to bring the engine up from below, rather than hoist it from above (the way I removed it). My plan was that this would allow me to pre-assemble a good portion of the engine accessories and hoses while it was easily accessible. So the first step was to remove the front crossmember (I had already removed the suspension stuff).
cleaning the years of grease and grime off of it revealed kind of an ugly residue of what remained of the original cosmoline.
So I painted it!
here's the steering rack, new hose, and engine mounts:
After installing the hoses and accessories and mounting the crossmember to the engine, I was struggling to get everything to fit under the front of the car.
I had the front of the car up as high as I could get it, and lowered the rear as much as I could. But still, I was a couple inches too tall.
But finally ended up removing the subframe, and using the dollies from Harbor Freight and some 2x4 shims, I could get the oil pan about 1/2" off the concrete. And then I could roll the engine/tranny in!
Once the engine was under the bay, I lifted it with the hoist so that I could mount the subframe
thank goodness for the load leveler! it made adjusting the angle of the engine/tranny very easy
with a little help from a jack below,
it was done!
then the task was connecting everything I couldn't pre-install, including the new shifter linkages/bushings
looking good...
I had a little glitch in that after wiring everything up, and not able to get the starter to engage the flywheel, I realized that I had inadvertently ordered the wrong starter...aaarrrrgghhh! I replaced it today, and now it's all better. (I even briefly started it even though the exhaust wasn't hooked up.
Member
*** Drive Train ***
After the engine install, I attacked the drive shaft. The center support bearing (CSB) was toast, but the u-joints felt solid. I decided to replace the CSB, clean everything up, and install a new Guibo. For both budget and time reasons, I will use this drive shaft until it fails. At that point, I would replace the half shafts, drive shaft, and re-seal the differential. These items can be replaced without major disassembly of the car, and this allows me to save some money and drive the car for the summer!
The old CSB, with rubber totally separated from the housing:
I thoroughly cleaned the splines, replaced the CSB, and re-assembled the two piece drive shaft:
The removal of the rear subframe went fairly smoothly. I purchased some jack pads from ebay that perfectly fit the pinch weld support area, this would allow removal of the subframe without interference:
Underneath the car looked fairly clean, but with some rusty portions:
You can see that I pulled the parking brake boden cable out from the hub, rather than out from the tube guides to the brake handle. I think this is an easier method, considering I was replacing the bearings and cleaning all of the brake parts.
to remove the bushings, I didn't have the factory tool, and since I was desperate, I decided to model a tool after what I've seen others do with a pitman puller as a bridge. I purchased this since the "feet" fit nearly perfectly into the slots on the bushings:
I didn't have a jaw puller big enough, so I bought this one:
together, these items formed a pretty good puller. However if I did it again, I would use a 2 jaw instead of three jaw:
Even though it fit pretty well, I still had a hard time pulling the bushing in this state. The other threads on this topic suggested to apply some heat to loosen up the bushing:
I eventually got frustrated and made sure I applied an adequate amount of heat!
It was a nasty job, and I would highly recommend wearing a mask to keep the burning rubber soot out of your nose.
I was able to use my home-built tool to finish the job though, so I was glad I had it.
B@stard, meet son of a beetch!:
After some cleaning and painting:
To re-install the bushings, I made another tool based on some posts on the forums. I bought a PVC pipe cap, threaded rod, several washers/nuts, and used "personal lubricant":
The install setup looked like this:
This worked like a charm!
The re-assembled subframe, ready to go back onto the car:
Before install, I wire brushed and painted any of the rusty bits under the car. I also installed stainless brake lines:
I installed new wheel bearings and re-attached the parking brake cable before re-installing the hubs:
- - - Updated - - -
*** Suspension, wheels, & Exhaust ***
For the suspension, I selected the H&R Sport Touring kit:
The claimed drop is just over an inch. This should match what I had, which was an e30 m3 spring/shock setup. I really liked the way this felt. Comparing the rear springs for reference, here is the m3 on left, the H&R in the middle, and the stock original on the right:
Here are the front springs, H&R on left, m3 in middle, and stock on the right:
The front struts were now up for rebuild:
Disassembly went fairly smoothly, except for the collar nuts
I ended up bringing the struts to a trusted mechanic who heated them to glowing red and was able to remove them without destroying the strut
I forgot to take pics of the re-build, but here is the final result. After painting, new hub/bearings, stainless brake lines...yada yada yada
The rears got repainted, stainless brake lines and new rotors:
For wheels, I purchased these Rota RB's 15x7 4x100 +25 offset 57.1mm bore:
I found this wheel size calculator to be useful: http://www.wheel-size.com/calc/?whee...=30mm&scl=50mm
For tires, I went with DIREZZA ZII STAR SPEC...I'm super excited to try them out!
Getting close to the finish line:
For the exhaust, I used the stock manifold, but thoroughly cleaned with a wire wheel:
I did the same for the cat, and purchased this stainless cat back from ebay. I'm about to install it tonight, but it looks to be pretty good quality and proper fit:
Other items I added...
A strut bar from ECS tuning:
The hood install went smoothly, but for future reference, I would use a sharpie or something to scribe the location of the hood to the hood bracket. This would make re-install much quicker to get aligned.
Bleeding the brakes went well, using the power bleeder. But I did the "reverse" bleed of the clutch.
I also installed a new master clutch cylinder, HVAC blower, fuel tank level sensor (drivers side), and fuel pump. the blower, pump, and sensor were all working, but I put them into my daughter's car when they failed. So I put the new ones in mine :o)
I hope to have photos of the finished product this weekend!!!
Last edited by mybimr; 05-12-2016 at 02:45 PM.
Member
This is a really epic build, man. It's clean and simple. Everything new and fresh and done well. I love it. Great job.
If your e30 runs bad, switch to Megasquirt first. Then try new spark plugs, cap and rotor, wires, oxygen sensor, crank shaft position sensor, coolant temp sensor, air flow meter, idle control valve, throttle position sensor, digital motor electronics unit, harmonic balancer, fuel injectors, engine harness...
Member
Midnight May 13: the car is back on its wheels and running for the first time in 6-1/2 years!!!!
And at work the next day:
Old. Skool.
Total parts investment for what I've done since January: around $5,000. Countless hours. Very satisfying.
Member
Very nice thread. Great work.
 Posting Permissions


 Reply With Quote


Bookmarks