
 Member
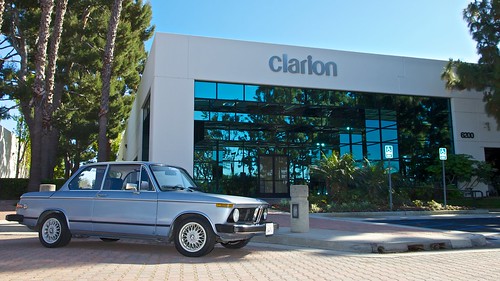
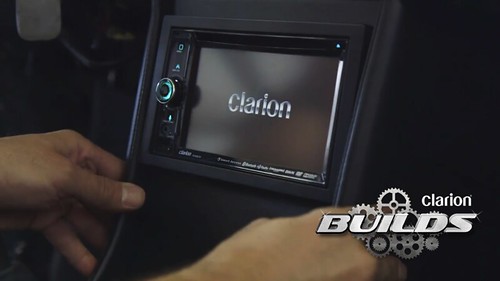
Several months ago we at Clarion (you know, the car audio company) threw around the idea of creating a program where we restore and enhance cars that have transformed car culture on an epic scale. Why would Clarion do this you might ask? Well, its simple, Clarions engineers, marketers, management, sales staff and practically all employees are car people. We love to be around cars and most of us have project cars of our own and are deeply entrenched in car culture, and this program was appealing because it would allow us to connect with the car loving community on a deeper level. Not long after the idea was proposed, a meeting was held to announce that the program was green-lit, and it seemed as if our entire group was thinking the same thing our first project had to be an 02.
Finally, after months of searching, we found our ideal candidate to use as the starting point for our Clarion Builds project. Our entire team carefully looked over the vehicle before deciding on pulling the trigger to sign off on the car. We met the owner at a restaurant down the street from our office in Cypress, CA. While the car was foremost on our mind, our stomachs were growling so we headed inside to grab a quick bite, which also gave us the perfect opportunity to get to know the seller and go over all of the details and history of the car.
Another advantage to eating first was it gave us a chance to follow our 4th rule for the previous post and took some time to go over all the paperwork, and boy was there a lot of it! The seller had records going back 20 years.
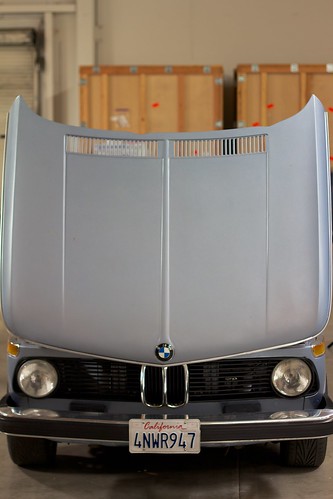
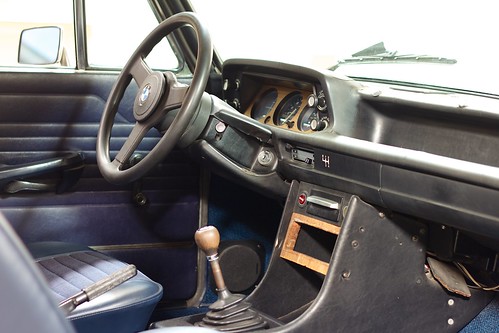
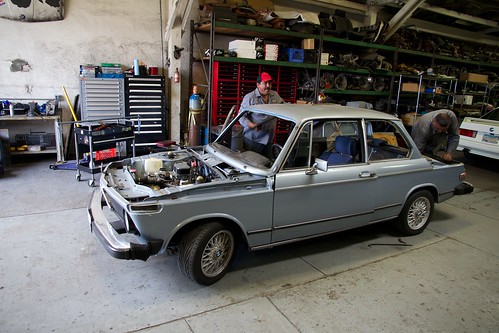
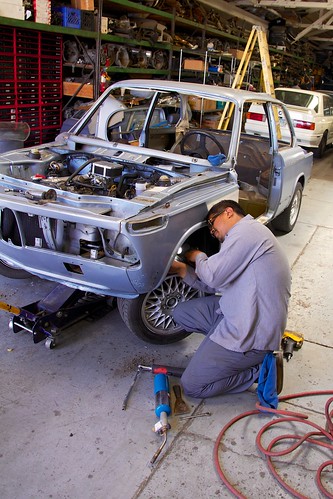
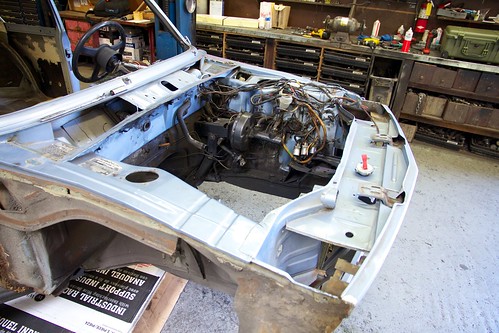
Upon review, we noticed that there were some reoccurring repairs to the drive shaft. The car had a 5-speed swap performed well before the seller got his hands on the car and the repeated drive shaft work was a red flag that something may have been a bit off with the swap. Following lunch, we walked outside to the parking lot to check out what the seller had brought us. All in all, it was a good-looking car Well, at least for a 40-year-old daily driver. The paint was faded and we could tell that it was a low-end re-spray job (see the before photos), but for us, that was the least of our concerns because our restoration plan included a full teardown. We immediately noticed the wheels were from a newer model BMW. Using our flashlight and magnet, we scoped out under the hood as well as all of the body panels - everything seemed copasetic. Moving into the interior, we found the normal wear and tear one might expect of a car of this age. The dash was cracked, there were small tears within the headliner and back seat, and the heater fan was not working. We took the car out on the open road and put it through its paces. Not a lot of get up and go left in the old motor but we knew that would be remedied soon. Also we heard some rather strange speed sensitive noises coming from the front end and chocked those up to wheel bearings. We were confident that this 74 BMW 2002 would make for a great canvas for our project. In the end, we negotiated the price and the seller was nice enough to deliver our newly purchased Clarion Builds project car right to our warehouse. With the easy part finally done, its time to get down to brass tacks!
Stay tuned for more posts as we move into the various stages of our restoration.
Last edited by ClarionBuilds; 11-14-2014 at 06:00 PM.
Member
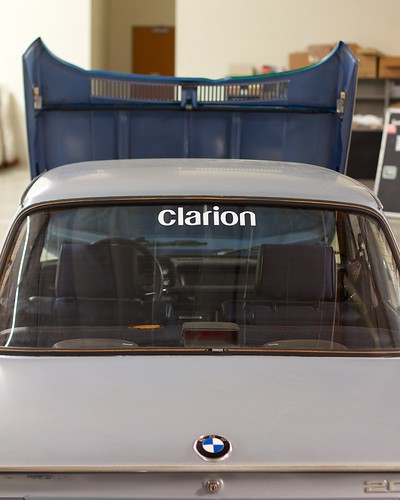
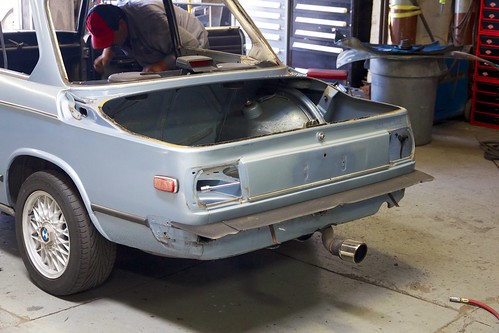
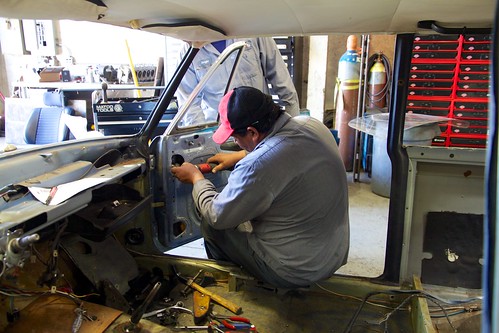
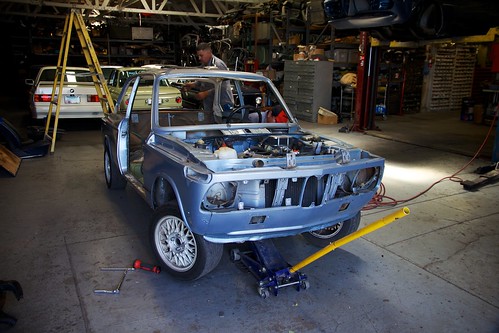
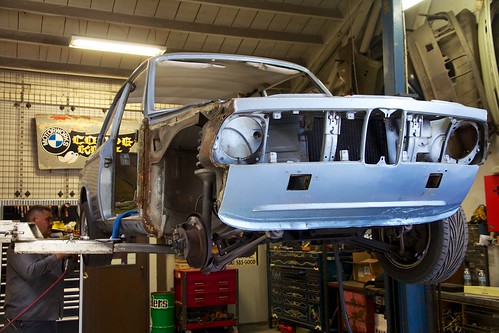
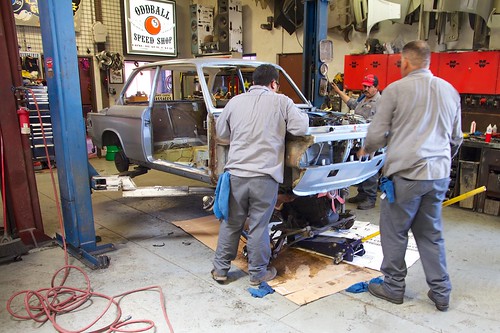
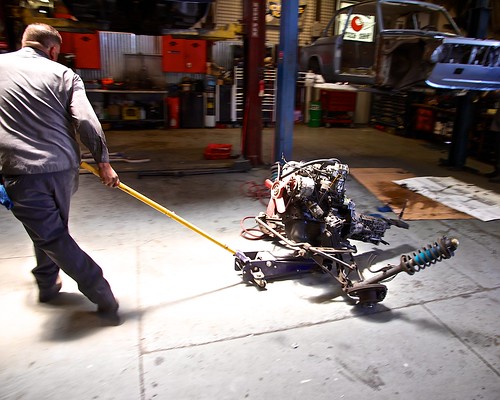
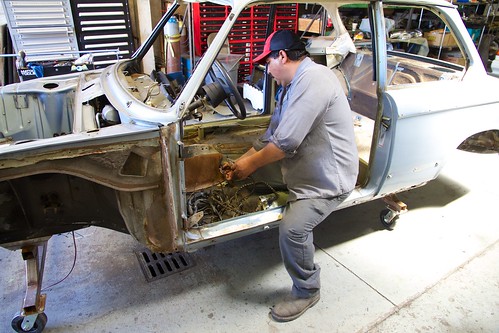
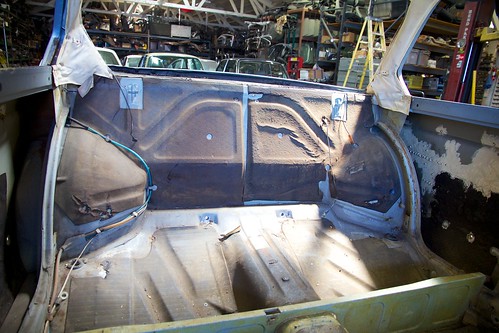
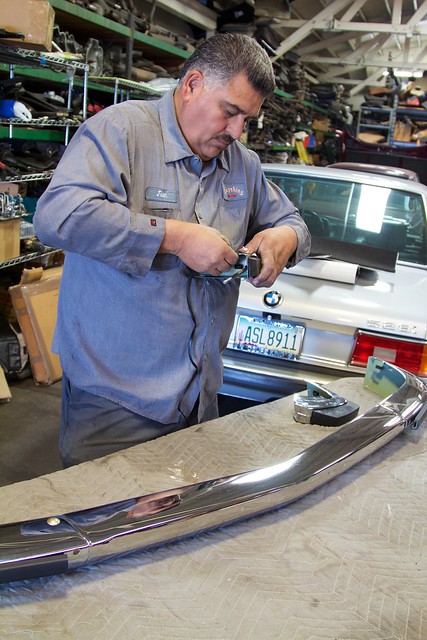
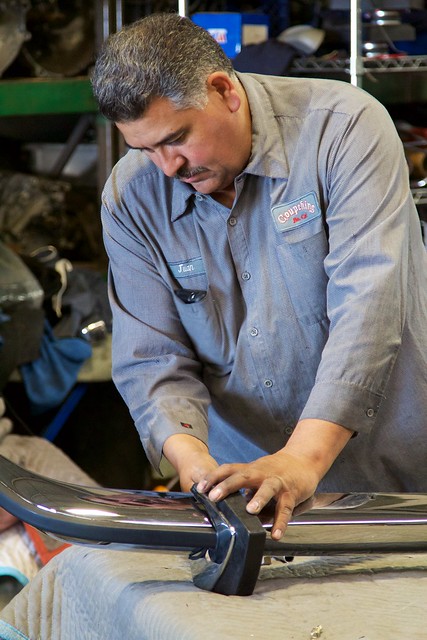
UPDATE: We gave Coupeking the green light to completely dismantle our 02. Check out the quick video we pulled together about the tear down.
- - - Updated - - -
Here are some pics of our 02 being torn down at the CoupeKing shop.
Member
BMW CCA Member
Oh ouch, some nasty spots here and there, but I see you chose an excellent shop for the repairs.
Once you figure out how, where and what you are installing for audio..... my little '02 needs a sound system! Well, both do actually.
Member
Looking forward to a quality restoration!
Member
Sweet rides! Both look to be in gorgeous shape! Stay tuned on the audio install, we have some pretty big plans for that and we will for sure share the install on this thread.Originally Posted by Captglenn

Member
Thanks @SkiFree! We promise to not disappoint.
- - - Updated - - -
Thanks Captglenn! We definitely have exciting plans for the audio system, and will share our audio plans soon! Stay tuned!
- - - Updated - - -
Last edited by ClarionBuilds; 11-14-2014 at 06:06 PM.
Member
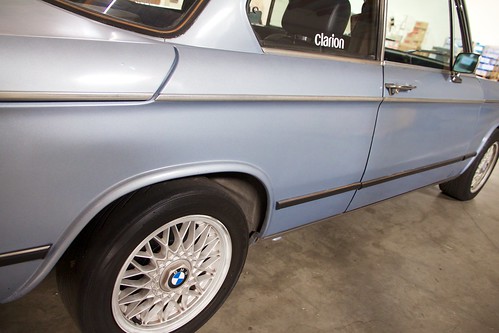
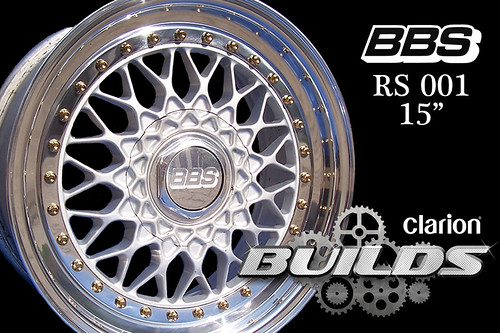
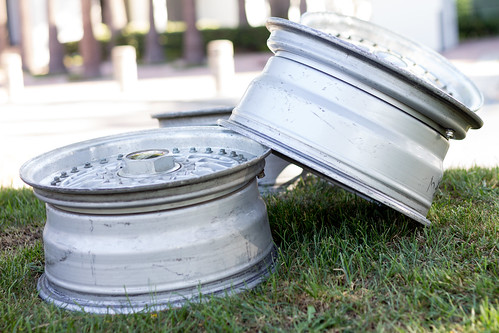
There is no denying that a nice set of wheels is key to setting your car apart from the crowd, not to mention, making or breaking the appearance of your ride. So, when it came time to pick the perfect wheel to outfit our Clarion Builds 02, we decided that a set of classic BBS RS-001 wheels would be the perfect fit! Back in 1970, BBS was founded deep in Germanys Black Forest, where the roads are narrow and windy. In the beginning, the companys main focus was racing but this quickly progressed to street vehicles. BBS developed their first forged aluminum wheels for consumer vehicles in 1983 with the RS wheel playing an integral role within their early lineup. Known today as a true classic wheel, the RS was first designed as a 3-piece wheel ranging in sizes from 15-inch up to 17-inch. The unmistakable spoke designs and silver or gold finish options, offered enthusiasts a wheel that not only looked great but was also superior in design, making it able to handle the rigors of both street and motorsports driving. Picking the wheels we wanted was simple, finding an original set with the right specs proved to not be.
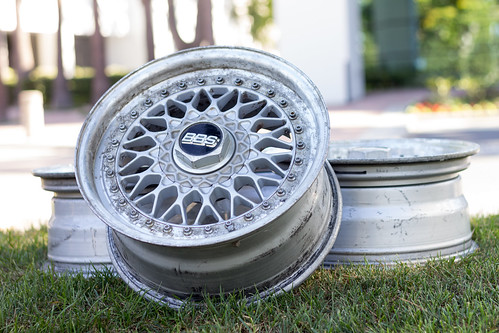
Days slowly turned into weeks as we searched high and low to find the classic BBS RS 001 wheels for our BMW 2002 in a hard to find 15×7-inch diameter with an even more challenging +25mm offset that has long been discontinued by BBS. Of course, new BBS RS copies do exist in the market but with the caliber of this vehicle build and our reputation as well as the reputation of our partners on the line, we were determined to find an authentic set! At the height of our desperate search, an industry contact gave us a tip and with a quick call to VR Wheels, located in the City of Industry, CA. We got ahold of owner, who told us he just might have what we were looking for, but he would have to check his inventory and give us a call back. Within a couple of hours (which felt like a couple of weeks), our guy delivered the good news: He had located a set of RS wheels, virtually forgotten, deep in the bowels of his warehouse. And the icing on the cake was, not only were the wheels in good condition, but they were the correct width and offset for our application! JACKPOT!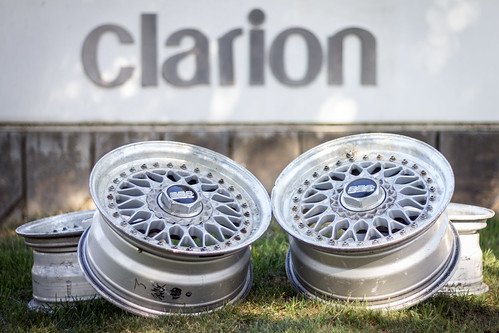
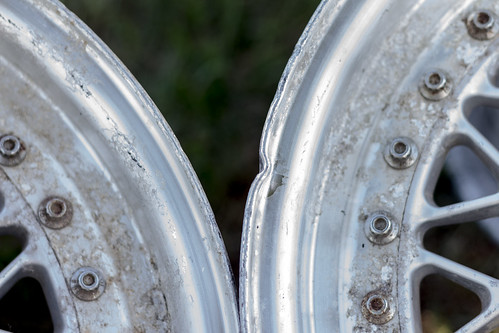
A quick inspection prior to purchase revealed a few nicks and dings along with a serious case of clear coat corrosion, all relatively minor issues that will be addressed by VR Wheels with a full refinishing prior to mounting.
Stay tuned for some tasty pics of our wheels as they undergo their own restoration.
Member
- - - Updated - - -
There is no denying that a nice set of wheels is key to setting your car apart from the crowd, not to mention, making or breaking the appearance of your ride. So, when it came time to pick the perfect wheel to outfit our Clarion Builds 02, we decided that a set of classic BBS RS-001 wheels would be the perfect fit! Back in 1970, BBS was founded deep in Germanys Black Forest, where the roads are narrow and windy. In the beginning, the companys main focus was racing but this quickly progressed to street vehicles. BBS developed their first forged aluminum wheels for consumer vehicles in 1983 with the RS wheel playing an integral role within their early lineup. Known today as a true classic wheel, the RS was first designed as a 3-piece wheel ranging in sizes from 15-inch up to 17-inch. The unmistakable spoke designs and silver or gold finish options, offered enthusiasts a wheel that not only looked great but was also superior in design, making it able to handle the rigors of both street and motorsports driving. Picking the wheels we wanted was simple, finding an original set with the right specs proved to not be.
Days slowly turned into weeks as we searched high and low to find the classic BBS RS 001 wheels for our BMW 2002 in a hard to find 15×7-inch diameter with an even more challenging +25mm offset that has long been discontinued by BBS. Of course, new BBS RS copies do exist in the market but with the caliber of this vehicle build and our reputation as well as the reputation of our partners on the line, we were determined to find an authentic set! At the height of our desperate search, an industry contact gave us a tip and with a quick call to VR Wheels, located in the City of Industry, CA. We got ahold of owner, who told us he just might have what we were looking for, but he would have to check his inventory and give us a call back. Within a couple of hours (which felt like a couple of weeks), our guy delivered the good news: He had located a set of RS wheels, virtually forgotten, deep in the bowels of his warehouse. And the icing on the cake was, not only were the wheels in good condition, but they were the correct width and offset for our application! JACKPOT!
A quick inspection prior to purchase revealed a few nicks and dings along with a serious case of clear coat corrosion, all relatively minor issues that will be addressed by VR Wheels with a full refinishing prior to mounting.
Stay tuned for some tasty pics of our wheels as they undergo their own restoration.
Member
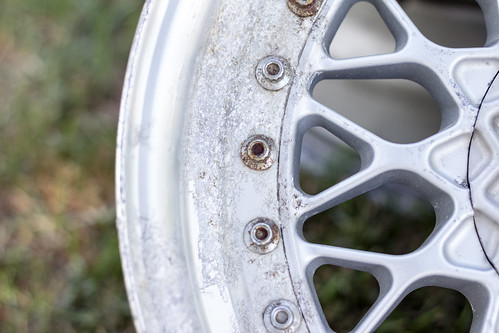
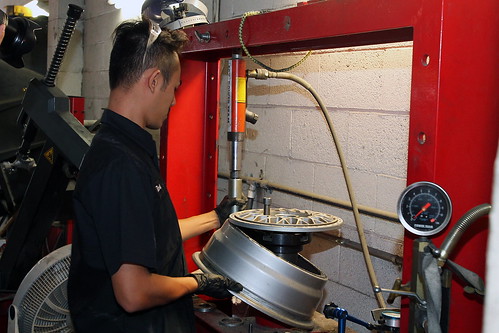
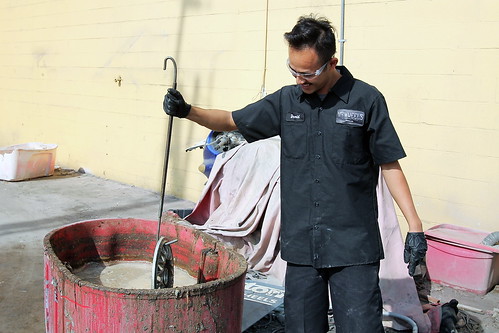
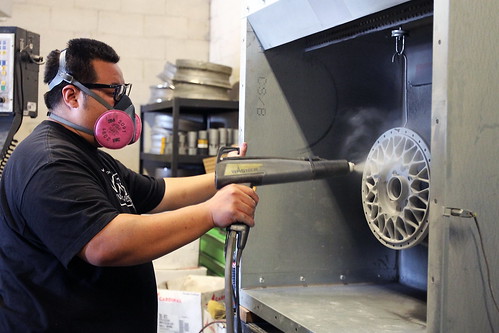
In our last post, we had tracked down a set of BBS RS-001 wheels in a hard to find 15×7-inch diameter with a +25mm offset, a size that has long been discontinued. Overall, the wheels were in good physical condition but completely lacked the visual pizazz needed for our show worthy BMW 2002. To address the wheels ugly duckling syndrome, VR Wheels in the City of Industry, CA was called upon to execute a full restoration. Follow along as we take you through the beautification process.
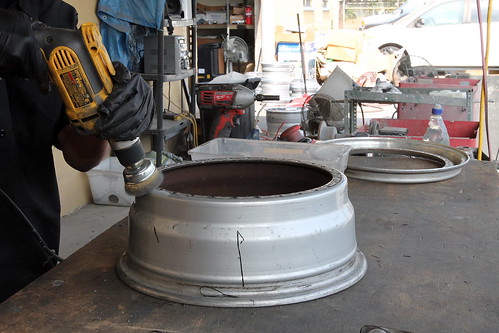
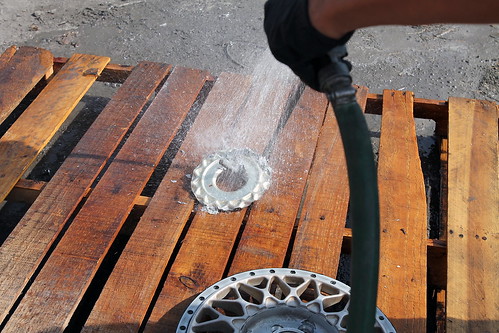
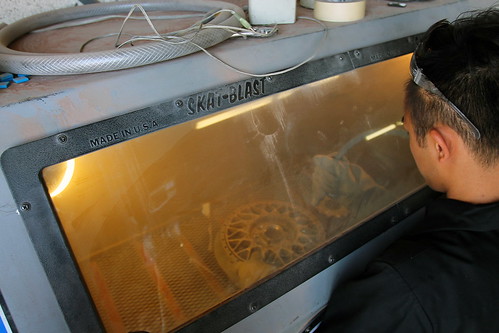
Wheel Specialists at VR Wheels quickly disassembled our decades-old BBS wheels prior to submerging the pieces in a chemical bath to remove the OEM paint, grime, and oxidized clear coat. Then the pieces were whisked off to receive media blasting to eliminate any remaining rust and old paint before the powder coat was to be applied.
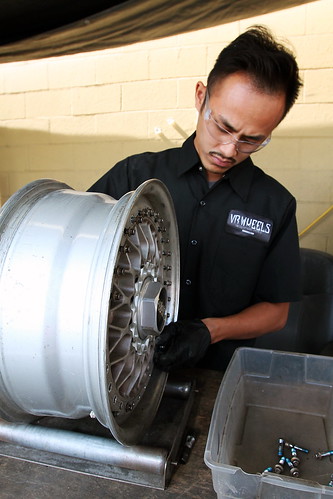
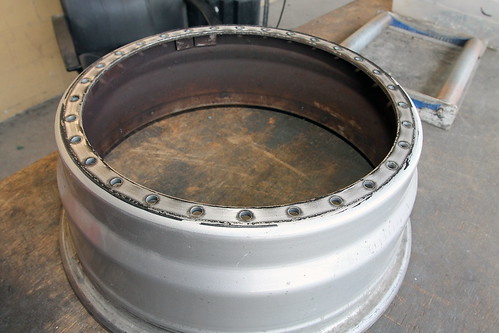
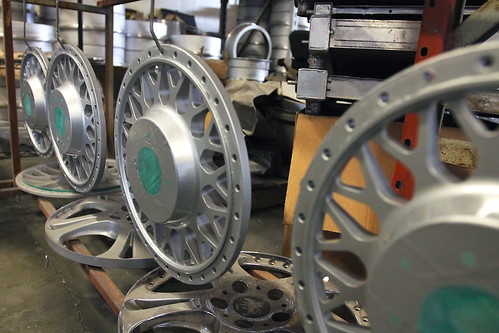
We decided to give our wheels the classic feel by powder coating the BBSs face in Bright Silver to simulate the OEM finish. Although OEM uses paint, we had VR powder coat the pieces for added durability and environmental corrosion resistance. The guys at VR Wheels carefully applied the powder to the wheel face before popping them in the industrial sized oven to cure. In the meantime, the guys proceeded to recondition the outer rim of the wheels, straightening any damage and removing curb rash prior to a full polish bringing back the intense shine that the wheels had when they left the factory in Germany.
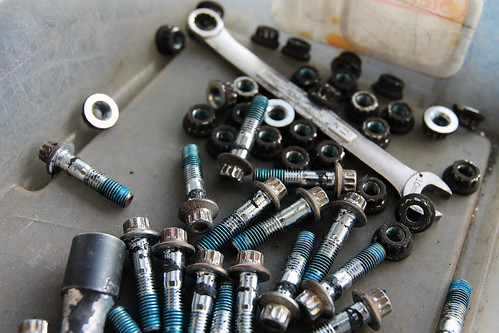
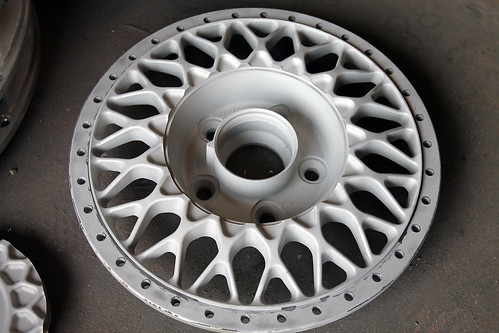
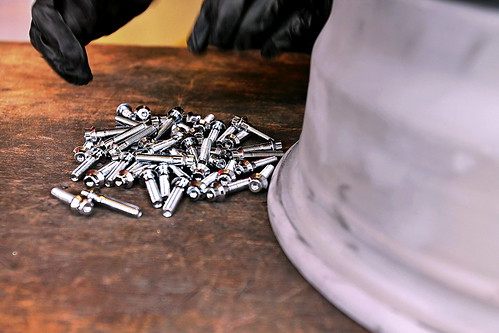
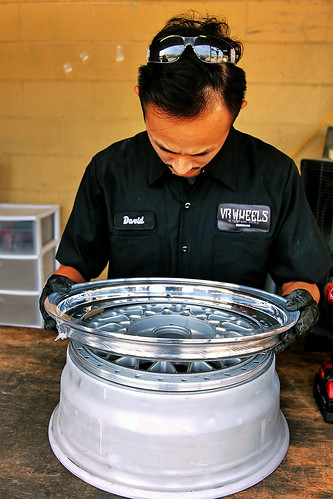
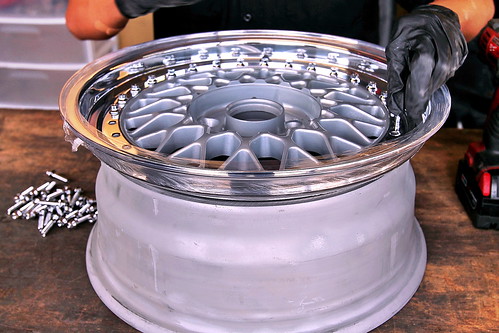
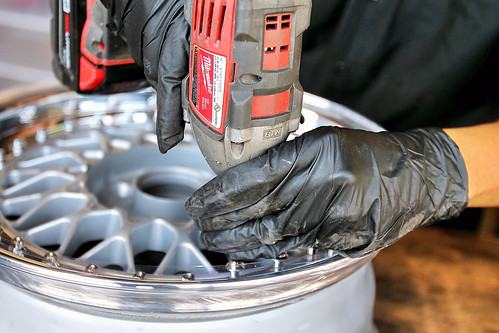
Prior to final assembly of our newly reconditioned BBS RS 001 3-piece wheels, David removed any excess powder coating to ensure the proper fitment when mating the parts together. A fresh set of polished nuts and bolts provided by VR Wheels were locked into place with some Locktite adhesive before securing each piece to 25 ft-lb. of torque.
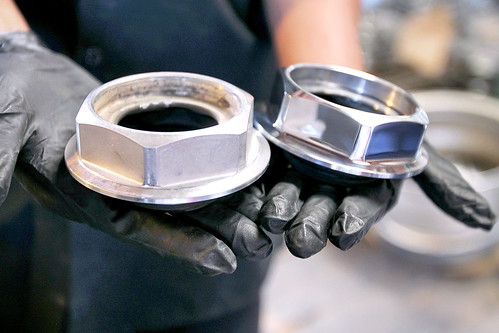
Accent pieces including our BBS center caps and emblems were reconditioned. A side-by-side shot of center cap both before and after show how well they cleaned up after 20+ years of exposure to the elements.
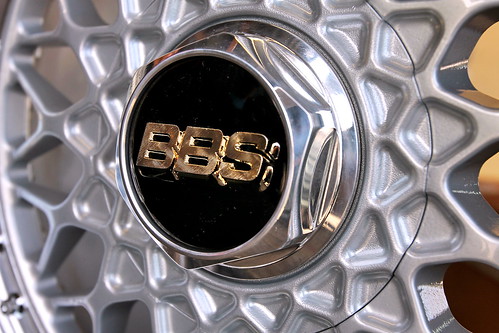
We all know the old adage; a picture is worth a thousand words. And, its true. We leave you with one final shot of our refurbished wheel the results are amazing! Stay tuned for the next edition of Clarion Builds blog as we continue to massage our BMW 2002s body into shape in preparation for paint.
Member
Looking good, Clarion! Nice choice on the wheels. I'm sure we're all excited to see the paint soon as well.
Keep posting
Member
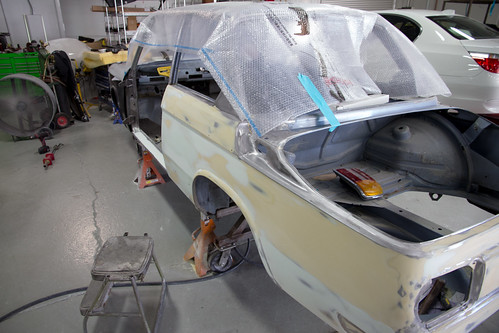
What Lies Beneath:
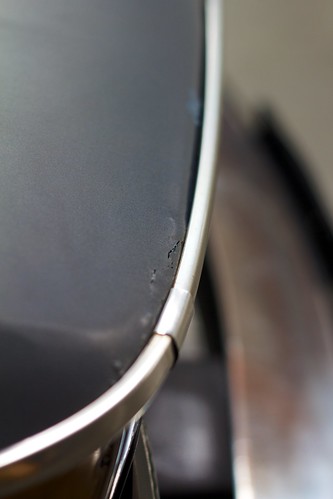
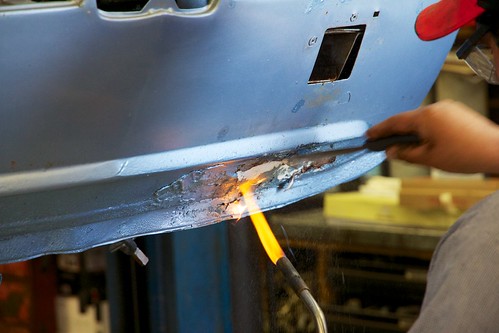
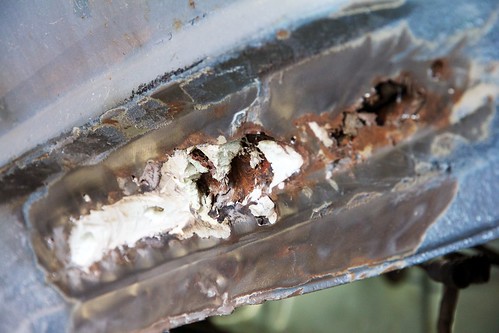
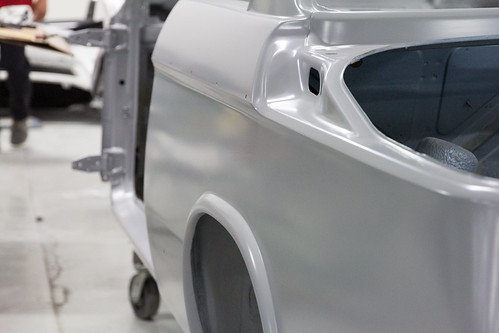
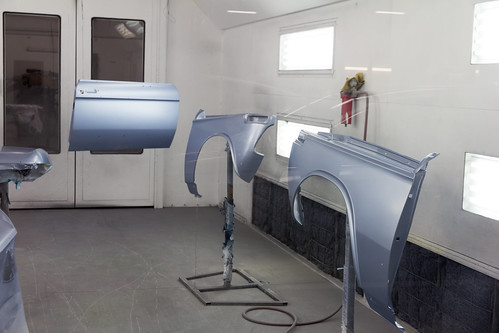
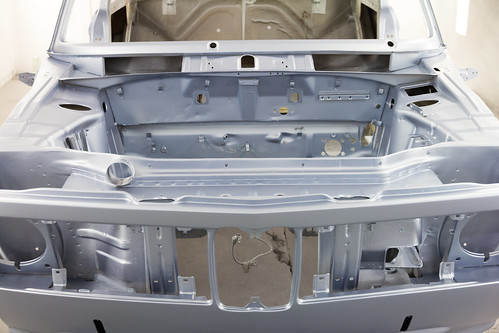
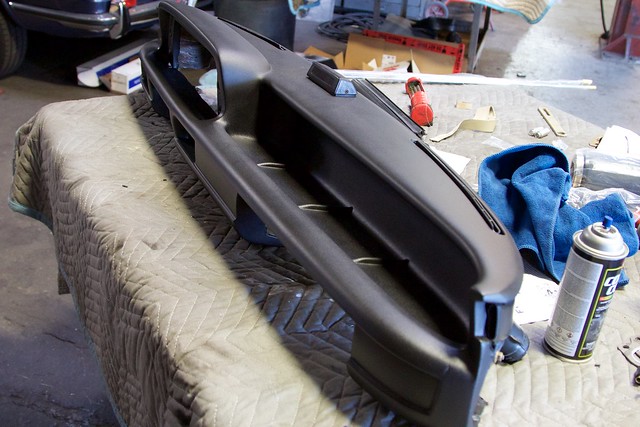
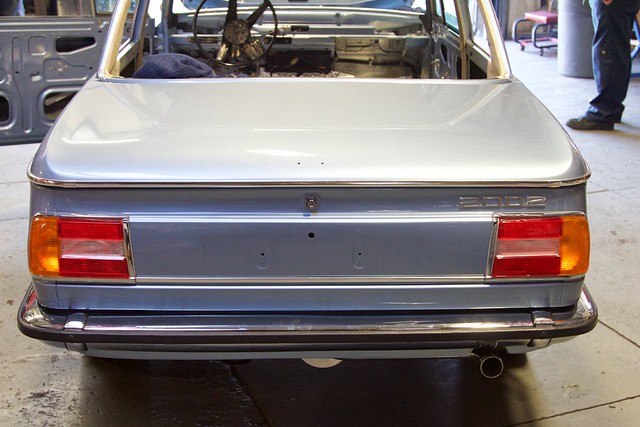
Having a car repainted and having it come out looking great is not an easy, fast, or cheap prospect. No matter how carefully the body is inspected there will almost always be surprises that wont show themselves until the car is disassembled. Our 74 BMW 2002 was no exception. After the skilled team at Coupe King had their way with our ride and the pieces were all neatly stacked on shelves, we started getting a better idea of what we were in for. Rust on a vehicle this old is normal, and we certainly did not expect our 02 to be an anomaly. Once torn down, we found trouble areas on many of the panels. For a car build of this caliber, we decided against merely treating the affected areas and painting over them. Instead, we opted to replace panels and cut out the affected areas where needed. We ended up replacing numerous panels including the doors, fenders, trunk lid and even the hood. Many of these parts were shipped directly from BMWs warehouse in Germany. After hours of cutting, welding, hammering, fitting and refitting, our 02 was once again rust free and ready to move to Diamond Hills Collision Center for some finishing body work and a fresh coat of paint.
Arriving At Diamond Hills:

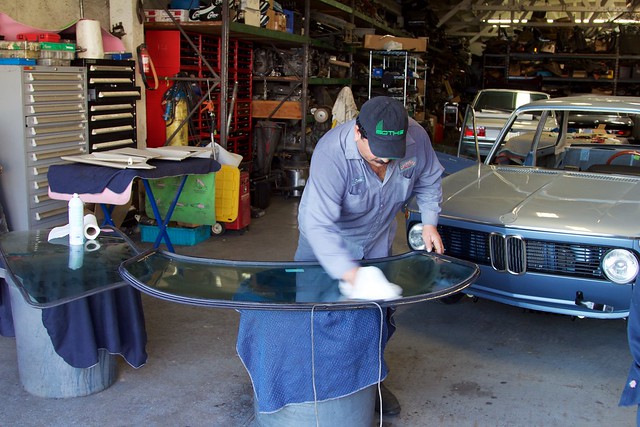
The team at Diamond Hills Collision Center is full of experts of all thing auto body, and the caliber of the vehicles they work on serves as a testament of their reputation for quality and attention to detail. Our BMW edged its way into their shop, pushing past Lamborghinis, Ferraris, GTRs, and a host of other high end luxury cars. The 02s shell looked a bit out of place in its current haggard state, but that did not last long. Mere days after the Clarion Builds BMW arrived at Diamond Hills facilities located in Walnut, CA, they began stripping all of the remaining paint and prepping the body for the next stage. Using a special (secret) compound applied directly to the sheet metal, the paint easily scraped off as if they were squeegeeing water off of a window and in no time they had the body down to bare metal. Once the sheet metal was prepped, the skilled craftsman at Diamond Hill began the delicate and complex task of making sure the body was completely straight and true to its original form. This slow and precise step of the restoration is crucial in order to guarantee that the finished product will look perfect once the paint is applied. In fact, any minor slipup or oversight at this stage could have permanent repercussions for the project as a whole. We knew the highly trained and experienced team at Diamond Hills Collision Center was up to the challenge.
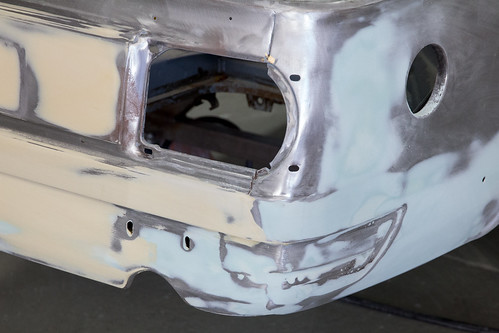
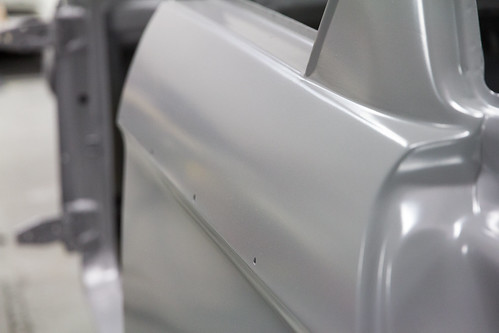
Metal Work and Body Filler:
Coupe King had handled the majority of the cutting and welding, but to make sure that the bodywork required a minimal amount of body filler, some fine metalworking was still necessary. So out came the hammer and dolly. This is a time honored metal working technique that requires both skill and the patience of a saint to master. While the principle is simple, hammering sheet metal against an object that has the shape you want in order to achieve show worthy results is anything but. The team at Diamond Hills is filled with true craftsmen, so within a few weeks they had the body panels where they wanted them and began applying the body filler. There are a few tricks to using body filler correctly but the most important one is simple patience. First, the panels must have a sanded finish and be contaminant free. If the surface is not prepped correctly then the bonding agents will not function properly and you will get cracking in no time. Next, the filler should be applied in a thin coat. The less that is used the better. Too often, we see filler applied too thick at one time and in the worst case you can lose the lines of the car. Once each layer is applied and cured, out comes the sanding blocks and the surface is sanded even. Where the metal begins to show back through the filler is where the high spots are, and where it still remains are the low spots. Repeat these steps as needed until the panels are straight and smooth enough for primer. This is exactly what the Clarion Builds BMW 2002 underwent and after a few weeks of hard work the car moved on to the next stage, primer.
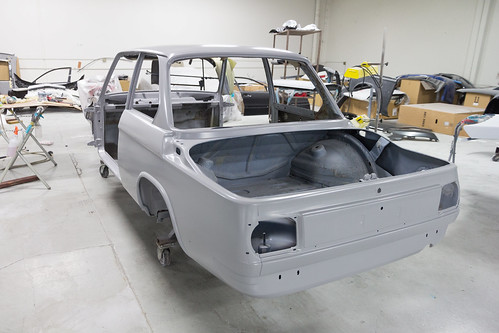
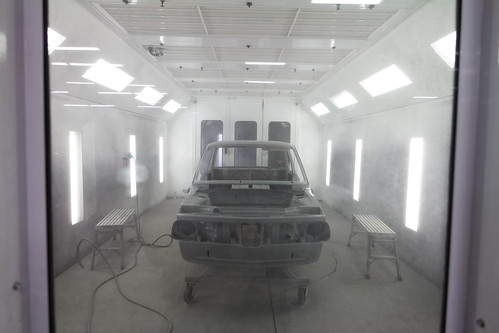
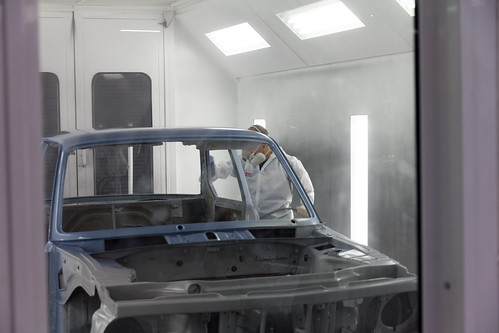
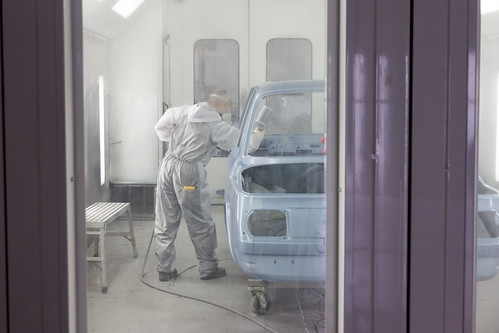
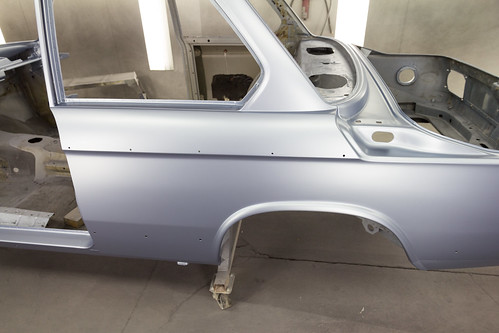
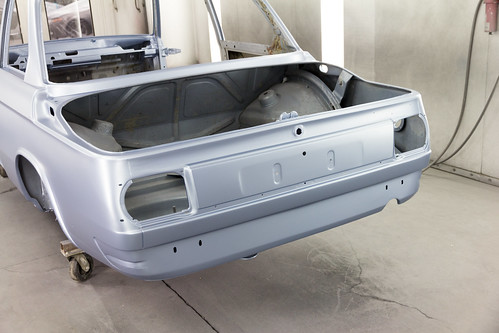
Finally Laying Down Some Paint:
After a clean shot of primer, the team at Diamond Hills went over the car once more to make sure there were no imperfections with the body of the car and then it was time for paint. Truth be told, we had no idea what color we wanted to paint the car another big decision that makes or breaks any build. With so many colors in the paint books to choose from, we decided early on that we definitely wanted to keep the car an original factory available BMW color from the 02s era, making the decision a little less onerous. After a little bit of research, we didnt realize just how special our 02 was. It turns out the cars original Fjord Blue paint was a pretty rare color to find on a US spec 74 model, however few did make it across the pond and ours just happened to be one so when it finally came down to it, we decided to keep the car unique and dress it back up in its original factory color.
Check out the full albums here:
Paint Prep: http://*******/12AReOo
Primer and Paint: http://*******/1qDaXYR
STAY TUNED!!!
I <3 My Sharpie e36
Friday test driver
Why did they paint the car with the fenders off? From the factory, the fenders are welded to the nose above the headlight.
The rides-
'68 Camaro- 511hp 388cid, Tremec 5 speed, Baer Brakes, Hotchkis suspension, 18" Budniks, Recaro seats
'73 2002- Metric Mech. 2200 efi, 5 speed, 3.90 lsd, Ground Control suspension, 16" staggered Alpina wheels, Recaro interior
'89 M3- CSL wheels, Ground Control Suspension, Koni dampers
http://www.cardomain.com/ride/792851
http://www.cardomain.com/ride/792793
Member
You must not have done a full 2002 restoration before. While the stock fenders had leaded seams up top they also have a tendency to rust there and inside the fender, it's common practice to use a restoration as an opportunity to fix/protect/paint behind the front fenders.
Member
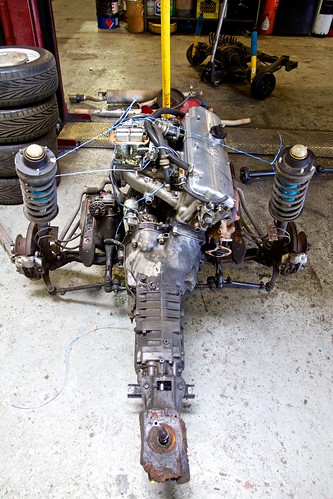
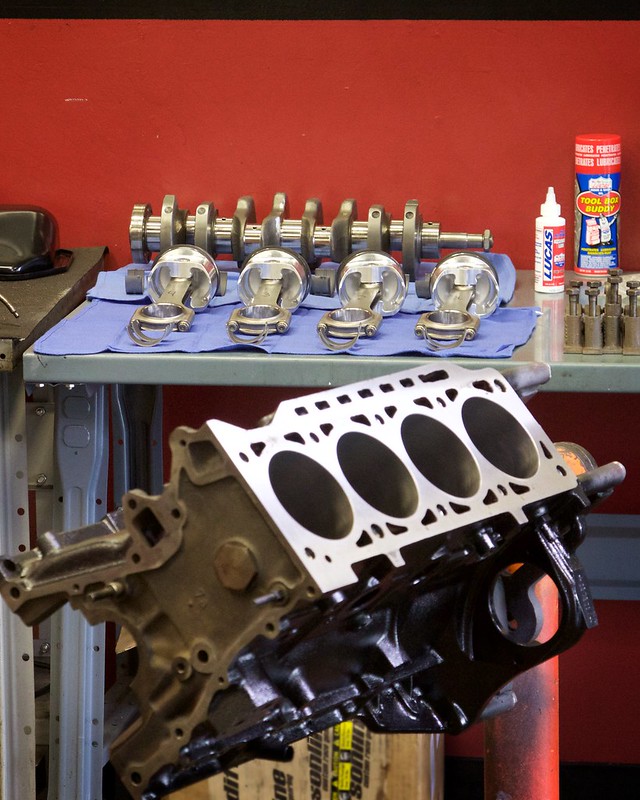
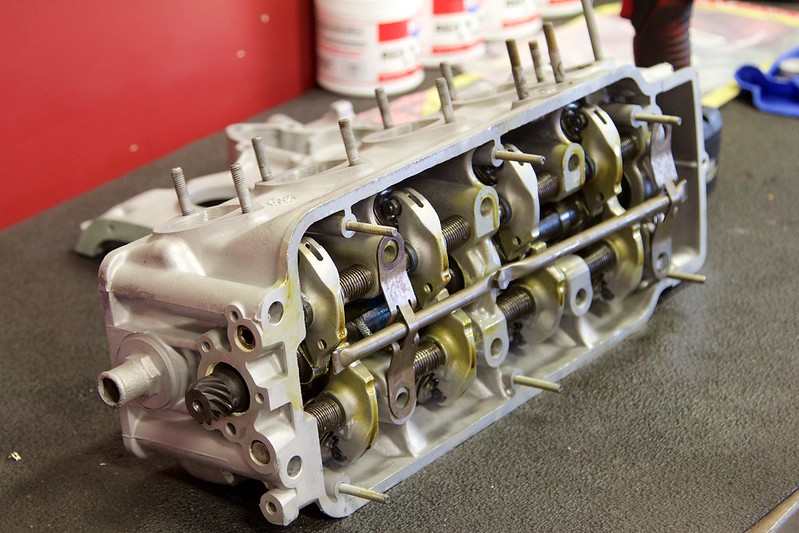
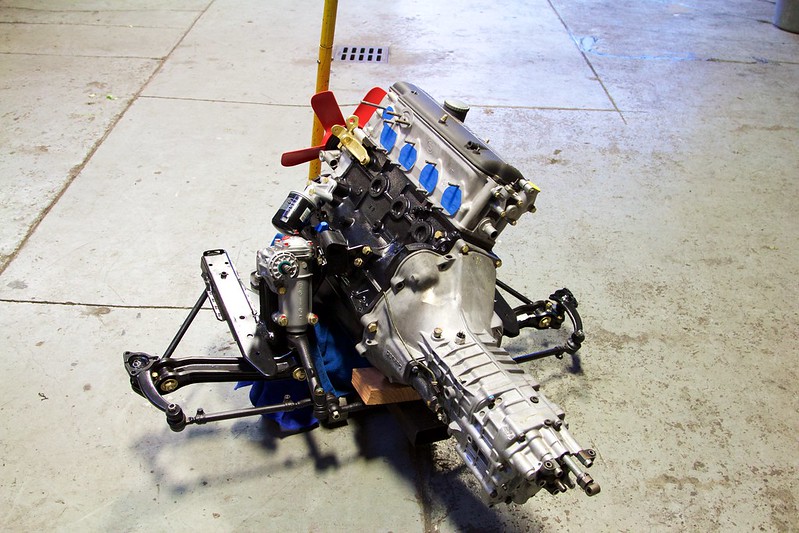
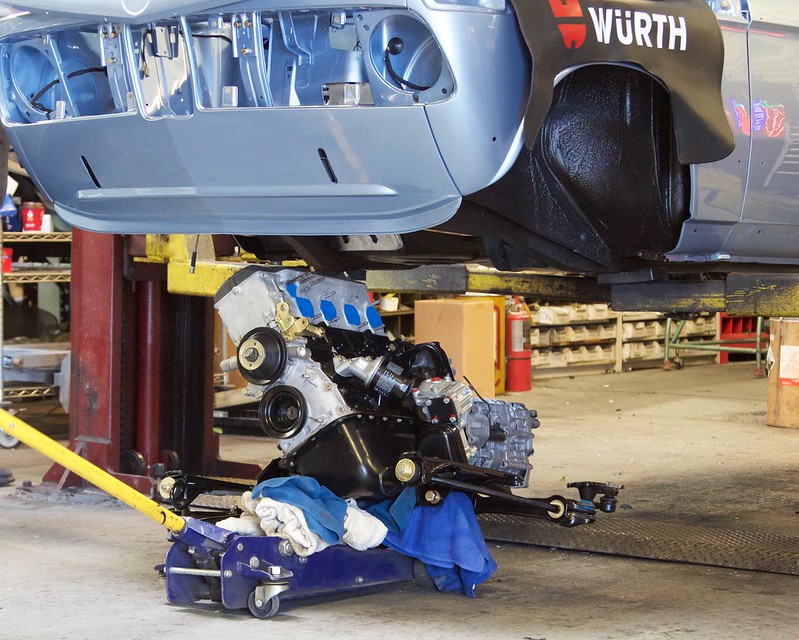
The Clarion Builds BMW 2002 project has come a long way in 5 short months we are very excited about the latest upgrades made to the cars engine, suspension and brakes not only did we want it to go faster, we wanted it to handle better and stop quicker too! Every piece of the engine, transmission, brake system and suspension has been either replaced, upgraded or rebuilt to new specs.
What we added to the car:
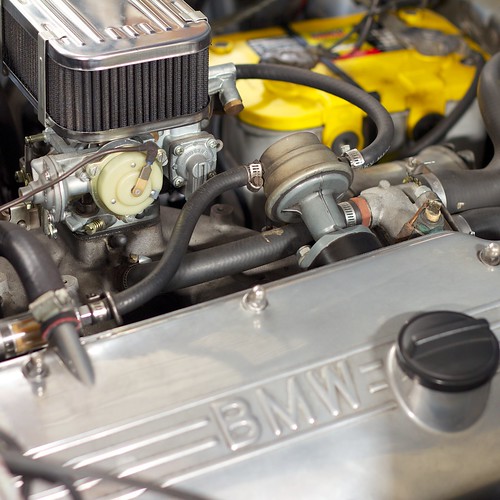
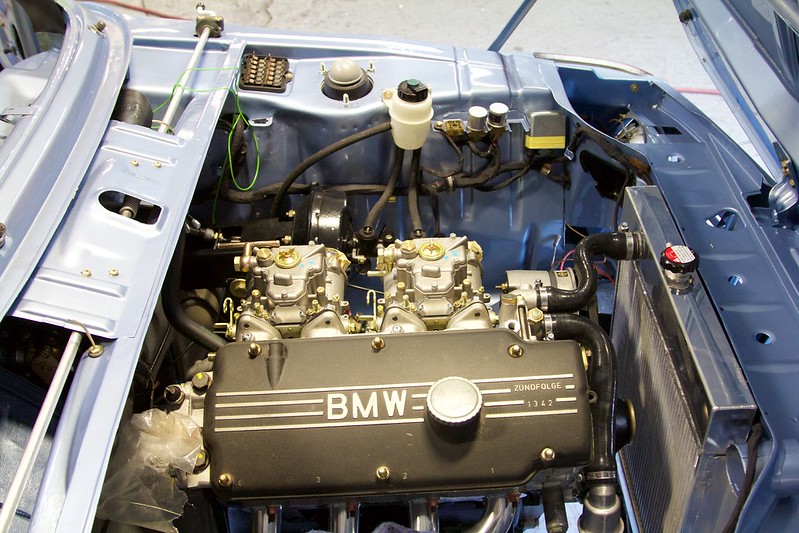
Engine: Fully rebuilt the engine with all new internals (Crank, pistons, bearings, valve train, etc.) - increasing compression from 8:1 to 10:1, replaced the intake manifold with a custom unit from Ireland Engineering, installed dual two-barrel side draft Weber carbs, a combo that effectively added nearly 60hp to the rear wheels.
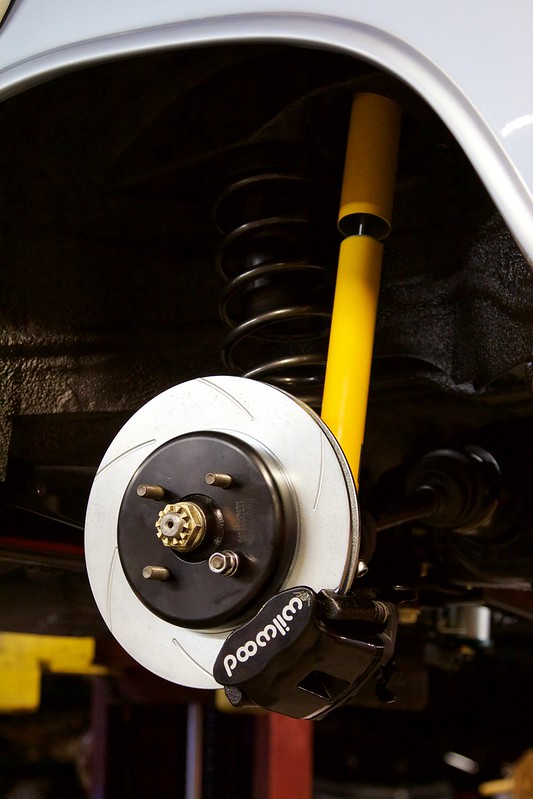
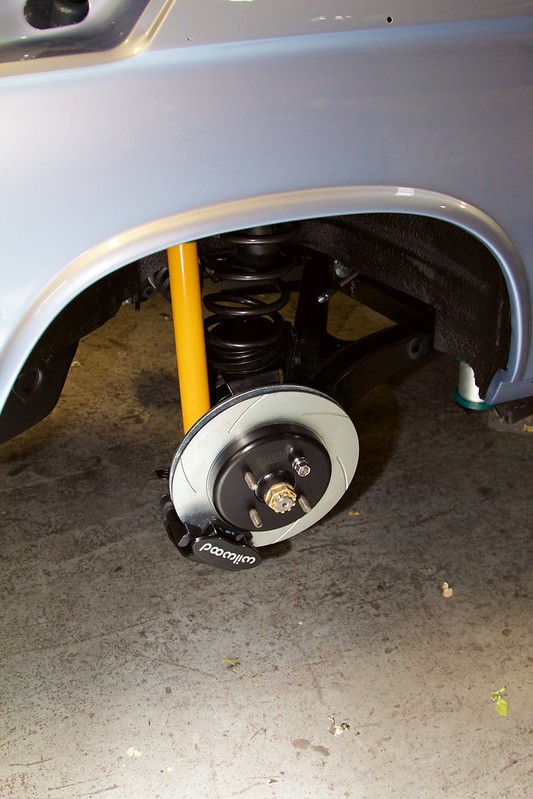
Brakes: Wilwood 4 piston calipers and two piece slotted rotors from Ireland Engineering.
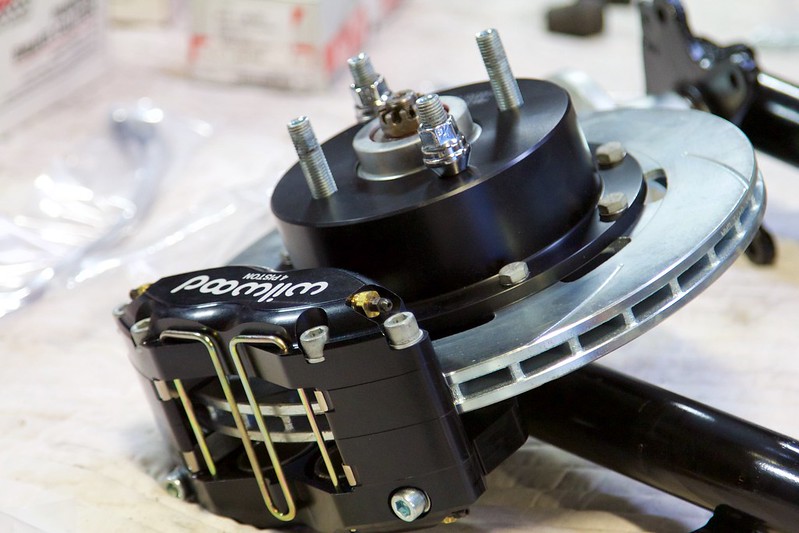
Suspension: Upgraded sway bars, Eibach springs, KONI strut inserts up front, and shocks in the back making ride height adjustable while maintaining the cars road manners.
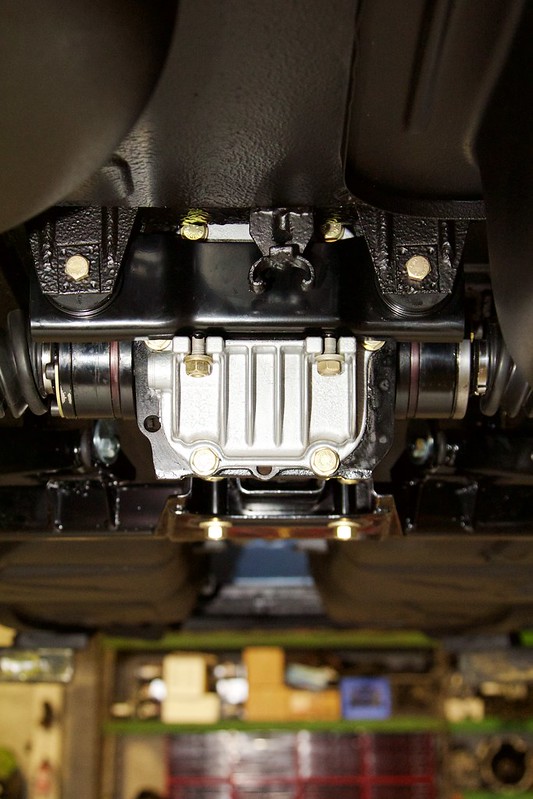
A shot of the rebuilt rear differential -
YouTube Video Link to Engine Build and Suspension Install: http://*******/CB_BMW2002_Engine_Suspension_Video
Photo Galleries:
Engine Build: http://*******/CB_BMW_2002_Engine_Build
Engine, Suspension and Brakes Install: http://*******/CB_BMW2002_Engine_Suspension_Install
All other photo galleries of the full build: http://*******/Clarion_Builds_BMW_2002_pics
More details about the Build: www.clarionbuilds.com
Friday test driver
Really? Never restored an '02 before? LOL! Get over yourself.
'68 Camaro- 511hp 388cid, Tremec 5 speed, Baer Brakes, Hotchkis suspension, 18" Budniks, Recaro seats
'73 2002- Metric Mech. 2200 efi, 5 speed, 3.90 lsd, Ground Control suspension, 16" staggered Alpina wheels, Recaro interior
'89 M3- CSL wheels, Ground Control Suspension, Koni dampers
http://www.cardomain.com/ride/792851
http://www.cardomain.com/ride/792793
Member
Well.....it's something you invariably come across if doing a full restoration, hence my supposition that if you had to ask the question then you hadn't been there yourself. Please forgive me if you were offended.
Member
Hi...I was just wondering what would be the cost of such a restoration? thanks
Member
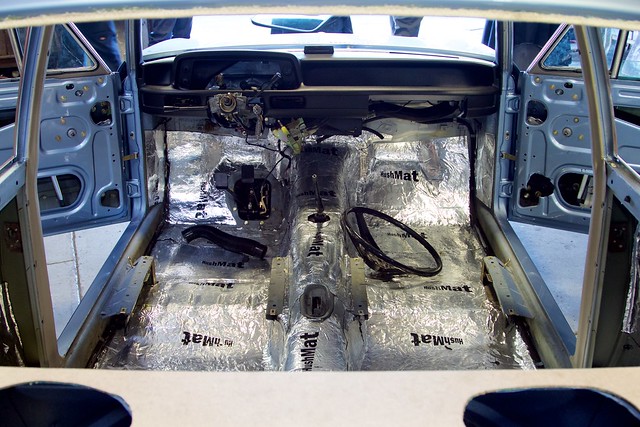
CoupeKing in Wilmington, California has been working around the clock to get the finishing touches on Clarion’s BMW 2002 project car’s interior, getting it ready to move on to the audio installation, where Clarion has some very big plans that will be announced in the next week.
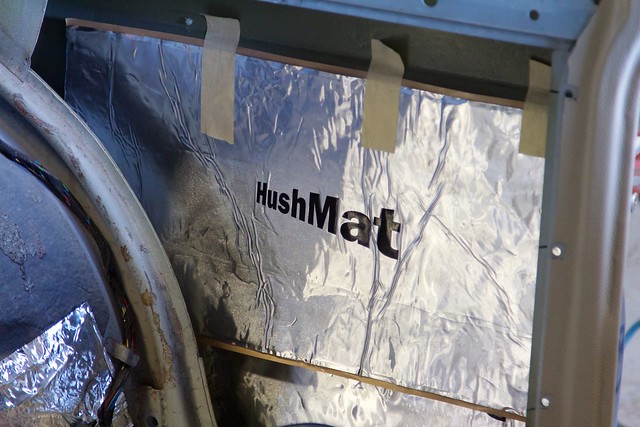
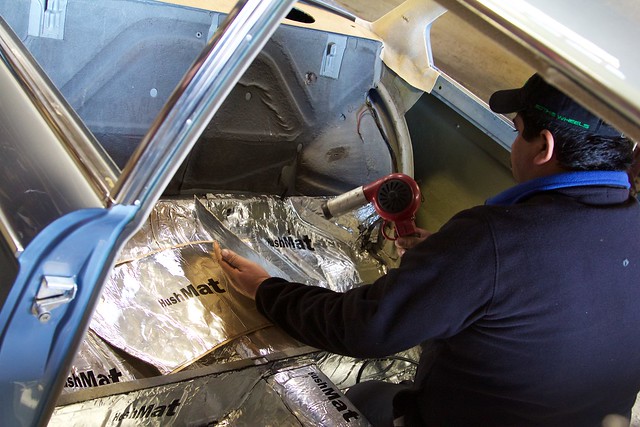
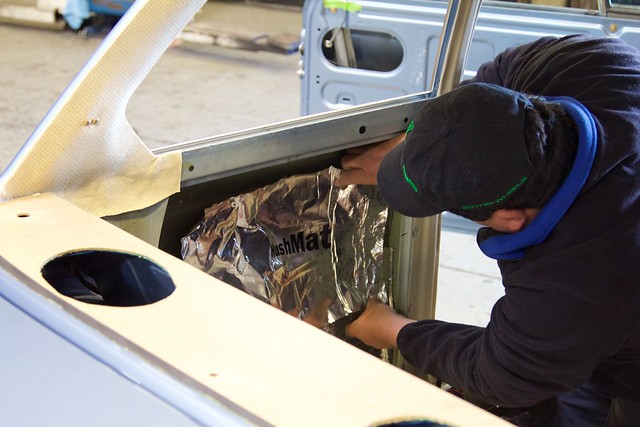
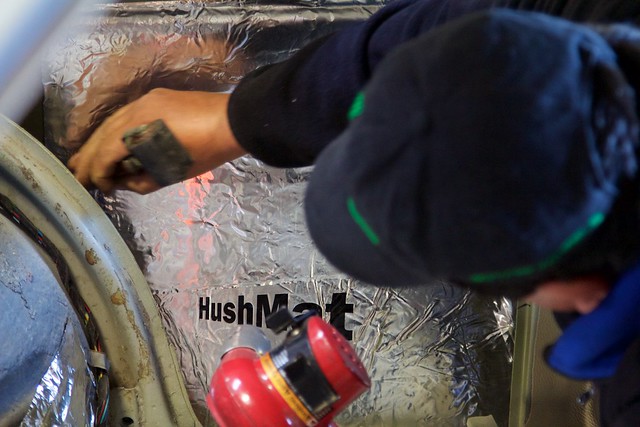
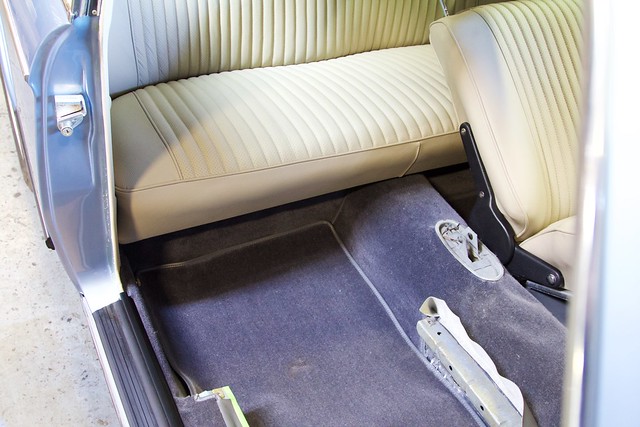
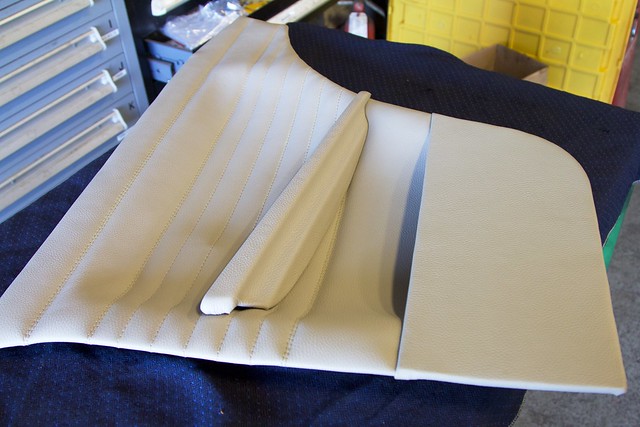
As a foundation for the interior, Clarion Builds partner Hushmat provided their Hushmat Ultra sound deadening mat for installation within the iconic 2002 build. The Hushmat Ultra is great for insulating and reducing road noise inside the car, and will allow the audio installation to shine.
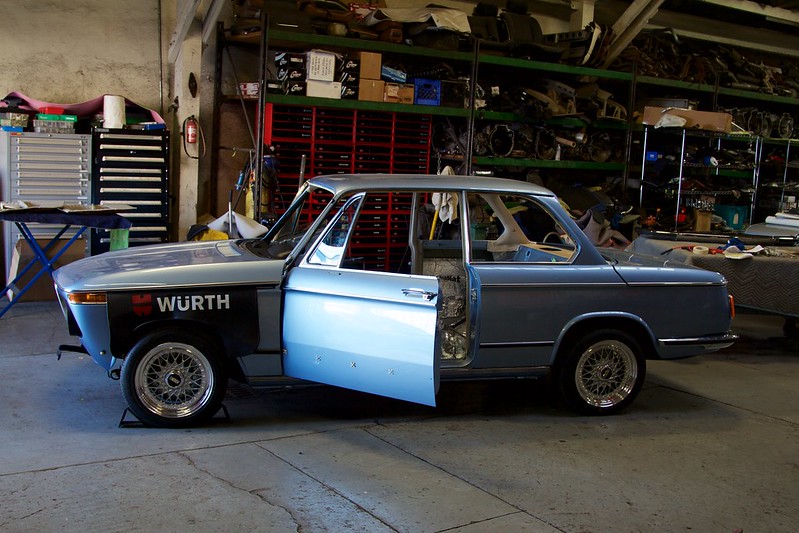
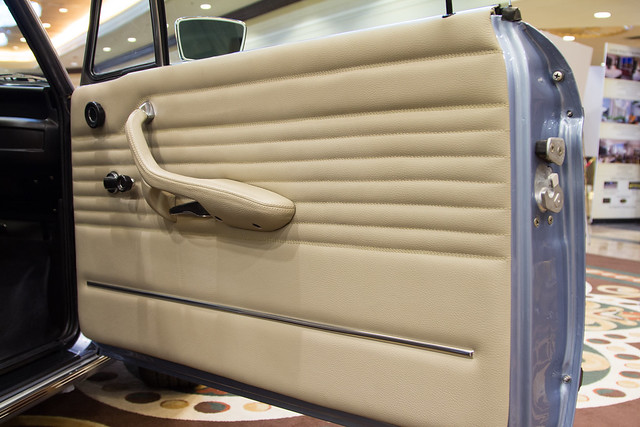
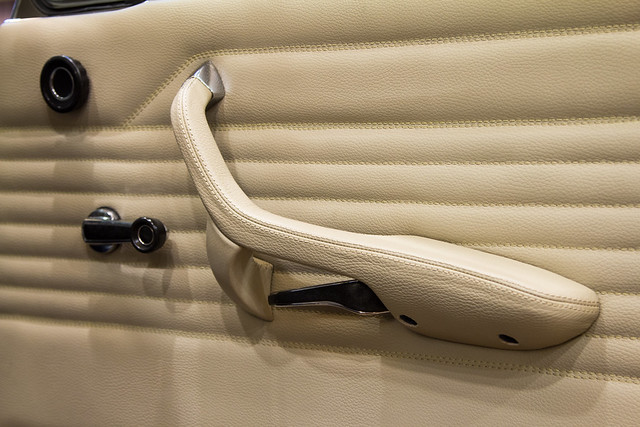
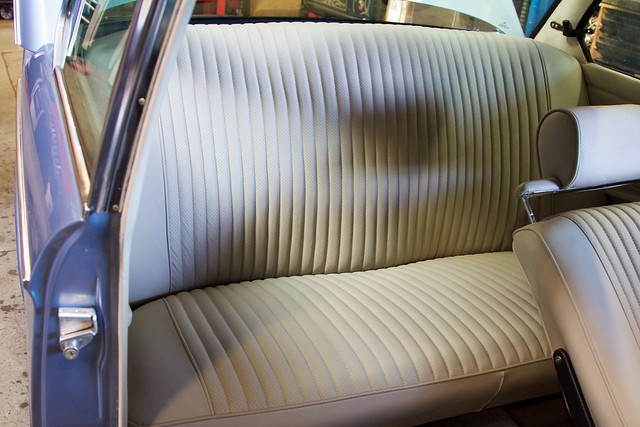
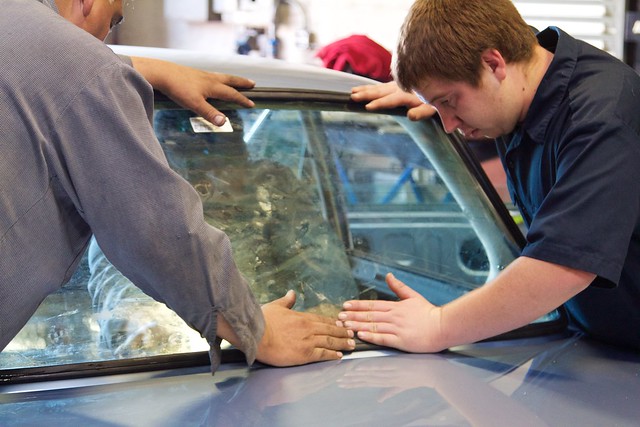
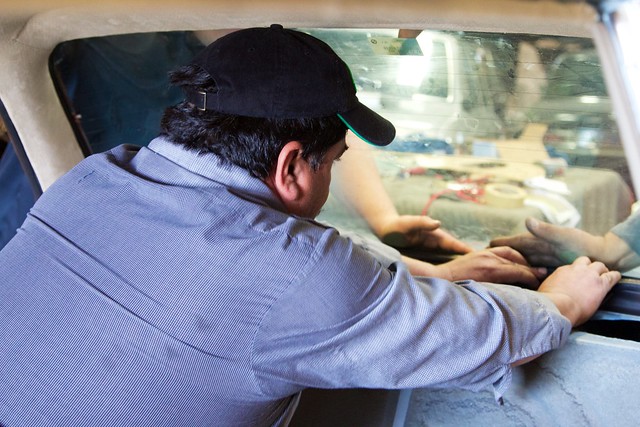
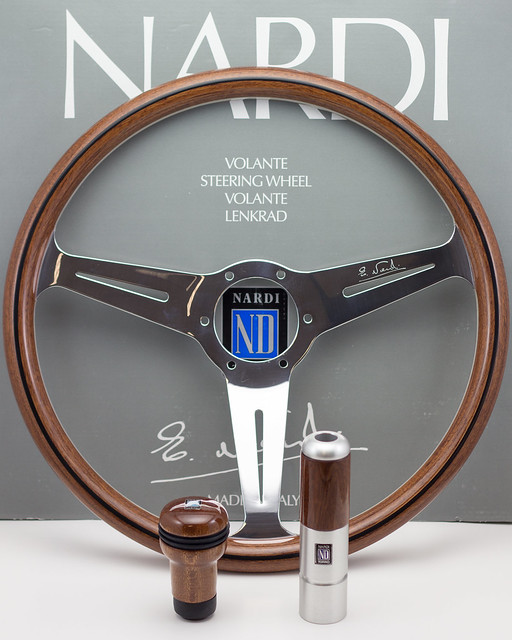
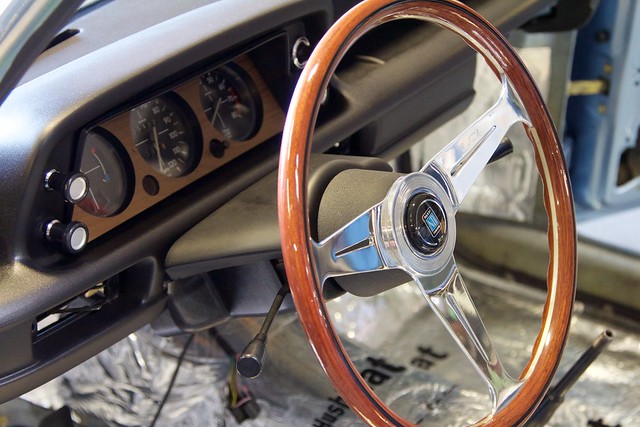
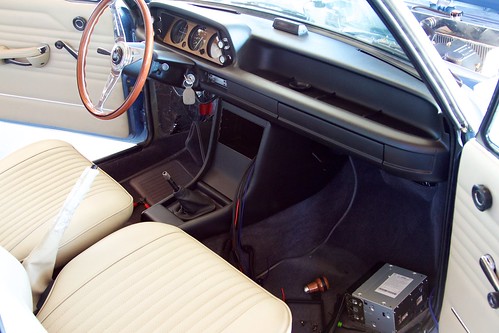
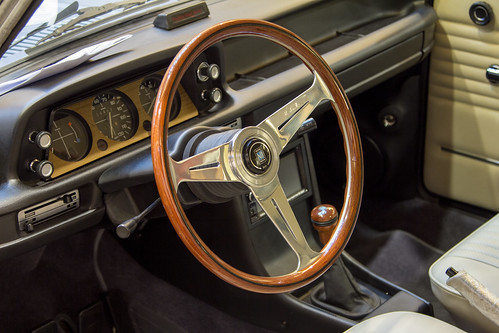
On top of the Hushmat, fresh dark medium/dark gray carpet was laid down in the 2002, serving as a terrific contrast to the freshly upholstered Oyster colored leather seats, and interior panels and Alcantara headliner. The seats, door panels and rear quarter panels were all done in leather, reproducing a look similar to what was found on non-US spec LUX edition 2002s. The dashboard was completely refurbished to look like new, and the gauges all rebuilt. Due to the rarity of replacement parts for these classic BMWs, every part of the car’s interior was either replaced or reconditioned and re-plated. To class up the interior, the steering column was topped off with a Nardi 390 steering wheel, and Nardi shifter knob and parking brake handle. The entire interior can be seen very clearly through the all new lightly factory tinted glass installed all the way around the car, and pops beautifully against the factory-fresh Fjord Blue paint job.
Modeling the exterior of the car after the more appealing Euro-spec 2002, CoupeKing ditched the crash-rated bumpers mandated by the US government in 1974 for the thinner more sleek looking bumpers from a pre-1974 model. Additionally, CoupeKing finished buttoning up all of the rubber molding and body panel alignment to ensure that the car look better than the day it did the day it rolled out of the BMW factory.
That car looks pretty close to done, but a few little tweaks are still needed. Regardless, we are so excited about the car we took it to the Consumer Electronics Show in Las Vegas to show off the progress that we have made so far. What do you think about our build so far?
Next steps, the Clarion Builds BMW 2002 gets a Clarion audio system. Stay tuned!
I <3 My Sharpie e36
Member
I really admire your vision and direction with this build. So many companies out there go full "pimp my ride" when building cars to show off their products, and end up ruining special cars like this that deserve so much more. Loving that you guys are keeping it clean and mostly original! It looks amazing.
Member
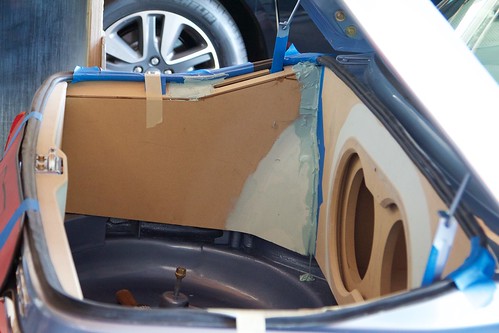
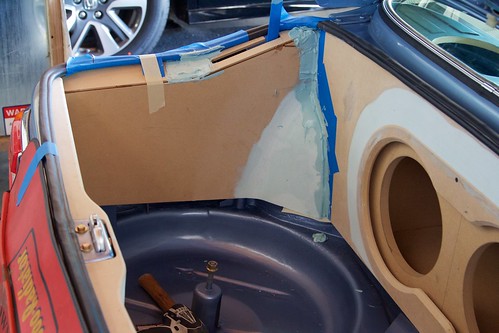
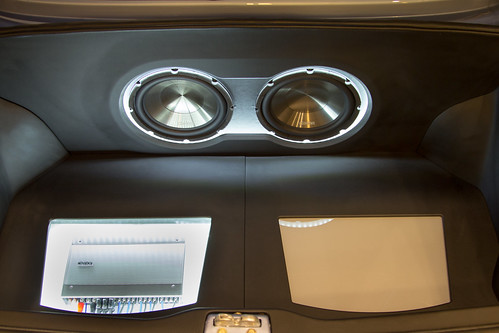
With the paint completed, the suspension and brakes installed, the engine bolted on to our 02’s chassis, and all the Hushmat sound dampening products laid down, we finally got to move on to our area of expertise: The Audio!
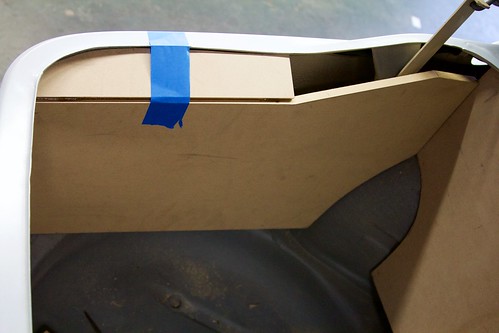
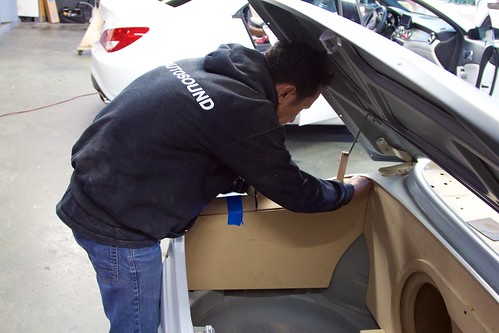
Enlisted to help, BP Autosound, one of our premier local dealers, wasted no time in crafting the custom panels for the trunk, rear deck, and kicks. All the Wirez audio cables were routed in preparation for the Clarion audio equipment installation. In the meantime, the last few stitches on our new leather upholstery were being sewed up and all the pieces arrived just in time for final assembly so that the car could make its debut at CES in Vegas!
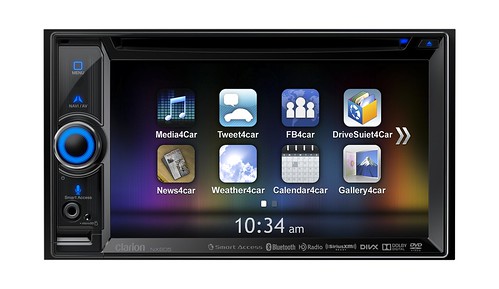
Many of those following the project have asked us to provide details as to what Clarion audio gear were installed into the car and why we selected those components, so here is a little breakdown. First, of course, was the headunit. In the BMW 2002 center console, we could easily fit a double DIN unit in the dash and we really wanted the safety and convenience of handsfree, so we chose the all new NX605. The NX605 also features Clarion’s exclusive Intelligent Voice technology powered by Google, which provides us hands free control of many aspects of the unit which is important as we are rowing through the gears while carving up the canyons above Malibu! The NX605 also gives us direct access to the Clarion Builds’ Pandora station using the dedicated Pandora source and smartphone link.
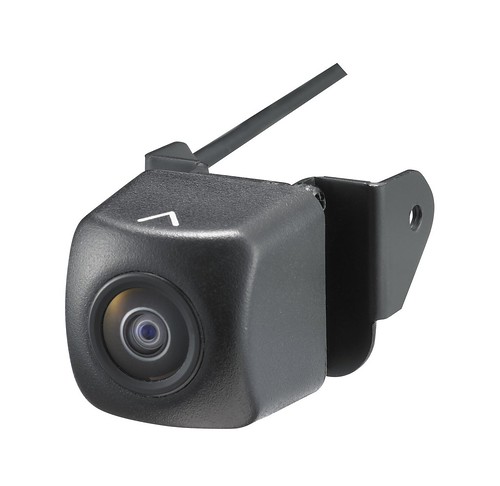
In case we ever need to see who we left in our dust, and so we can keep the tail end of the car free of scrapes, we installed a CC510 rearview camera. This great little thing can see in nearly pitch black, thanks to its .5 lux light sensitivity. We also don’t have to worry about the camera succumbing to the elements due to its IP67 water proof rating, not that our ’02 will see much rain anyway.
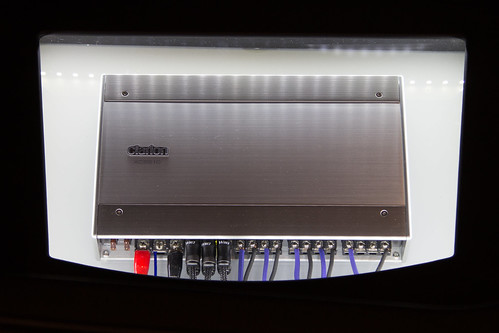
The NX605 also has 4V RCA’s that outputs high quality audio to the Clarion XC6610 6ch amp that we elected to use for the project. We went this route because it allowed us to spec in only one amp to power the whole system. Channels 5&6 are used for the subwoofers still leaving 1, 2, 3, & 4 to run the highs and mids. The XC6610 is marvelously compact, making it simple to drop into the spare tire well with room to spare. It is also a fantastic sounding amplifier which as you might have guessed is pretty important to us.
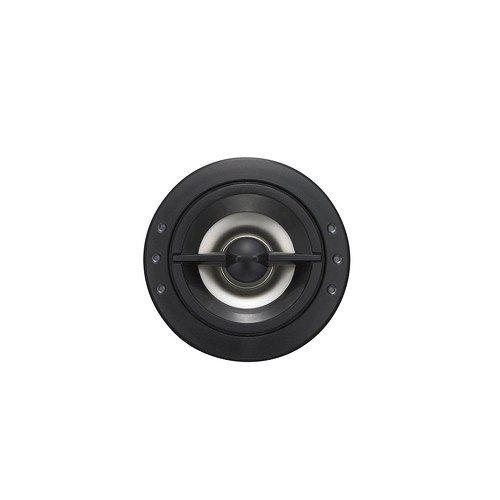
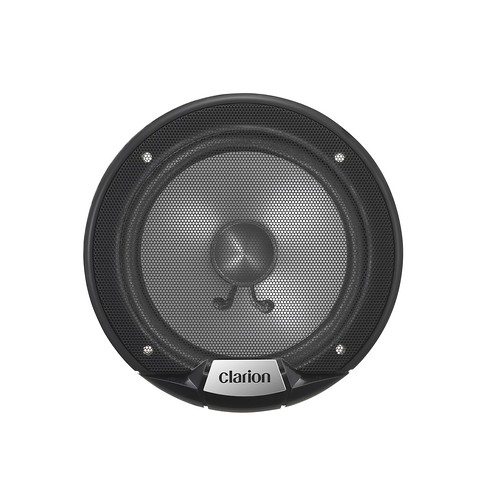
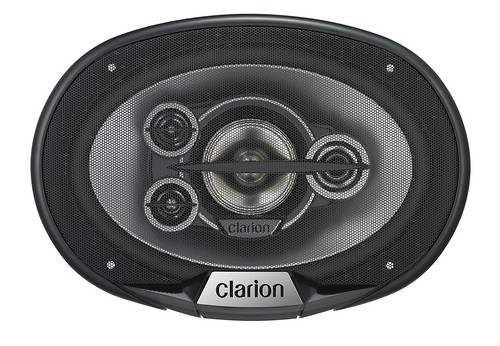
Now we needed something to take advantage of all that clean power and we hate cutting holes in the door panels of a classic car if it can be avoided. So, the guys at BP Autosound fabricated some custom kick panels to house our SRG1623S 6.5” component speakers. Their shallow basket design and minimal space requirements made them an ideal speaker for this application. For the rear fill, we dropped a pair of SRG6953R 6x9s into the rear deck. They add a fair bit of punch even at medium volume and, when we decide to really crank the system, their 5-way design really screams! And, to spice them up, BP added a custom trim panel sporting a lighted Clarion Builds logo!
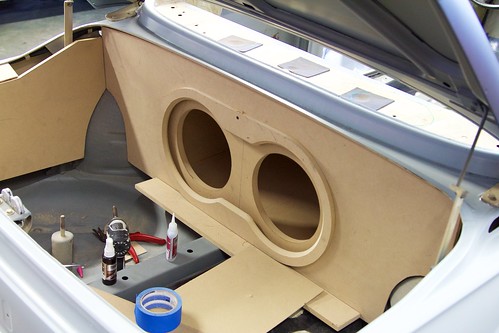
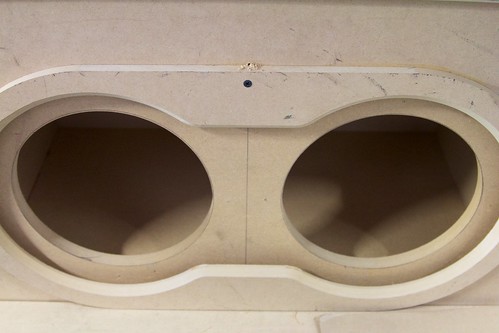
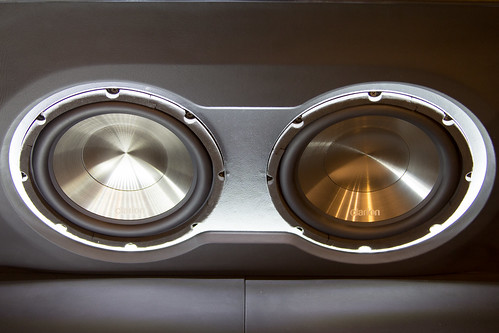
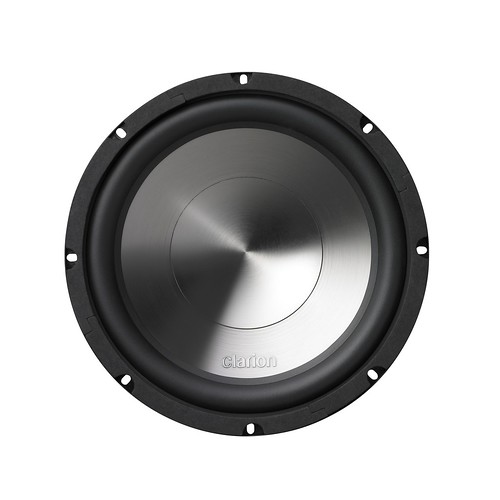
Of course, we needed some low end to complement all the highs and mids so we went with a set of WG2520D 10” subwoofers. These particular woofers were chosen for their musical performance and efficient design. Because we did not have any limitation on mounting depth, we did not need to employ our phenomenal WF series shallow mount subwoofers for this build. The pair of WG252D’s are installed in a custom-built, rear firing enclosure that is trimmed out with a contoured and leather wrapped beauty board. The whole trunk for that matter is covered in leather wrapped panels, giving it a simple, well sorted, and classy look. To enhance the visual appeal, white LED’s are used to accent the important bits, including a ring around the amp and another around the subwoofers.
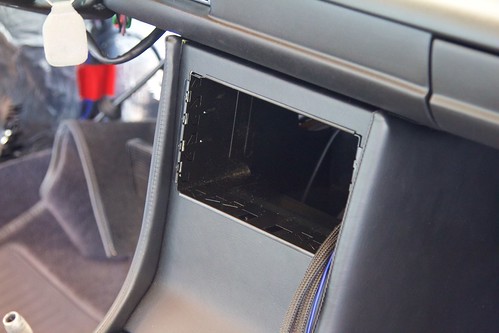
To finish off the center stack where the radio was installed, we added three VDO gauges, our CCAUSBAV so we have easy access to the USB and AV input on the unit, and to keep thing symmetrical we relocated the factory hazard switch. Our Clarion Builds partner, SiriusXM, provided a SXV200 tuner that got tucked out of sight behind the radio.
NX605 $899.99 M.A.P.
Installed Clarion Products
2-DIN DVD Multimedia Station with built-in Navigation, HD Radio, Smart Access, Intelligent VOICE powered by Google, & a 6.2-inch touch screen
CC510 $99.99 M.A.P.
Rear Vision CMOS Camera with Distance Guide Lines
XC6610 $649.99 M.A.P.
Marine Grade 6-ch Class D Amplifier with 1000 watts Maximum Power, 85 Watts x 6 Channel @ 4-Ohms, and 250 Watts x 3 Channel @ 4-Ohms Bridged
SRG1623S $69.99 M.A.P.
350W MAX. 6-1/2" 2-way Component Speaker System
SRG6953R $99.99 M.A.P.
600W MAX. 6" × 9" Multiaxial 5-way Speaker
WG2520D $69.99 M.A.P.
1000W MAX 10" Dual 4-ohm Voice Coil Subwoofer
CCAUSBAV $39.99 M.A.P.
Flush Mount Female 3.3mm to Male RCA Audio/Video and USB Extension Cable
Check out all the details of the products we installed in our Clarion Builds 1974 BMW 2002 at www.clarion.com/us
Last edited by ClarionBuilds; 02-10-2015 at 05:32 AM.
Member
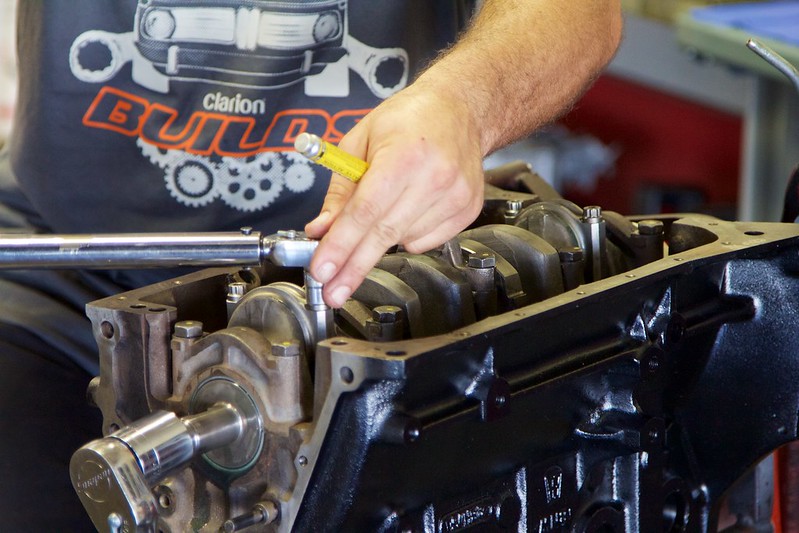
On February 13, 2015, Coupeking fired up the freshly built M10 engine on the Clarion Builds 1974 BMW 2002 for the first time!
9 months ago, we purchased a very tired, but running 1974 BMW 2002. Once the engine was pulled and disassembled, it was completely rebuilt with all new internals. Compression was boosted from 8:1 to 10:1, custom designed CP pistons replaced the factory-original BMW pistons, and factory intake and carburetor were replaced in favor of a custom Ireland engineering dual carburetor intake manifold mated to dual Weber two-barrel side draft carburetors. To expel the gases, we went with a custom mandrel bent header and finished the system off with a beautifully polished Magnaflow exhaust system. The combination ended up effectively adding an additional 60+ horsepower to the rear wheels, making it possible for the motor to churn out a naturally aspirated 140hp+ to the rear wheels!
Check out the full build at: http://www.bimmerforums.com/forum/showthread.php?2139498-Clarion-Picks-Up-a-1974-BMW-2002-and-Commences-Full-Restoration-with-Mods
Last edited by ClarionBuilds; 03-06-2015 at 02:10 PM.
Member
This is a great thread! A poster asked about cost and I think a lot of us would be interested in that issue. I understand much of this work is being done by co-sponsors but for guys who would love to restore a 2002 it would be nice to know an order of magnitude relative to the mods being chosen.
Another question for '02 people-- Clarion has chosen a base model 2002 for this restoration. I guess I'm wondering about whether something like this would have made more sense with a tii? Maybe I'm off the mark here but I'd love to hear input from others on choice of palate.
Member
BMW CCA Member
Love the rebuild and have been watching since the beginning. But I also wonder regarding the costs involved, not many of us have $1930 +installation fees to throw at a new stereo system. And I do not even want to hazard a guess at the car's rebuild cost... "if you have to ask, you cannot afford it" is most likely the response.
You're talking to a bunch of people who own these great little BMW 2002s but most of our cars are 40 years old and the work is being done by ourselves.
I am wondering what was the angle and what is the pitch for including the Clarion rebuild on this website?
We have all drooled over this beautiful restoration and stereo installation but is there anything in this for us "common folk" other than watching and dreaming?
 Posting Permissions


 Reply With Quote
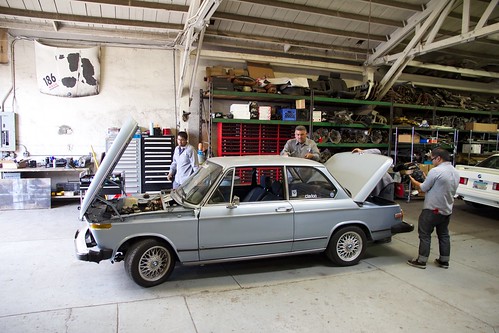


Bookmarks