
 Member
This DIY was written so that even a novice could complete the repair, so please excuse the heavy details in some areas as well as an oversimplifying of what might seem obvious to the more experienced forum member. Some of you may want to just skip to the details that you need, but others may feel the need to read through all of it. If this is the first time you are attempting this kind of repair, I would recommend taking the time to read through this entire post first. The details herein are included to answer most questions you may have about each step of the repair.
For several months now I have been researching different ways to fix a severely cracked dash from an E21 donor car. I actually have two dashes; one from the donor and the other from my 82 320iS. I chose to repair the donor dash because it was in much worse shape and I wanted to experiment with the restoration process on one that would be more challenging. I figured I could take what I learned and apply it to the other dash that I am planning to put back in my fully restored car. I will probably sell the one used in this DIY to any forum member that would like it. I have tested many different products and techniques (spending quite a bit of money along the way to fully experiment) to repair this specific type of dash, which is constructed of polyurethane foam, hard plastic and vinyl. What follows is a list of materials and a step-by-step procedure that I found to work best to make a lasting repair to the E21 dash. I hope some of you try it out and have the same success!
Here is a quick video of what my dash looked like before the repair:
[ame]http://www.youtube.com/watch?v=ebIf0NHv6hQ[/ame]
-------------------------------------------
MATERIALS REQUIRED:
Each price listed below represents the cheapest I could find that specific item on the web, including the cost of shipping, if needed. Additionally, each item is linked to a website where you can order it from. Unless otherwise noted, only one of each item is required for this DIY, but you may need more of a specific product depending on how many cracks and holes you are trying to repair in your dash.
>> Dremel tool w/ pointed stone grinding tip- $40 (Free shipping through Amazon) Im assuming most of you own a Dremel or similar rotary tool. If not, you can find a basic corded model for about $35 or even cheaper. A stone grinding tip is no more than a few dollars.
>> Plastic Welding Kit- $16.99 (shipping not required due to in-store availability)
>> Padded Dash Filler w/ hardener [#2050-9]- $20.95 (+ $9.49 shipping or $11.90 if shipped with Prep Filler below)
>> Filler Prep [#1060FP]- $8.95 (+ $9.49 shipping or $11.90 if shipped with Padded Dash Filler above)
>> Fiber-Flex Welding Sticks [30 ft.]- $26.96 (Free Shipping through Tool King)
>> SEM Rubberized Undercoating [Black #39523]- $9.80 (+ $6.95 flat-rate shipping up to 5 lbs)
>> SEM High Build Surface Primer [Gray #42003]- $14.94 (+ $6.95 flat-rate shipping up to 5 lbs)
>> SEM Plastic/Leather Prep [#38353]- $12.06 (+ $6.95 flat-rate shipping up to 5 lbs)
>> SEM Cover Coat Dash Paint [Gloss Black #15233]- $11.74 (+ $6.95 flat-rate shipping up to 5 lbs)
>> Plastic Putty Knife [2]- $0.98
>> Sandpaper [3-6 sheets each of 320, 150 & 80 grit]- Norton brand from the Home Depot makes quality sandpaper. $3.97 per 3 sheet packs; you can buy larger quantity packs for less than the cost of buying 3 packs separately. You will find yourself using more than you think for this repair, so be sure to stock up.
*Note: SEM products can be found locally at car paint supply stores for about the same price or even a little less than what it cost to buy online and have it shipped. It is more expensive than many other aerosol spray paints/under-coatings, but youre paying for the high quality of their products. You will even notice a difference in the spray tips they use; they rarely clog and consistently put out a uniform spray. Some of these products contain high VOCs, so be sure to wear the proper respirator and spray only in a well-ventilated area.
-------------------------------------------
REPAIR PROCEDURE:
Step 1- Prep Dash for Grinding
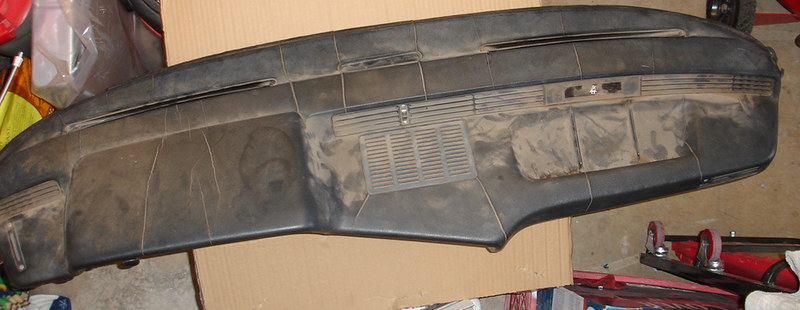
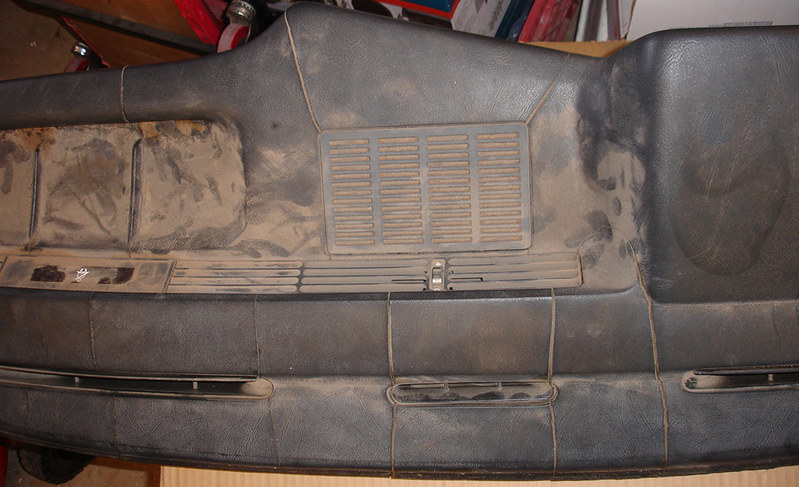
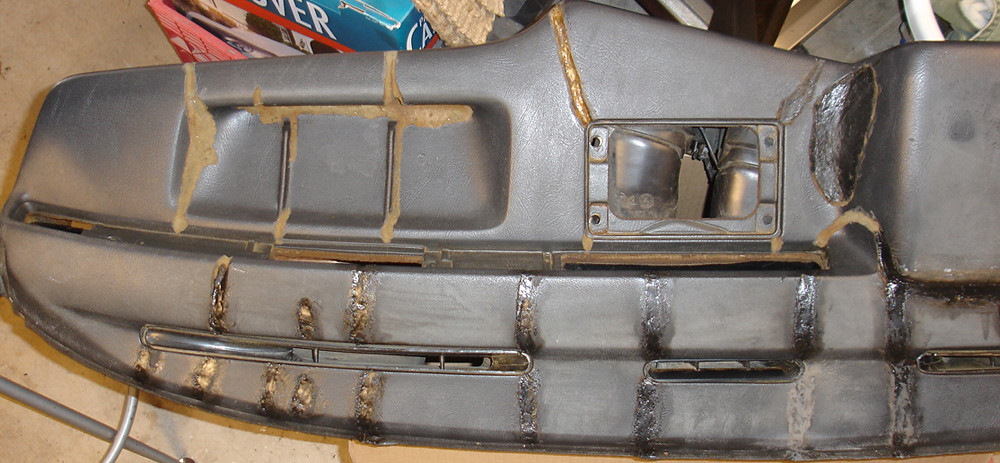
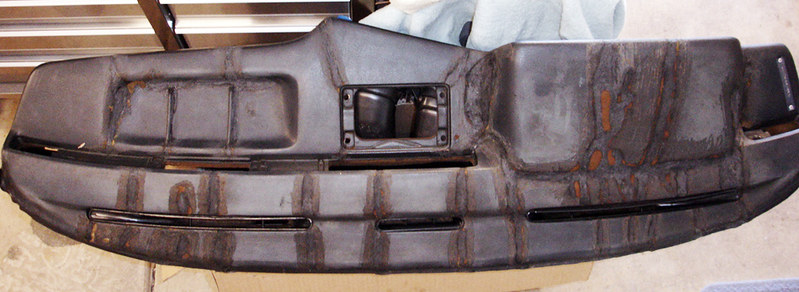
My dash straight from the donor car...
More sun damage...
Depending on the severity of the cracks, you may have to remove your entire dashboard to properly execute the repair. Your chances of doing a quality job will likely increase if you are able to have access to all cracks from any angle. Begin by wiping down the entire dash with a wet cloth, especially the cracks. Be sure to go over the cracks in a parallel direction, as this will allow you to fully see the extent of the damage by wiping away dust and dirt in the gaps.
At this point, you may want to remove the fascia panel, instrument cluster, HVAC vents, and speaker grille, especially if the cracks protrude into or near these parts of your dash. Small black screws hold most of them in place, so you just need to locate them within the plastic. If leaving these parts in place will not damage them during the repair, you should at least cover them with paper to protect from dust and aerosol overspray. Special attention should also be paid to covering the three windshield vents in the top of the dash if you choose not remove them from below. Be careful in how you tape off this area, as you can ruin the finished top coating if a piece of tape gets stuck onto the dash surface. When you go to pull this tape off, the layers of coating youve applied may go with it.
Step 2- Grind Cracks in Dash
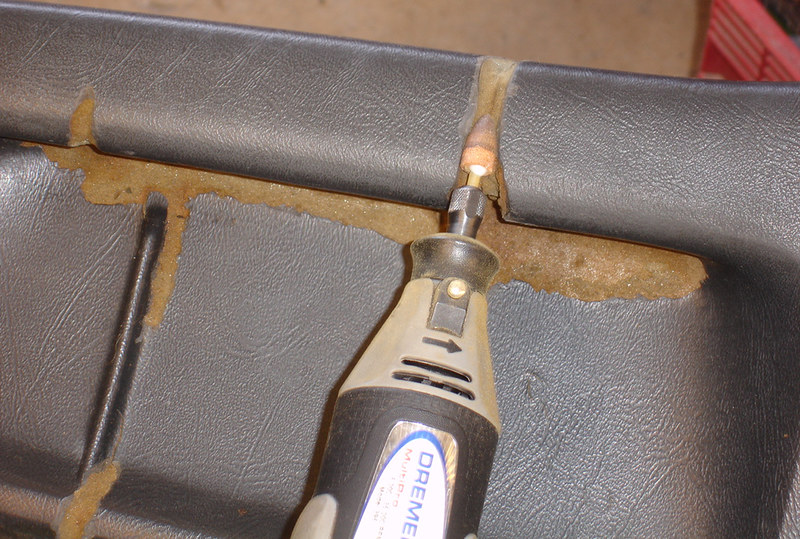
A major reason padded/foam dash repairs fail is because only the crack on the surface is treated and the underlying crack within the foam is left in place. If you repair only the top plastic surface of your dash, chances are very good that the crack below will eventually work its way back up there. The only way to guarantee that the same cracks will not come back in the same place is to grind them out right through to the base foam. To do this, you will need to make a V-shaped groove with a Dremel or rotary tool at the top of the crack and work it down through the foam. A pointed stone-grinding tip works best to achieve this groove. You should keep channeling through each crack until you have penetrated far enough into the foam so that you can no longer see any separation.
Creating V-shaped grooves with a Dremel tool...
The reason for the V-shaped groove is that it provides something for both the plastic welding stick and padded dash filler to bite into and permanently adhere. If you make the groove too shallow or fail to give it the proper V-shape, the filling product will not adhere properly. After you have channeled all cracks with the Dremel tool, blow them out clean with compressed air. A bristle brush works well, too, but air pressure will do a better job of blowing out loose foam and plastic particles.
Step 3- Fill Cracks With Plastic Welding Rod/Stick
First, a little background on the welding stick you will be using and why I chose it over other plastic welding materials. Many companies that sell plastic welding supplies recommend using a plastic fill material that matches the plastic you are trying to repair. While this concern over plastic compatibility makes sense, I found that the polyurethane welding rod I purchased for this repair was too difficult to work with. Not only is this rod too small in diameter, which means it will take several spools of it to fill the cracks, but it also has a higher melting temperature when compared to other types of welding rod and this results in an even longer wait time to fully melt it.
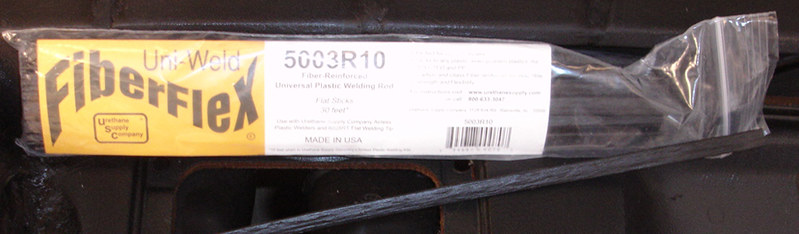
The welding stick you will be using...
I chose Fiber-Flex welding sticks for this repair because they are reinforced with fiberglass, melt at a lower temperature and are much larger in size to easily fill wide dash cracks and holes. This is the same welding material that is used to repair the TPO plastic used in many bumpers on today's cars. Since Fiber-Flex is recommended for hard-to-weld plastics, it works great for this application due to its high adhesion properties when melted. The Fiber-Flex sticks melt fast and become very sticky, so this will make your repair go many times faster when compared to polyurethane rod. Now back to the repair
Plug in the plastic welding iron for about 5 mins so that it reaches the proper heated temperature. If you have any kind of welding gloves (or other thick work gloves), you should wear them to help protect your hands from accidentally being burned. As you work, its easy to forget where the plastic handle ends on this particular heating iron; I found out the hard way. Place one end of the Fiber-Flex welding stick into the start of a crack (which is now a groove) and melt about 1 inch of it with the welding iron. Keep the tip of the iron on one side of the stick just long enough to soften it up and then flip the stick so that the melted side is now facing into the groove. This will help the stick to begin adhering to the foam. Continue to melt the stick into the groove until it becomes taffy-like, making sure to fully melt it so the weld completely flows into the open space. Work the heating iron slowly down the welding stick so that you melt a little at a time until you reach the end of the groove. If you still have stick left over, use the welding tip to melt through the extra piece to cut it off.
A large hole being filled with the welding stick. This gap in the side of the dash wasnt even visible until I tested that section for cracking. It was so dry-rotted that my fingers went right through; this was the extent of the damage. Also, note the clear polyurethane welding rod coiled up to the right of the dash. I gave up on using this rod once I realized how inefficient it was to work with.
Depending on how deep the crack is being repaired, you may need to melt another welding stick on top of the previous one to build up the surface. You should continue melting the welding stick into the groove until you are able to bring it within 1/8 of the top surface of the dash. You dont want to completely fill the groove flush with the dash because this will make it much more difficult for the surface filler to adhere. Remember, by keeping the welding stick just a little below the surface of the dash, you will provide something for the surface filler to bite into. Continue melting the welding stick into all grooves. When done, be sure to use the wire brush in the welding kit to clean the heating iron tip.
More progress:
Just about done with the plastic welding:
Step 4- Prep Dash For Surface Filler
Proper preparation of your dash for the application of the surface filler is critical to the success of this repair. If you fail to do this step correctly or choose not to use the recommended prep solution, the surface filler will not adhere properly and eventually, will peel off your dash. Wipe down the entire dash again and if there are any high spots from the welding stick, you can either re-melt it to reduce its height or sand it down. Fiber-Flex is difficult to sand unless you use a fairly abrasive paper, like 80 or 100 grit. However, be careful to only sand down the welding stick and not the actual dash surface, otherwise you will create deep scratches in the plastic and it will take that much more sanding to get them out.
Spray the SEM Plastic & Leather Prep liberally onto a small section of the dash and immediately wipe in one direction with a clean cloth. Re-wiping back and forth with the same side of the cloth will only reintroduce new dirt and dust into the previously cleaned area. Continue until the entire dash is wiped clean. This initial cleaning will now be followed with the Filler Prep solution, which will help the filler material to bond with the dash surface. Open the can of Filler Prep and use the cotton swab to clean the melted Fiber-Flex weld and about an inch outward on either side of the weld. All areas where the filler product will be contacting the dash must be swabbed with the Filler Prep solution; allow 10 mins to fully dry.
Step 5- Apply Filler to Dash Surface
Although it may be tempting to try using a Bondo/fiberglass filler for this step, DO NOT! Bondo tends to absorb moisture and hardens without much flex. The dash filler used in this repair hardens like Bondo, but stays flexible due to its elastomeric properties. A dash repair made with this type of filler will expand and contact with changes in temperature, unlike Bondo, which will most likely crack and ruin your repair.
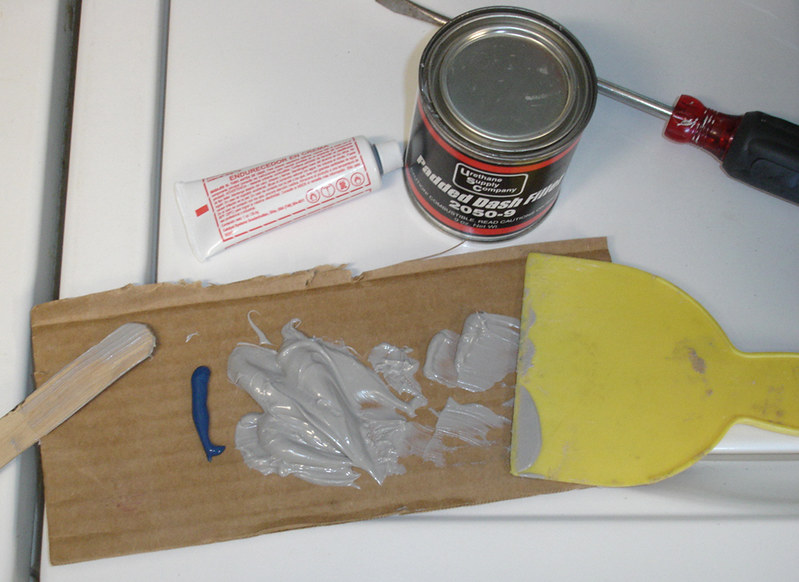
Open the can of Padded Dash Filler and use a 2 putty knife to scoop out half a golf ball size of the product onto a piece of cardboard. This filler comes with a small tube of hardener and you wont be using more than half of it for the entire job. Squeeze out about an inch long ribbon of hardener next to the filler on the cardboard and begin mixing both materials into a uniform color, which should be a light blue. If you use too much hardener, the mixture will be a darker blue and you will have about a minute to work with it before setting and quickly hardening. If you dont add enough hardener, the mixture will be a very light blue-gray and although you will have a few more minutes to work, it will set slower and may not catalyze/harden properly. The key to using this filler is to make very small batches and only attempt to fill a couple areas at a time. Once the mixture begins to set, you will notice how quickly it firms up and becomes very difficult to spread. DO NOT use any more of the mixture once it starts to set; throw it away and make a new batch. If a batch is mixed in the proper proportion, you should have about 2 mins working time to spread it over the plastic welds.
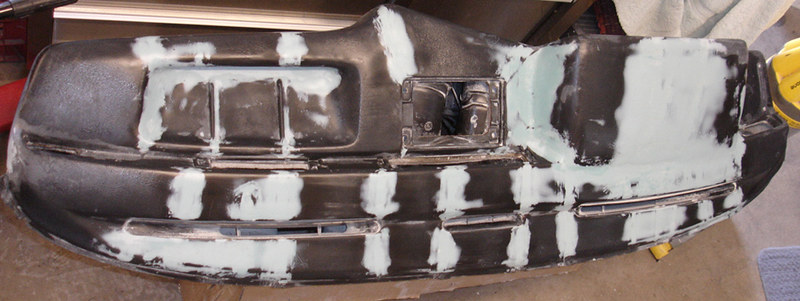
Getting ready to mix a batch of Padded Dash Filler...
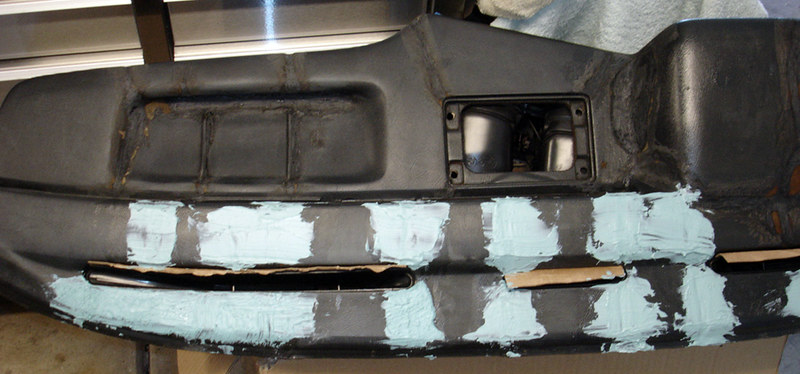
Start about a half-inch before the weld on one side and use your putty knife to spread a thin coating of the filler across to the other side, about a half-inch past the weld. Work quickly down the weld until it is fully covered with filler or until you run out of your mixture. DO NOT use thick coats of filler or expect to completely fill a weld in one pass; too much product laid down at once will require major sanding to knock down high spots, which are inevitable when using this dash filler. Thin coats will not only keep sanding to a minimum, but will also provide a higher quality repair. Continue filling over all the welds in the dash, as well as any other superficial surface cracks or imperfections you come across. Allow 30 mins to one hour for the filled areas to fully cure.
Working the dash filler, one weld at a time...
Step 5- Sand Dash Filler
Begin knocking down the hardened filler with 80-100 grit sandpaper, only if there are excessive high spots. Work slowly with a little pressure at first so that you dont sand too deep into the repair. Try to focus the sanding on just the areas that are thick with filler, otherwise you will end up with scratches in the dash surface that will take a bit of additional sanding to smooth out. If you find the filler difficult to sand, either use a new piece of sandpaper or apply a little more pressure. The rule here is not to be too aggressive while sanding the repair.
Once the high spots are flattened, switch to 150 grit sandpaper and focus on smoothing the filler almost even and flush with the dash surface. Pay particular attention to thinning out and feathering the edges of where the filler begins on each side of the repair. Your goal here is to sand down these edges enough so that there is a smooth and almost imperceptible transition from the original dash surface to the filler. You will know that you are achieving this when the filler around the edges becomes so thin that it is translucent. If you notice the filler coming off the dash in small chunks around the edges of the repair, it may be caused by sanding with too much pressure or sanding in a direction toward the repair that lifts and shears it. To counteract this effect, you can try sanding from the inside of the repair out toward the edge of the filler. Moving the sandpaper in small circles along the edge of the filler with light pressure can also help with this problem.
Large hole filled and sanded; notice the feathering along the edges.
Finish sanding with the 320 grit sandpaper to fully smooth out the filler so that all scratches left from the previous sandpapers are rubbed out. Be sure to rework the edges one more time to ensure that the transition between the dash and filler is unnoticeable. Confirm this by using your hand to feel it there are any changes in the height of the filler compared to the surrounding dash surface. Most crack repairs will take at least 2-3 layers of filler, with each layer followed by a sanding with all three grits of sandpaper. DO NOT expect one layer of filler and sanding to achieve a finished surface repair. You must repeat Steps 4 & 5 until you have built up enough filler over the weld repair to bring it flush with the original dash surface. Any scratches left between filler coats will make it that much more difficult to attain a smooth finish.
Finished sanding...
Step 6- Test Your Repair
The best way to check the quality of your repair is to subject the dash to similar temperature conditions that will be experienced once installed in your car. You need to consider that your dash will be subjected to a wide range of temperatures that can cause both expansion and contraction of the materials used in the repair. Fortunately, this DIY uses only materials with elastomeric properties; the welding sticks, filler, texture coating and paints all have the ability to expand and contract with hot and cold temperatures.
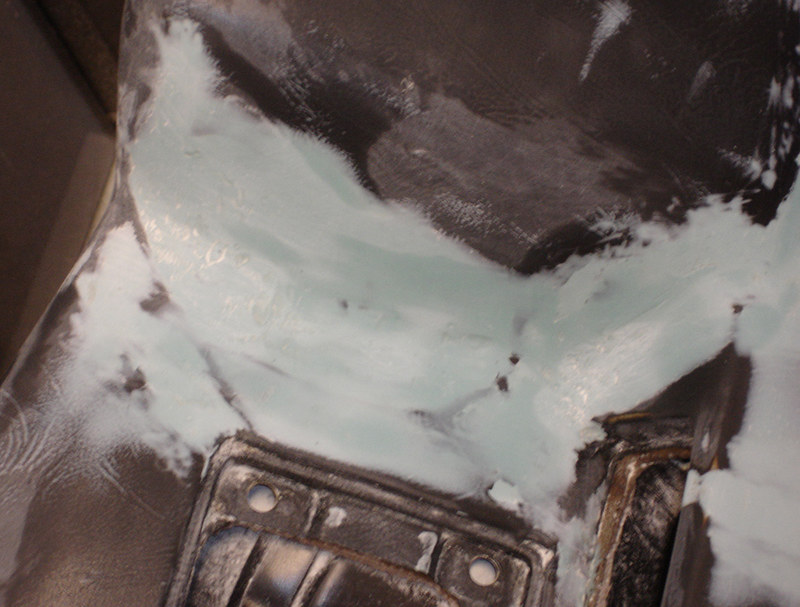
Testing your repair is as simple as placing the dash in direct sunlight for 30 mins and if possible, exposing it to colder temperatures at night. After this, you should inspect the dash for any changes to the filler or plastic welds below. Since I live in Arizona, I am much more concerned with the impact that heat will have on my dash repair than the effects of cold weather. Consider the kind of extreme temperatures that your dash will experience where you live and then test your repair accordingly. The most common sign of a failed repair will be separation of the filler from the dash surface, usually brought on by high temperatures. This often occurs under the filler between where the edge of the plastic weld meets the dash. If this happens, you will notice air bubbles under the surface of the filler. Reasons for this bubbling may include: dash surface not being properly cleaned, improperly mixed filler, not enough wait time for filler to cure, aggressive sanding that causes filler to lift off surface and too much filler or too thick of an application to one area.
During my repair, I noticed some bubbling that I believe happened because I spread the filler over too large of an area outside of the repair, instead of concentrating it within a half-inch of the weld. The more area you cover outside the repair, the more likely it will bubble under higher temperatures; this is due to not giving the filler enough of a depression to bite into. Remember, the filler will not adhere properly if spread over too large of an area that is completely flat; you need it to bond onto a surface that has a gap or divot which can be filled in.
Testing the dash repair by exposing it to direct sunlight; temperature is about 108ºF. Notice the seam of the dash filler bubbling up; this section will have to be cut out and redone.
Before going to the next step, you must rectify this issue by cutting around the bubbling filler and removing it, sanding along the edges where the filler used to be, prepping with the filler prep solution and then reapplying the filler. Be sure to change either the amount of filler that you apply or the size of the area that you cover, otherwise, you will end up with the same failure. If you choose not to test your dash repair at this stage, you risk possible problems with your repair showing through when you are finished. The only way to fix it then will be to go back through several layers of paint, texture coating and filler to get at the problem; this will require refinishing the entire dash again to blend the newly applied materials with the finished surface.
Step 7- Apply Texture Coating
Before moving forward with this next step, you must clean the entire dash surface again. Used compressed air to blow the surface clear of sandpaper grit and filler dust. Wipe down with a wet cloth and then use the Plastic & Leather Prep spray to clean the dash in sections, making sure to wipe with a clean cloth in one direction each time. Now you are ready to apply the SEM Rubberized Undercoating to the dash surface. I have tried a couple of products that let you lift the original dash texture, but it's difficult to transfer that texture back onto your dash. You need a product that will adhere and hold to the dash and is thick enough to fully conceal the repair underneath. Those texture lifting compounds can be used to duplicate any surface, but they are usually intended for duplicating smaller grain textures that consistently repeat over the material being repaired. The E21 dash does not have a consistent pattern of veining; it's random and difficult to match up, even with a duplicate in hand. The next best option is create your own texture that fully covers the dash using an undercoating spray.
To begin, shake the can for about a minute and then practice your spray pattern on a piece of cardboard. This SEM product comes with a longer spray nozzle tip that helps to diffuse the product more evenly than the regular spray nozzle. I suggest you try using both nozzles when spraying your sample pattern so you can decide which one gives you better control. Spray the undercoating 8-12 from the dash surface in short circular bursts. You will notice that this product forms bubbles that quickly pop on the surface and then settle down into a random blotchy texture. DO NOT try to cover the entire surface in a continuous spray or apply it in thick coats. If too much product builds up too fast, you will be left with a rough porous texture. Spraying over this rough texture will only lead to a new top-coat lacking in smoothness and uniformity. Keep your coats thin and use shorts bursts to help control the texture and build-up of the product. It also helps to pause between sprays to see how the product settles so you can make adjustments in your spraying technique as you go.
Ultimately, you want to build-up a texture that is uniform and smooth across the entire dash surface that will fully conceal the filler and weld repairs. Irregularities in the shape of the dash may require you to build-up more texture in some areas than others. After laying down your first thin coat, allow the product to flash for about 10 mins before spraying another one. If you notice some high spots or areas with a rough or porous texture, wait at least one hour before attempting to lightly sand it using 150 grit paper. Although this undercoating is quite flexible, it can be sanded down and shaped. However, you need to be careful not to heat it up by rubbing too much with the same side of your sandpaper, as this can cause the product to become too soft and will result in a deformed surface.
Final coat of rubberized undercoating...
A spray of three coats should provide enough texture build-up for a nice finished dash surface. If you apply the undercoating properly, you shouldnt need to sand the final coat. Any sanding on this last coat will make those sanded parts of the dash texture uneven compared to the rest of the dash that is not sanded. The only way to ensure that the final texture is uniform is to not sand it. If you do need to touch-up a section, try to blend your spray into the existing texture. In some cases, touch-ups may not leave a texture the same as the rest of the dash and a light re-spray of the entire dash is recommended. Let the undercoating dry for several hours before moving on to the next step.
Close-up of the final rubberized coat...
Step 8- Apply Primer
Using an elastromeric primer and top-coat paint is an important part to finishing this repair. You could choose to leave the entire dash as it is with the rubberized undercoating as the finish, but the primer will help to seal the pores of the rubber and prepare the surface for the top-coat of paint. Without the primer, the top-coat will only be absorbed by the rubber in the undercoating, keeping the final coat of paint from protecting the dash. The primer youll be using contains high solids that will fill the pores and imperfections in the texture of the undercoating. Its designed to provide build-up on the surface and then be sanded down.
Shake the can for a minute and spray a light coat over just the areas of the dash that have undercoating. Since this primer builds up quickly, you need to keep it light because too much primer will fill-in too much of the surface and you will loose the texture. Wait 10 mins and then spray one more light coat. After 30 mins, use 320 grit sandpaper to lightly knockdown any high spots. Be sure to apply almost no pressure to the sandpaper at this point, otherwise you will sand away the texture. Blow off the entire dash with compressed air before moving on to the top-coat.
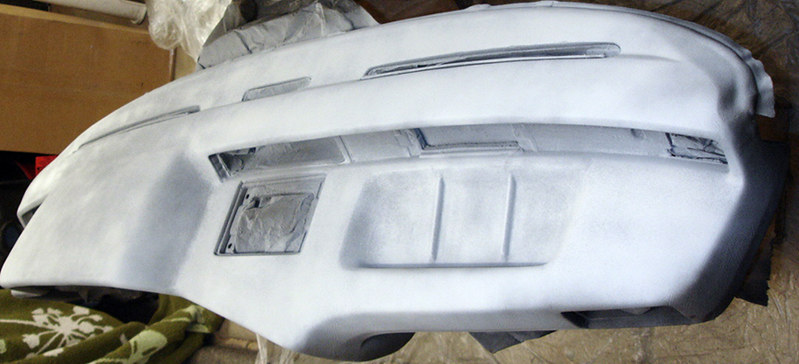
Finished primer coat...
Step 9- Apply Top Coat
SEM makes three types of black paint for re-spraying plastic and vinyl car interiors: Landau, Satin and Gloss. I chose gloss because its sheen is closest to the original finish of the E21 dash and its more of a pure black than the landau color. Shake the can for a minute and spray a light coat over the entire dash, including those areas with no undercoating. Wait 10 mins and then spray a heavier coat. Even with the primer being applied, the undercoating will still absorb some of this top coat, so put enough paint on to cover the dash fully with a uniform color. The finish will not be a high gloss, but more of a high sheen satin due to the rubber in the undercoating. If you desire a higher gloss, you can try giving the dash another coat of paint. You may notice a little difference between the sheen of the paint in areas with undercoating compared to areas without. Since most of my dash surface was sprayed with undercoating, its difficult to see this change in sheen throughout the dash. Let the final coat fully dry over the next few hours before moving on.
Step 10- Reassemble & Install
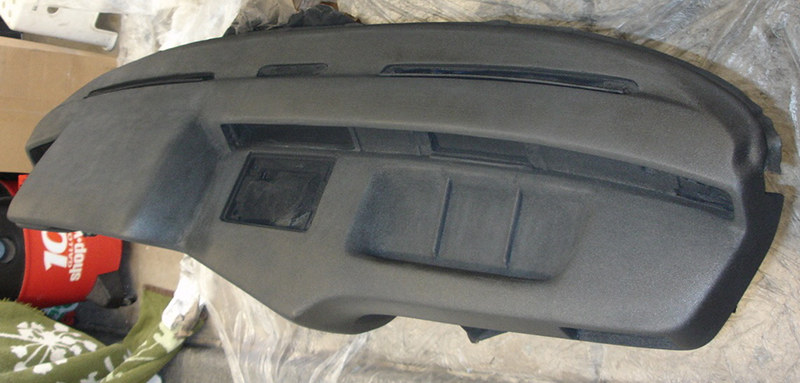
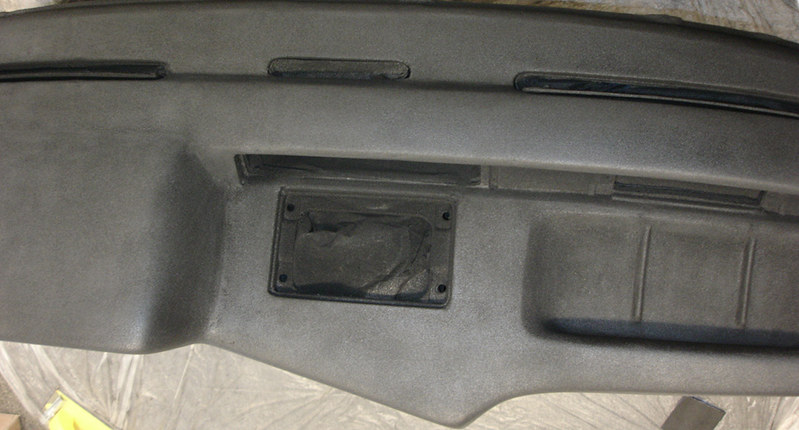
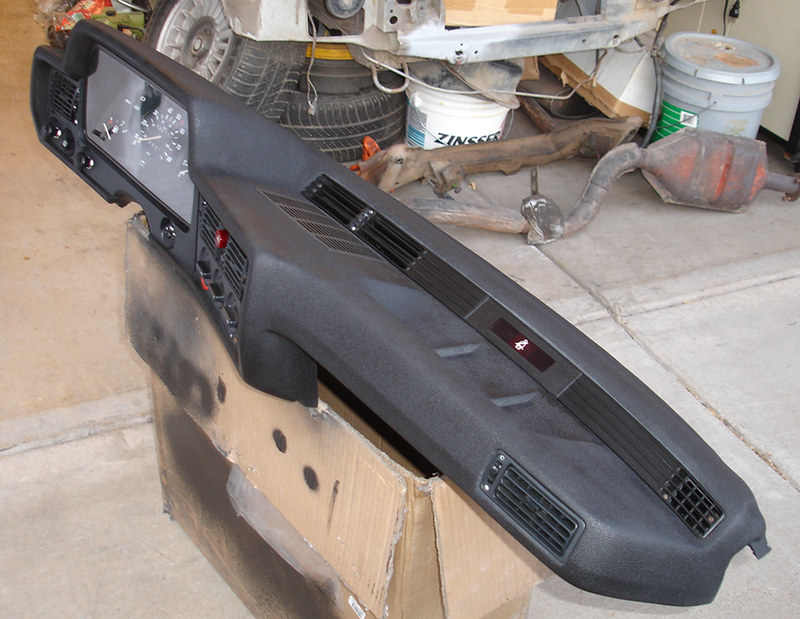
Completed dash; ready to be installed back in the car.
Congratulations, you did it! All thats left is to remove the tape/paper and reassemble the parts back onto your dash. Take extra care to remove the tape cleanly so that you dont peel off the paint or undercoating with it. It may be worthwhile to use a sharp blade to cut along the edges of the tape to ensure that there is good separation between it and the dash. Also, be careful not to mark the paint or gouge the undercoating when putting the dash components back in place. Maintenance for your restored dash is pretty simple; use nothing more than diluted mild soap and water in a spray bottle. Just mist it lightly on the dash and wipe with a clean cloth that doesnt leave lint or loose fibers behind, as they can be more challenging to remove from a painted undercoating surface. The use of Armor All is debatable; although it can be used on SEM paints without issue, your dash wouldnt benefit from it since the dash surface is no longer plastic and SEM paints are already formulated with UV protection.
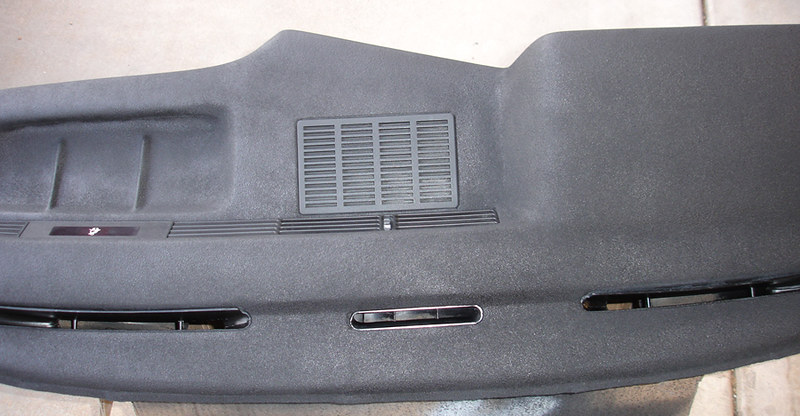
A couple more angles...
I still need to post walk-around video of the finished dash.
Cheers and good luck with it!
Last edited by npover72; 05-04-2013 at 07:34 PM. Reason: Re-uploaded Missing Images
E21 Addict
Awesome job! thanks for sharing!
Baurspotter
Wow! Kudos on the job and the post! I didnt have time to get into the details of the work yet, but, just skimming over the whole post..... that looks like a great job!
Nice!
Tom
SE Connecticut
1982 323i Baur, 1977 320i (carbed),
1978 320i (parts)
1991 325ix 5 speed, 1989 325ix (winter),
1989 325ic (summer)
1973 2002 Malaga (with frosting)
1975 Mercedes W115 300D (The Departed)
the late 1979 323i Euro (project, Now Departed)
Visit my blog: Baurspotting
http://baurspotting.blogspot.com/
BWR PWR!
Member
Fantastic work.
The end result looks terrific!
Eric P.
Member
Thats amazing! Nice work for sure!
Member
The original grain can be duplicated using a molding material such as this;
http://www.mohawk-finishing.com/cata...asp?ictNbr=486
Member
Beautiful!
So much patience and craftsmanship.
Tbd
Member
^ This. Or a liquid/gel latex compound available at numerous places.Originally Posted by ross1

e21: 1981 2.5L sleeper
e21: 1982 323i Baur TC 1 # 4210
e21: 1980 323i project or parts car, can't decide
e21: track car project
e46: 325XiT

click here for the latest updates
Member
Oh my god! I love this! The dash repair in the FAQ is outdated and missing all the pictures. Thank you for doing this!!
Member
Impressive results! I had thought of doing something like this on my e28 since it was so bad off and dash caps generally have poor fitment. Great work. The exact prices and shipping might scare some off though since you listed over 220 bucks worth of supplies there haha.
Member
Hey guys, thanks for the positive comments on the repair. I'm hoping someone out there will eventually try this procedure out on their dash and then share their results.
There are so many vinyl repair kits out there that all seem to offer the same thing: a vinyl-based fill compound that goes on too thin and doesn't provide a long lasting repair. The other issue with these kits is that they are intended for small hole and crack repairs; they never seem to come with enough product to do a sizable job. I think you could do a decent small repair with one of these kits, but I wouldn't waste my time with them for a dash that was as bad off as mine.
I have tried a couple of products that let you lift your dash texture, but it's difficult to transfer that texture back onto your dash. You need a product that will adhere and hold to the dash and is thick enough to fully conceal the repair underneath. Those texture lifting compounds can be used to duplicate any surface, but they are usually intended for duplicating smaller grain textures that consistently repeat over the material being repaired. The E21 dash does not have a consistent pattern of veining; it's random and difficult to match up, even with a duplicate in hand. If anyone out there has had success with duplicating the dash texture over a larger crack, I would like to hear about it. The repair compounds and kits I have tried on my dash have been disappointing, with mediocre results. Maybe it's the intense heat out here in AZ that ruins these kinds of vinyl dash repairs, but like I said before, I had to pursue my own repair procedure because nothing else was working.
The rubberized undercoating may not be ideal, but it does provide enough build-up to completely conceal the repair below the surface, it's elastromeric, sticks like a SOB to anything it's sprayed on and seems ideal for large-scale damage to a dash. If anyone is trying to repair small cracks or holes in their dash, I would suggest a small investment in one of the many vinyl repair kits out there to see how well it works. If you have major cracks or other damage like the dash I used for my repair, I think you would be better off trying out this DIY.
I remember visiting that DIY dash repair thread a long time ago; those pics never showed up for me either. Maybe Josh (JRCook) can add this to the DIY/FAQ section as an updated version for others to try out.
If you already own a Dremel or other rotary tool and have items from the same supplier shipped together, the total cost is about $150. Still not cheap, but it's better than paying $100 for a dash cover or shelling out serious $$$ for a full dash restoration at a specialty shop. I was willing to spend the money for those materials because I couldn't stand looking at all those gouges and cracks anymore and it was worth the effort to try the repair myself.
Last edited by npover72; 07-18-2012 at 04:20 PM. Reason: Automerged Doublepost
Member
Hot diggity! I think I'll be delving into this when I get my CB on the road and can have the Bimmer down for a while.
He who dies with the most unfinished projects wins
Member
This is a great write-up. Nice addition to the forum!
Member
Sorry to bump an old-ish thread, but any chance you could get those pics back up?
Thanks!
Member
Hi. It'll be great if u can repost the pics. Thx
Sent from my iPhone using BF.com
Member
Hey guys,
Sorry for the delay; I've been off the forum for awhile. The pics are no longer showing because the server I used to post them is now offline. I am republishing all the images and will reconnect them to this post. Should be done in the next couple days, so hang tight.
Member
no problem. thanks.
Member
All the pics have now been reposted!
Feel free to let me know if you have any questions about this DIY.
Member
Sir, thank you. You are the man.
Member
Hi. Thanks for the pics. If I decide to try I'll let you know the results.
Sent from my iPhone using BF.com
Member
Thank you so much for sharing the step-by-step.... I'm going to try it and will document the results. I was torn as to which method to go with since there are a few here in the DIY section of the forum but I think I'm going with this one.
Member
Great tutorial! Maybe you mentioned this, but any estimate on the amount of time it took you from start to finish?
Member
Looks like a great repair - good job!
Randy V.
San Diego, CA
'98 740iL (Black/Tan/NAV-TV & all the gadgets)
Squirrel!
Guess who will be doing this to their e24 . . . if you said this guy you are right
E21 Legion and proud member
No dash to cracked, No shimmy to strong!
RIP 1976 316 charbel is picking your parts from his teeth
1977 320i
1986 635csi
1983 320is, parted for the 77
2012 BMW G650GS Sertao
Wife's:
2007 Suzuki SV650
1989 535 with manual swap
1993 740i
Member
Excellent write up with details. I have an E24 dash in need of help.
How long was your process?
Have your results lasted?
 Posting Permissions


 Reply With Quote


Bookmarks