
 Member
I finally finished up replacing the timing chain guides and a variety of other parts on my 99 540i. I thought that I would post up some pics and some things that I learned during this DIY voyage.
First, a little back story for anybody that is bored enough to read this. I picked up my 99 540 last fall from another forum member. I ended up moving a month after I bought the car, and it was damaged in transport. After new front and rear bumpers and a lot of insurance drama, I got the car back in late November. Shortly after buying the car it started to smoke on startup. I started off by replacing the CCV at the back of the intake manifold, valley pan, and other associated gaskets. This did not solve the problem, so I put the car away in the garage for the winter (this car won't see a winter under my watch) and started planning to replace the oil separator valve and timing chain guides. The motor has 188,000 miles on it, so I figured it is high time to get the guides replaced for piece of mind. Well, thats enough of a life story, on to the job at hand!
I should start by thanking nighttowl for posting an excellent DIY and the BMW timing TIS documents. I primarily used the DIY, and referenced both the TIS and my Bentley manual. I also have to give a big thanks to Mark at EAC tuning for answering all of my many questions. I sourced the majority of my parts from EAC, and also rented the timing tools from them to do this job. If you are planning on doing this job and you have a vanos motor, you NEED the timing tools to do this properly.
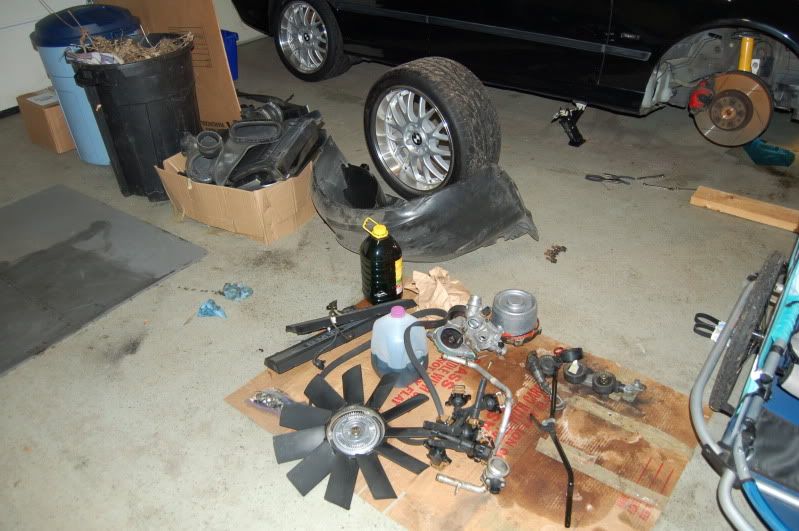
I started off by pulling all of the accessories off of the front of the motor, draining the oil and the coolant, and generally making a mess all over my garage floor.
Next came the battle with the crank hub bolt. I should note that I pulled this bolt off with the car on the ground, and staged these pictures later. I used a 1/2'' breaker bar and a 1 1/16'' hex socket on the hub nut and a custom tool to hold the hub stationary. I put 4' steel beams on both the tool and the breaker bar. Initially, I tried having someone pull on one side while I pulled on the other, that did not work. Then I wedged the crank hub holder onto my garage floor, which also did not work as I was able to lift the front of my car and not break the bolt free. I finally wised up and braced one beam against the side of the engine bay by placing a 2x6 from the shock tower to the front end of the car. This gave a solid brace, and I was able to wrestle the bolt off. This bolt is deceiving, as it will offer a lot of resistance for almost a full turn before really breaking free. Here are a couple of shots of what I ended up rigging up.
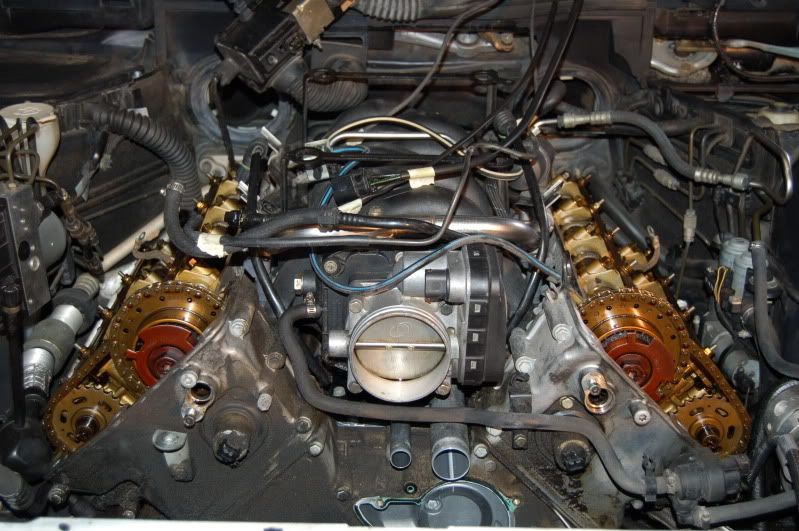
With that done, I pulled off the valve covers, upper timing covers, oil pan and lower timing cover.
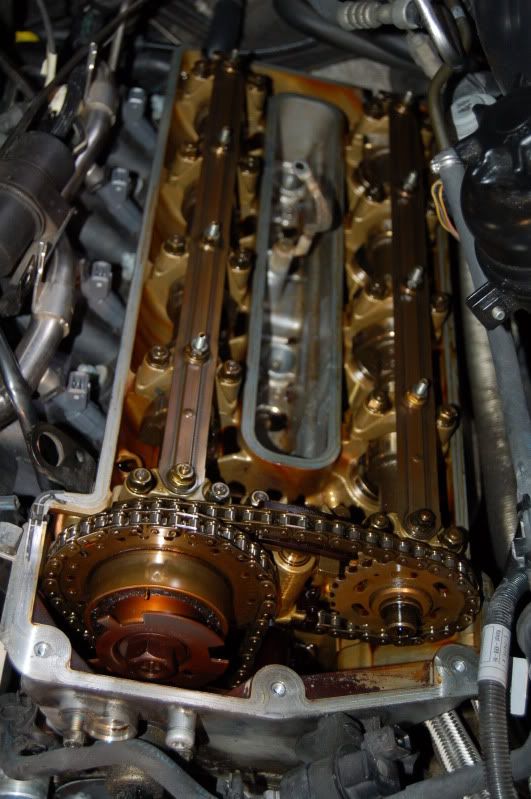
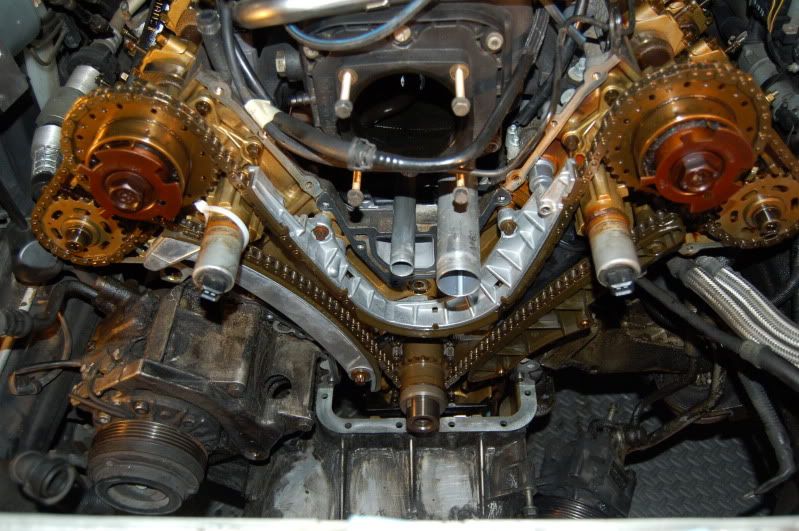
A this point I followed the two guides, locking cylinder 1 at TDC at the flywheel. Then I pulled the old guides off and replaced them with the new guides. Here is a shot of what my old guides and OSV looked like once I pulled them off, and a shot of the new guides on. I did find one tiny piece of plastic guide material in the oil pan when I pulled that off.
The U-shaped guide was broken into two pieces, and was being held together by the chain. The driver side guide snapped when I pulled it off to replace the OSV. The plastic tube connecting the OSV to the upper metal fitting crumbled when I touched it. I think that it would be really tough to replace the OSV without breaking the driver side guide unless the guides are
fairly new.
NOTE: One small detail that I did not see covered in the guide. In the top of the driver side of the U-shaped guide that is pulled off the car you will find a set screw that is turned with an allen key in the metal portion of the guide holder. This needs to be pulled off the old guide and placed in the new guide. The purpose of the set screw is to hold the top connection of the OSV into the proper hole in the driver side head.
With all of this done, I continued to retime the engine following the guide. I have to say that it was pretty straight forward. One aspect that required some improvising was properly tensioning the tool that applies tension to the timing chain during the timing process. The spec is 6 inch pounds, much smaller than most torque wrenches are capable of measuring. My solution was to tie two 12 oz cans of soda to the end of a 4'' open ended wrench and use the weight of the cans to provide the proper torque. To determine torque, simply multiply the force exerted by the distance from the center point (in this case the bolt to be tightened). So, 1.5 lbs x 4 inches = 6 inch lbs. I'm sure this is not as accurate as using the factory specified tool, but I thought it would be better than just guessing. Here is a picture of my super high-tech torque tool:
After the timing was completed, it was pretty much just a matter of putting everything back together again. I made a list of everything I took off, so I just followed the reverse order of the list. I'm not gonna lie, it was a lot of work. I'm guessing that I put in between 20 and 30 hours to do this job from start to finish. I tend to work more slowly than a lot of people, as it usually takes me longer to do a job than most on the forums seem to quote. I also ran into a few problems, had to repair a couple of stripped bolt holes, and made a stupid mistake during reassembly that required the removal of a bunch of parts. I also managed to install one of the valve cover gaskets with a kink in along the bottom edge, which resulted in a nice oil leak when I filled up the engine with oil. All of these little screw ups really added to the total time required. Here are a couple of shots of the motor back together:
After everything was back together and fluids were back in, the engine fired right up. It made quite the racket for the first few seconds as the the oil worked its way back to where it belongs. I've got no smoke on startup now, so the oil separator valve was definitely the offending part. The down side is that I seem to have picked up a minor ticking sound in my valvetrain. It has been quite a few months since the car has run, but I remember the engine being very quiet with the hood up. Now I have an RPM dependent tick that seems to be localized on the driver side of the engine. The motor is running strong, with no codes. I probed around the engine with a screw driver to my ear, and the sound is the most pronounced around the driver side timing chain area, and perhaps even more pronounced around cylinder 6 and 7. I'm not sure if the noise is coming from the timing chain area, or is perhaps a sticky lifter. My plan for now is to run the engine for a few days and keep an ear on the noise. If anyone has any experience with this type of noise, especially after doing this job, I would appreciate hearing if you figured out the cause of the noise. The noise is barley perceptible at idle from inside the cabin with the radio and fan off, so its not nearly as annoying as some of the videos I have seen posted. I hope that this rambling post helps someone get successfully through this job. I know I would never have had the guts to do it without the help of this forum and its members!
Last edited by ElJefe125; 04-05-2011 at 11:00 PM.
been there done that...
thanks for taking the time to post, much appreciated!!!!
(oOO\(|||)(|||)/OOo) /00=[][]=00\
Check twice, fix once...
Nice, thanks for posting! Ingenious tool!
1999 540it - Schwartz II/Sand Beige, style 5 rims, Conti DWS 235/45 tires, Billy HD/Sports, Stoptech S/S BL, F1 Pinacle 35% tint, Zionsville Cooling kit
1998 318ti Cali Sport - Schwartz II/Schwartz Anthratz, staggered style 23
1997 318ti Sport - Schwartz II/Schwartz Anthratz, staggered style 68 ,
1995 318ti Active - Alpineweib III/Schwartz, squared style 32
1994 325i - Bostongrau/Tan, Billy Sports, H&R springs
1991 318ic - Schwarz/Anthratz Stoff, Bilstien HD, Z4 3.0 SS, Magnaflow, S/S Stress bar, x-brace, M20 FW, Elipsoid/HID, K&N
BMWCCA# 160411
1995 318ti Sport Schwartz II/Schwartz Anthratz - Sold
1985 635CSI - Schwartz\Sand - Sold
1984 533i "Max" - Schwarz/Schwarz, - Sold
1984 318i - Champagne/Tan, Stock - Sold
Member
Wow, congrats. I'm sooo procrastinating this job. Here's a question for you.
Since you've done both the timing chains, and the CCV/valley pan/ cam cover gaskets previously, would you do them all at once, or seperately?
Part of me says just do it all at once and only rip the damn engine apart once. But I also know the odds of me screwing things up goes up dramatically the more I touch at the same time.
Anyway, nice work, and congrats! I'd love to see more pics of the crank nut removal, but I assume that's all you've got.
And did you really do all this with the car up on the factory jack and not jackstands? If you did, you're a brave man indeed!
No current BMWs.
1994 Roadmaster Wagon
1974 Alfa Romeo Berlina
Member
I'm coming up on 120k and need to do this as well. The only problem is I'm worried I'll f the timing part up. Is this the most difficult part?
Member
I think it comes down to personal preference on whether to do the ccv/valley pan together with the timing chain stuff or do it separate. The intake and valley pan job is much easier. As you can see from my pictures, there is no need to touch this area in order to do the timing chain guides. It would add more time and a bit more complexity to an already time consuming job, but if you have another car to drive and won't be under the gun to finish the work in a weekend or something it may be the better way to go. Positives for doing both at once are that all of the electronics have to come off for both jobs so you save time there. You also have to open up the cooling system to do both jobs, so it would save you a bit of coolant to do them together and you would only make one mess instead of two.Originally Posted by sfgearhead

I do have a few more pics of the crank nut removal that I can post up.
And no, I did not do this job using the factory jack. My car is lowered, and I can't get my hydraulic jack under the front of the car unless I lift one side with the factory jack. I should probably make some ramps, but this method has worked OK for now. Once I got my hydraulic jack under the car, I placed jack stands on both front jacking points. There is no way I would get under the car with only that scissor jack holding it up!
Member
I thought that the timing procedure was going to be tough, but it really wasn't bad once I got into it. Until you see everything in front of you it is hard to follow the instructions in your head, but once you start in for real it all makes pretty good sense. I think that the hardest part for me was getting that darn crank bolt broken loose.
been there done that...
OP, good choice of the car BTW
thats PutterMcGavin's old Dinan 5 IIRC, a very sweet setup 540!
(oOO\(|||)(|||)/OOo) /00=[][]=00\
Member
THANKS!!
The crank bolt is scary. I guess the chances of stripping it are minimal, considering that you did about all the molestation you can do to it (absent cheap tools). What brand breaker bar and socket did you use that managed to do the job safely?
I bet you have a sticky lifter from the winter storage. Hopefully it will go away over time, as my e36 sticky lifter eventually quieted too.
Member
When it comes to crank pulley bolts-aint nothing like an IR 2135 with some stubby impact socket and a little more air pressure(sometimes) from the compressor.
http://www.amazon.com/Ingersoll-Rand...2097660&sr=8-1
Member
Thanks! This is indeed PutterMcGavin's Dinan 5. I love the car. It has just about every modification that I would have chosen to make, so it was a great find. I've got a couple of additional issues to iron out with the car that popped up shortly after I purchased the car, but I expected that given the age and miles. I was happy to see what good condition the engine internals were in once I opened her up, no sludge to speak of at 188,000 miles. The car was clearly loved by the previous two owners.
I think that you would be hard pressed to strip this bolt. It is really long, so there are an awful lot of threads engaged. I used a Craftsman breaker bar and socket. I figured that if I broke these I could always move up to a 3/4'' breaker and socket, but those are $$$.
I hope you are right about the sticky lifter. I'm leaning towards that for a diagnosis. It seems like these are more of an annoyance than anything else. I may do an oil change and see if that helps at all. I hate to do it, as I only have about 1000 miles on the Mobile 1 0W40 that is in the car right now, although it is about a half year old.
Member
Thanks and subscribed! Did my CCV and VCG over 20K miles ago and may need to consider this as preventative.
Member
Here is one more pic of the crank bolt removal
And here is a shot I took when tightening the new bolt.
It felt like I was taking more pictures at the time, but these are all that I have. For anyone that was wondering (I was after trying to break this thing loose) the bolt is a standard thread, NOT reversed.
Member
Glad I could offer you some insight as you went along and it's nice to see it come back together. There is another guy on here "chigga" who had a shop do his timing guides and then noticed the driver's side bank was noisy. They then replaced the vanos transmissions with no change and last I talked with him I sold him some lifters to replace in that head. You may want to look him up and message him, or maybe he will chime in here with the results of the new lifters. If nothing else it would be nice to know exactly what the noise is coming from.
Member
Thanks for the tip Mark, I will try to touch base with him and see if he resolved the issue. Its hard to diagnose a cause since the car had been sitting for months.
Member
Awesome write-up. I am starting to acquire all the info needed to do this job which I would like to attempt in a few weeks. What is the special tool you used to hold the hub stationary. Is there any way you would tell me what parts you ordered to complete the job? I have ran across many different lists.
Member
Subscribed.
Member
I received a full parts list from Mark and Jared at EAC Tuning. I'm sure you could PM them for their comprehensive parts list. Here are all of the parts that I ended up buying to complete this job:
* All 3 timing chain guides
* Oil separator valve
* valve cover gaskets
* valve cover bolt grommets
* upper timing chain cover gaskets (left and right)
* Vanos solenoid gaskets (left and right)
* Lower timing chain cover gasket
* Front crankshaft gasket (could be called something else???)
* Water pump gasket
* O-rings for both the large and small pipes that run from the water pump to the water manifold at the rear of the engine under the intake manifold
* alternator gasket
* Main timing chain tensioner
* Metal washer for timing chain tensioner
* lower oil pan gasket
* Crank hub stretch bolt
I also ended up replacing my AC compressor belt because it looked pretty past it, and my lower radiator hose because it looked like it was starting to leak a bit at the fitting to the radiator. On a side note, the lower radiator hose was REALLY stuck onto the radiator. I ended up having to cut through the hose fitting with a dremel and prying the fitting off with a screw driver.
I chose not to replace my chain, and I also did not replace my cam chain tensioners as these don't seem to have the reliability problems that the main tensioner has. They have a lot less work to do as the cam chains are pretty small. I used a home made hub holding tool, but there is a hub holding tool for our cars that you can purchase as well. You basically just need a piece of steel with correctly spaced holes to match the hub bolt pattern, a central hole to access the main bolt, and a straight piece coming off that you can put some sort of large steel bar on. I hope this helps.
The guys at EAC were kind enough to send me their spare hub holding tool along with the timing tools that I rented from them. I believe that they only have one of these tools, and it is a home made job that they bought from a customer I believe. The thing was pretty stout, and it did the job for me. More incentive to do business with the folks at EAC if you are going to tackle this job!
Last edited by ElJefe125; 04-07-2011 at 03:34 PM.
Member
For those who are interested our parts list is located here:
http://www.eaceuroparts.com/content/...ls-parts-list/
You can look at the links and add the items up for current pricing to get an idea of what it will cost you.
Member
I just finished up this job today. My car is not vanos and I didn't replace any chains so it was pretty much cake. Well, a bit easier than it was to do the chain guides on my q45. Once the covers are off and the bungee cord is holding tension on the passenger side tensioner, the chain will want to jump on the crank sprocket in some positions as the engine is turned. It's pretty easy to slide on the lower cover and check the timing mark against the slipped on pulley and the position of the flats on the back ends of the cams. Use your left arm/hand to hold solid pressure against that tensioner rail while cranking the engine over, which I used a pipe wrench on the hub normally held on by the Jesus bolt. That bolt came out with a 1 1/16" socket on my cheapo Earthquake 1/2" impact and 130psi of pressure... but just barely.
My tip to add is that if you reuse gaskets like I do, the upper covers will want to leak where they join the lower cover. The trick is to leave the bolts loose on the upper cover (of course put a dab of rtv in the corner) and push down hard on the upper cover while tightening the bolts. Saves a bit of work compared to getting it running and then finding small oil leaks on both sides.
Last edited by 514mach1; 04-18-2011 at 12:38 AM.
Member
Congrats on getting your car back up and running. Thats a good tip about the upper timing covers. I used new gaskets, but I still played it safe and put a dab of sealant on the bottom corners where the lower and upper covers meet the engine block. I also left the upper timing cover bolts loose, then I installed and tightened down the valve cover gaskets in order to "press down" the upper timing chain covers. Then I tightened the bolts on the upper timing cover. Apparently there is actually a special BMW tool to seat the upper timing cover correctly, but I'm guessing even the pros don't bother with it.
Member
BMW has a special tool to open the special tool cabinet.
If you guys want them, we can order them by part number, which you can find listed in the TIS. Have your wallets handy!
Member
Just finished this job on my 1998 E38 and would like to thank all who provided the wonderful useful pics and written help.
If I may add some tips I picked up along the way.........
1) Crankshaft Bolt.... I purchased the crank balancer holder it was $80 delivered. That combined with a 25" breaker bar with a 2' pipe eased the bolt off without a problem.
2) as I have a non-vanos motor I opted to not remove any of the chains. The issue of removing the center guide and the possibility of not being able to get to the lower right bolt was no issue for removal or instalation of the new guide.
3) Being very careful and multiple markings on the chains sprockets insure that there are no timing issues. Take it slow and the chain will stay where it should. remember to cable tie the slack out of the chain so that the chain does not jump.
4) A far as the wear on the guides the center U shaped guide was totally devoid of the plastic guide material, as was the drivers side guide. The adjusting guide on the passenger side was intact on the guide however split in the middle. Do not skip the dropping of the lower oil pan to scoop out the plastic that will settle in it.
5) The only unexpected issue was the $325 for a new oil filter canister. The plastic stand in the middle broke apart just like the guides. It unscrews from the housing, but guess what, that piece is not available as a separate part.
6) Prior to the rap rap noise associated with this issue the motor started throwing may misfire codes and running great one day and horrible the next. Once again I thank this forum and those writing about these issues which gave me the push to DIY......
7) With the new guides in place the Motor fired right up light ticking for a bit and after the engine reached operating temp all quite. Runs strong, quiet and idles like it did 10 years ago. Have 500 miles on since completion. Go slow and don't forget to properly torque everything. http://www.boltscience.com/pages/convert.htm
Last edited by jpgilroy; 12-11-2011 at 04:27 PM.
Member
OP, I see your upper oil pan gasket got ruined in the process. What did you do to make sure it won't leak from there?
e30 84 340i m6x powered.
e34 89 535i 5speed - current DD
e24 89 635csi - maybe a DD?
e34 93 525i (m50tu) - gone
e39 540i 6spd m-sport - gone
e53 x5 4.4l - gone
e30 89 325i (m20) - gone
Member
It's also good practice to change the gasket ring (# 11141736758) to assure that there's good oil pressure to the chain tensioner.
 Posting Permissions


 Reply With Quote


Bookmarks